The Viltrox AF 35mm f/1.8 is a full-frame autofocus lens available both for the Nikon Z system and for Sony E mount. At just $380, it undercuts lenses such as the Nikon Z 35mm f/1.8 ($850) and Sony FE 35mm f/1.8 ($750). But how does it perform? This review will answer any questions you might have!
We’ve all had the misfortune of traveling to a promising location, only to be confronted with bad light that’s guaranteed to result in flat, boring photos. Under this situation you have two choices; return on a better day or do the best you can and see what you can accomplish when processing your shots.
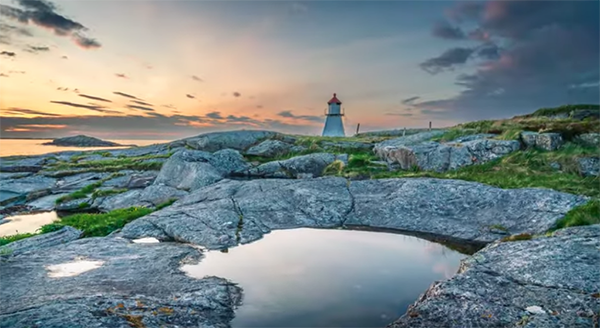
This Photoshop tutorial from the popular PHLOG Photography YouTube channel takes the latter approach, guiding you through a Photoshop edit to transform a ho-hum shot into one that’s truly special. In less than 13 minutes you’ll learn how it’s done with a bit of help from Photoshop.
We often turn to German landscape pro Christian Mohrle for solutions to common problems, and the method you’ll learn in today’s episode will prove helpful for rehabilitating just about any unimpressive photo you shoot in the great outdoors. We encourage you to download the demonstration Raw file with the link beneath the video so you can follow along and make the changes yourself as they’re explained.
Mohrle is working with an HDR image and the first thing he does is change the profile from Adobe Color to Adobe Landscape, which immediately brightens the shadows and enhances saturation. He also makes a few quick global adjustments to prepare his image for the selective enhancements that follow.
The preliminary modifications take place in Lightroom’s Basic panel where Mohrle cools down White Balance to accentuate blue tones in the sky, adjusts Tint to strengthen the sunset colors, and does his best to correct exposure by balancing highlights and shadows. He also brings up the blacks and tones down highlights and now the image is significantly better.
After a few other basic adjustments it’s time for simple masking to selectively enhance various portions of the shot, and this is where the real magic occurs. He first uses a Color Range mask to further improve the sky and then applies two Liner Gradients to refine the effect.
The next step is adding a Radial Gradient over the left side of the horizon that Mohrle uses to add a bit of glow. He completes the masking with a one more Linear Gradient, this time over the foreground, that helps brighten up the water.
All that’s left is to accentuate the glow and increase contrast, at which point the impressive transformation is complete. You can find more ways to enhance landscape photos by paying a visit to Mohrle’s instructional YouTube channel.
Nighttime offers a variety opportunities for capturing eye-catching images, whether you’re shooting cityscapes, on the water, or elsewhere outdoors. That’s because scenes that look boring during the day are often transformed into sparkling tableaus once the sun drops below the horizon and the lights come on.
The trick involves arriving at a balanced exposure, without crushed shadows and overexposed highlights, and often a bit of post processing is required to get the light just right. This tutorial from photographer Joe Redski delves into the depths of night and reveals a straightforward method that anyone can accomplish with ease.
Redski’s technique is all about recovering shadow detail while maintaining the allure of the highlights. He guides you through an effective step-by-step approach that involves exposing for highlights in the camera, leaving the rest of an image underexposed. Then he employs a few quick Lightroom tricks to open up the shadows without compromising the brilliance of the highlights.
Redski pulls up a street scene that appears far too dark because he properly exposed for streetlamps, shop lights, and illumination streaming through windows. He explains how to begin by using the correct metering mode and other important camera settings.
The histogram of his demonstration image confirm that the highlights are just right, with the rest of the frame so dark as to be difficult to discern. He then illustrates a quick Lightroom method for achieving the delicate balance between highlights and shadow—thereby transforming a throwaway shot into a keeper.
Redski’s photo has plenty of contrast so he reduces that slightly for the adjustments that follow. Then he carefully opens the shadows, being mindful to retain the nighttime appearance of the photo. He also reduces Clarity and adds some atmospheric haze with the Lightroom’s Dehaze slider to achieve “a softer vibe.”
The next step involves a bit of color grading by adjusting temperature and tint. Now it’s time for a simple Radial filter to guide the viewer’s eyes to what he considers the most import portion within the frame. He also reduces the exposure of the sky and pumps up saturation with Lightroom’s Select Sky feature.
At this point the transformation is almost complete, with just a few other enhancements to complete the job. A quick comparison of Redski’s before/after examples confirm the efficacy of this easy technique.
Most photographers understand that the f/stop they choose is an important component of arriving at a correct exposure. But this setting affects other attributes of a photo that novices often ignore to the detriment of their images.
The tutorial below from instructor Jason Vong clears up several misconceptions regarding aperture and explains how to make the best choice for the specific task at hand. According to Vong, “The way most beginners understand aperture is simply that’s it’s a setting that gives a blurry background; AKA bokeh.”
In other words, we’re taught that the lower the f/stop the blurrier the background we can achieve to make a key subject closer to the camera really stand out. While wide f/stops may improve the look of an image, they can also create a lot of problems—one of which is the struggle to achieve sharp results.
Another misconception is that prime lenses with fast maximum apertures are the only way to go, and slower lenses are just a waste of money. In barely seven minutes Vong corrects these and other confusions and demonstrates several pro tricks for using various aperture settings to shoot the best possible photos.
Vong starts with the basics of “big hole vs. small hole,” explaining that the f/stop you select controls the amount of light hitting the camera’s sensor and how this affects other key settings like shutter speed and ISO. Put simply, “the larger the hole the more light that comes in, while the smaller the hole the less light enters the camera.”
Vong then describes how to stop missing focus by choosing an aperture that optimizes depth of field for the subject at hand. He explains why “this is where most people mess up on aperture and fail to get sharp images.” You’ll see how very shallow depth of field gives you a razor-thin zone of focus. Sometimes that may be exactly what you want if your focusing skills are really good, but in other situations a bit less depth-of-field provides better results.
You’ll also learn how to achieve pleasing, soft backgrounds with just about any lens you use, even if it lacks the f/1.4 or 2.0 maximum aperture of costlier glass. That’s because focal length has a lot to do with blur. He provides a helpful example of just how this works.
Similarly, Vong describes how camera-to-subject distance factors into the equation. In essence, the closer you are to the subject, the blurrier the background will be—regardless of the f/stop in use. And if you think that always shooting wide open is the best way to go, Vong will quickly change your mind.