Get more from your smartphone by exploring hidden hardware features and performing professional-looking edits on the images you capture. This story focuses on iPhones only, but there are similar apps available for Android fans. But first, a serious warning to users of any flavor of apps, photo and otherwise.
A Serious Warning
Some apps access and record your personal data. It doesn’t matter what they do with it — what if their databases are compromised? What will the hacking actors do with it?

Some capture personal identifiers, financial info, your location, search history, purchases and contact info. Are these things you’re willing share with total strangers? Some of these I don’t even share with friends.
Fortunately, Apple lists the types of data an app collects, and indicates whether or not the data is linked to you. So be smart, check the details, and avoid the data collectors, even if they offer a cool-looking app. Make sure your kiddos do the same.

Adobe Lightroom Photo & Video Editor
If you’re a user of the desktop version of LR or Light Room Classic, you’re certainly already familiar with its mobile cousin. It’s unclear how many times Lightroom Photo & Video Editor has been downloaded, but it’s received 280,000 ratings at the app store, so I’m guessing a number higher than 3 million. Maybe twice that number.

Adobe’s Lightroom Photo & Video Editor is free and the in-app purchase options are for cloud storage space. It suggests Quick Actions to enhance your photos, and has Adaptive Presets that work like magic. Also, you can create and save your own Filters and Presets to apply to all your photos. Best of all for some, the current version (which requires iOS 16 or later) features the powerful Adobe Firefly-based Generative Remove to vanish your ex when the romance is over.
On the video side, Lightroom Photo & Video Editor offers Presets plus Light, Color and Edit tools so you can make your videos truly your own before posting on social media.
Download Adobe’s Lightroom Photo & Video Editor here.

NightCap Camera
If you’re frustrated by so-so results when using your iPhone in dim light, download NightCap Camera and enjoy amazing low light and night photos, videos and 4K time lapse. It also offers four different Astronomy Modes to capture the stars, Northern Lights (Aurora Borealis ) and more. Damn — could’ve used it last week when the Northern Lights danced in the skies over New York.


If you like to take pictures of the night sky, download NightCap Camera. It’s free and the developer does not collect any data whatsoever. Good for them. We like.
Careful!
The next three apps have names that are ridiculously similar. As far as I know, there’s no connection between them except, perhaps, the reluctance to pick a unique name.

Pro Camera by Moment
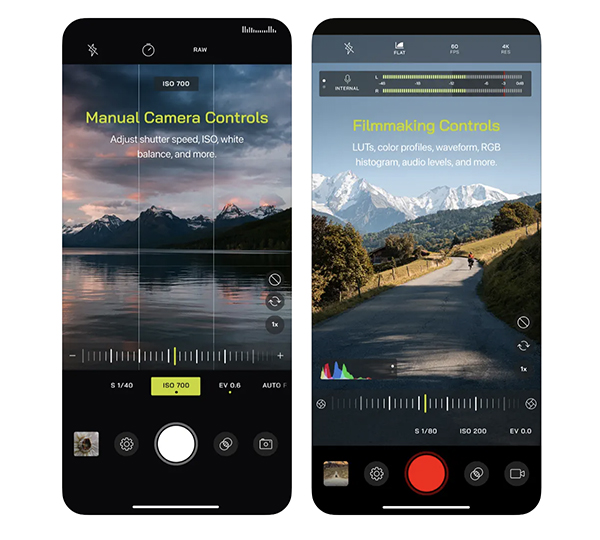
Priced at $8.99 (plus optional in-app purchases you’ll probably want), Pro Camera by Moment does indeed deliver several professional features, including control over shutter speed, ISO, white balance, focus — and some more esoteric stuff like burst shooting in Raw, LUT support in video mode, and more. Check it out.

Take control of your iPhone. Download Pro Camera by Moment from the app store.

ProCam – Pro Camera
If you love your iPhone but hanker for some of the high-end features you enjoyed with your DSLR or mirrorless marvel, take a close look at ProCam – Pro Camera. Shoot Raw and TIFF files, perform AE bracketing, explore 3-shot HDR imagery, view a live histogram and select the aspect ratio (4:3 / 3:2 / 16:9 / 1:1). Pro Cam — Pro Camera costs $9.99 plus the long list of in-app purchases you’ll likely want.

The developer does not collect any data. You can download ProCam – Pro Camera here.
We Cautioned You to Be Careful!
Here’s yet another useful app that has a name that’s hard to avoid confusing with the previous two. Developers: get a clue.

ProCamera. Professional Camera
Priced at $24.95 (plus optional in-app purchases) ProCamera. Professional Camera is one of the most complete iPhone control apps you’ll eve encounter. In addition to the mundane exposure, focus and zoom, it goes much deeper. It offers Focus Peaking, exposure compensation with zebra stripes, Raw, ProRAW, TIFF and HEIF formats, manual White Balance, Image Stabilization, upscaling to 48 megapixels, EXIF and metadate viewing, adjustable aspect ratios (4:3, 5:4, 3:2, 1:1, 16:9, 2:1, 2.4:1, 3:1, golden ratio), gray card calibration and the option to embed your copyright notice.

ProCamera. Professional Camera is available from the app store. Considering the name confusion, confirm you’re selecting the correct app.
A vobis peto, ut consilium probetis.
Speaking just for me, not Shutterbug, I hate smartphone cameras. The better models produce photos and video footage that’s good enough to dissuade people from discovering the enjoyment and higher quality of real cameras. There are so many great things you can do with a smartphone, but there are so many more you cannot. So if you’re getting great snaps and satisfaction from your pocket phone, do yourself a huge favor and use a high-quality digital camera once in a while — at least part of the time — otherwise you’re missing more than you know. Please.
Want to Become a Better Photographer?
Begin by taking more pictures. Carry a camera everywhere you go and shoot even when you’re 100% sure the picture won’t turn out. Review all of your images with a critical eye and share them with others – and that includes posting the best on our Gallery. Subscribe to our newsletter (see sign-up form on our homepage) and bookmark Shutterbug as a Favorite on your browser so you can check back often. We’re in this for the same reason as you – we love photography, and we’re learning more about it every day.
—Jon Sienkiewicz


