What is the best type of lens for wildlife photography? No doubt, the most popular and easiest way to photograph animals is with a telephoto lens. However, there are many other factors to consider: focal length, aperture, weight, price, close focusing distance, image quality, focus speed, and more. Where do you start?
A solid understanding of key camera settings is essential if you’re serious about shooting impressive photographs instead of mere snapshots, and one of the most important considerations is whether to use the Raw file format or shoot Jpegs. As you’ll see in the video below, the decision you make depends up a variety of factors—including the specific way you intend to use the images you make.
Conventional wisdom is that “real” photographers always shoot Raw because of the greater detail and quality this format provides. But what if you never make large prints, or simply want to share images on the Internet? Other considerations include the greater storage requirements of much larger Raw files and the fact that some modern cameras deliver really good Jpeg output.
Resha Reay is a pro based in Bangalore India who recently launched an instructional YouTube channel with the goal of helping other photographers elevate their skills. In this five-minute episode he explains what you need to know when choosing an appropriate file format for the specific task at hand.
The choice between Raw and Jpeg involves a number of compromises. Reay explains that “Raw files are the untouched, unprocessed data captured by your camera’s sensor.” Thus, these images contain all the information recorded without any in-camera processing, compression or downsizing.
Another way to think of this is that the Raw file is a “digital negative” with the highest image quality possible, along with the maximum control of exposure, white balance, and color grading during the image-editing process. Raw files also enable you to recover highlight and shadow details that may be lost when shooting Jpegs.
One more key consideration is that editing Raw files, unlike with Jpeg files, is a “non-destructive” task—meaning you can go back and make additional adjustments (or change the ones you made earlier) without degrading image quality. But as you’ll see, these significant benefits come at a cost.
Jpeg, on the other hand, is a compressed file format. Rey puts it like this: “When you take a Jpeg photo the camera processes the image and compresses it before saving the image.” The compression process greatly reduces file size but also sacrifices some data. Thus, while Raw files can be considered “digital negatives,” you can think of Jpegs as “digital prints.”
With all the theory out of the way Reay discusses several important practical matters that will help you decide when to use one of these formats versus the other. After watching the video pay a visit to his YouTube channel where you’ll find additional lessons on the basics aspects of photography.
Clear blue skies may be great for picnics or a trip to the beach, but when it comes to landscape photography not so much. Or as Portuguese photographer Andy Mumford says, “Blue skies without drama are among the hardest conditions for making impactful images.”
With a home base in Lisbon Mumford travels the globe in his quest to capture stunning nature, travel, wildlife, and landscape imagery. In this helpful episode he discusses a successful approach to shooting all types of outdoor images when confronted with featureless skies—a situation that’s the bane of all outdoor photographers.
Mumford is shooting in Italy’s magical Dolomite mountains, a place so special to him that he visits the region at least once a year. He begins with a discussion of why a specific approach to composition is required when there’s nary a cloud in flat, boring skies.
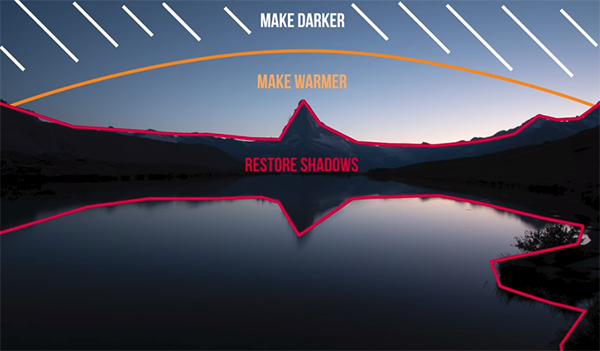
The basic plan under these conditions is to concentrate on the foreground and other key elements, while making the most of whatever light is available. As you’ll see, Mumford’s thoughtful approach enables him to capture very dramatic images. The key to his demonstration image is an imposing peak in the distance (and it’s reflection in a small foreground lake).
One of Mumford’s challenges is to compose the scene in a way that distracting reeds and other floating plants in the water don’t obscure key areas of the refection. He also makes use of a small tree growing out of a log near the camera position to add interest to the shot captured with a wide-angle lens.
As you’ll see, there’s an abundance of negative space in the shot, and Mumford was able to best handle that by flipping the camera into a vertical orientation. While this framing greatly improves the impact, careful post processing is required to make the shot really special.
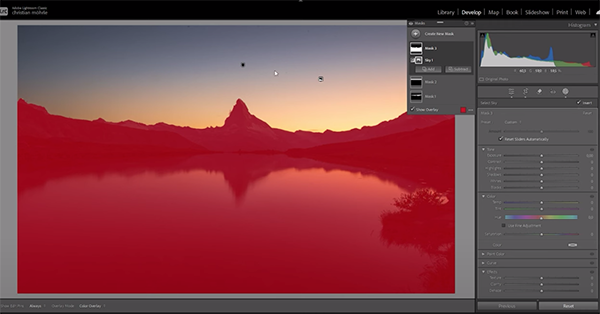
Mumford uses Lightroom to make the necessary enhancements, and he walks you through the detailed step-by-step method for his impressive transformation. The process doesn’t begin on the computer but rather in Mumford’s brain, as he takes time to reflect upon the specific look and mood that he wants to convey.
The processing technique isn’t difficult, but it consumes the balance of the video, so pay close attention and maybe jot down a few notes. Mumford turns to Photoshop for some quick finishing touches once the Lightroom adjustments are complete. Overall this is a great approach to take when photographing scenes with unimpressive skies.
Last week we featured a very popular tutorial, explaining several reasons why landscape photos may be unsharp, with a foolproof technique for solving the problems. Today’s lesson takes a similar approach with regard to capturing crisp images of birds.
For this demonstration Misa is using a Canon EOS R5 full-frame mirrorless camera and the premium Canon RF 100-500mm telephoto zoom lens, along with Canon’s RF 1.4X extender. But as you’ll see, it’s not necessary to own high-end professional gear to take advantage of the tips she provides.
While watching Misa demonstrate five straightforward techniques for sharp images of birds, keep in mind that the techniques she reveals are equally valuable for capturing images of other animals in the field. She begins with a thoughtful discussion of how the quality and quantity of light in a scene impacts the performance of a camera’s autofocus system and determines the specific approach you take for capturing the shot.
Misa then moves on to important camera settings, beginning with a few tips for choosing an appropriate shutter speed, whether your subject is stationary or your goal is to freeze motion of birds in action. As she explains, “too slow a shutter speed and you risk a blurry image, while too fast a shutter speed with insufficient light means you’ll have to ramp up ISO and open up the aperture”—thereby sacrificing image quality and depth of field.
Next is a closer look at how the f/stop you choose has a big impact on the sharpness of a photo. Here she covers two key aspects worthy of attention: the aforementioned depth of field issue, along with considerations for overall frame sharpness. She also explains the importance of understanding which aperture of your lens is sharpest at different focal lengths.
Other key topics covered in this very helpful lesson include how in-body image-stabilization works, the difference between various autofocus settings, and several other random factors that impact whether or not you achieve fast and precise focus. After watching the video head over to Misa’s instructional YouTube channel where you’ll find more great tips for better wildlife and landscape photography.