Pro-Level Accessories That Empower Creativity
You don’t have to earn a living taking pictures to enjoy pro-level product quality. Enhance your photography passion by adding the right gear to your equipment arsenal. Even if you don’t currently work as a pro, you can work like a pro.

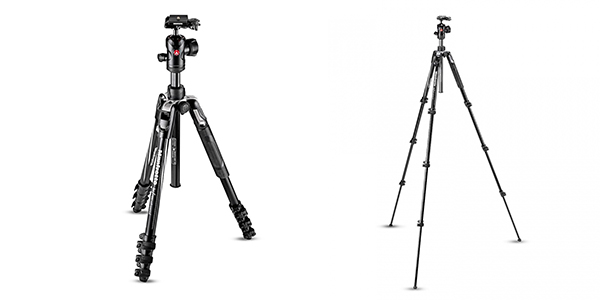
Befree Advanced Aluminum Travel Tripod
The Manfrotto Befree Advanced Travel Tripod features a center ball head and Manfrotto’s proprietary QPL Travel lever that ensures maximum stability and easy setup. It measures 15.8 inches (40cm) closed and extends to 59 inches (150cm). It weighs only 3.3 pounds (1.49kg) and is superbly built to endure heavy professional use. In fact, it boasts a load capacity (“Safety Payload” in Manfrotto’s vernacular) is 19.84 pounds (9kg). The four leg sections are crafted from aluminum alloy for strength and light weight. Order from Manfrotto, price is $234.95. Also available from Amazon.

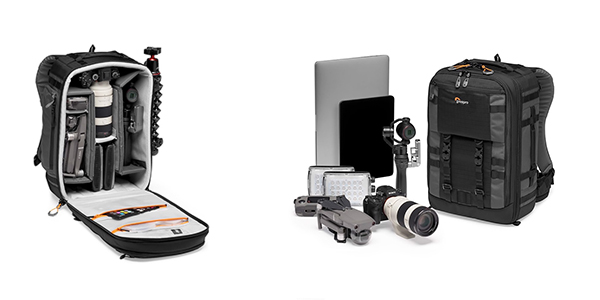
Advanced Befree Backpack III
Weighing in at just 2.69 pounds (1.22kg) the Advanced Befree Backpack III will accommodate a 15-inch laptop, 9.7-inch tablet and a DSLR with 70-200mm f/2.8 zoom attached, and features an expandable side pocket for a tripod. In other words, it will tote the gear a pro needs for a full day’s outing. Contents are accessed from the back for greater security and it’s small enough for airline carry-on. It’s water resistant and also includes a raincover. External dimensions are 13 x 8.3 x 19.3 inches (33 x 21 x 49cm) and the internal dimensions are 9.8 x 5.5 x 17.3 inches (25 x 14 x 44cm). Comes with camera insert for safer transport. Available directly from Manfrotto; cost is $125. Or order today from amazon.com.

Lowepro Pro Trekker BP 350 AW II
Lowepro’s 24L (liter) photo backpack is constructed from 75% recycled fabric and is carry-on compatible. It accommodates a 15-inch laptop, 10-inch tablet and a mirrorless or DSLR with 70-200mm f/2.8 zoom attached, plus four or five additional lenses. Measuring 12.6 x 9.8 x 18.9 inches (external), she weighs 5.3 pounds (2.4kg). The Lowepro Pro Trekker BP 350 AW II is built from 1680D ballistic polyester, 420D ripstop nylon and 500D polyester. Interior material is scratch-free Velex nylon. Available today from Lowepro for $229. Can be ordered from Amazon, possibly at a higher price.

PRO TH-55 HighLid Rolling Case
When heavy-duty protection is necessary, but convenient light-weight desired, the PRO TH-55 hard rolling case provides IP67 level protection against water and dust ingress and weighs less than 10 pounds. IP67 indicated that it is 100% dust-tight and can withstand being submerged in one meter of water for at least 30 minutes. Learn more about IP classifications here. Manufactured in Italy, this sturdy case includes four layers of pre-cubed foam for easy equipment organization. Best of all for travelers, it fits the standard to be used as carry-on luggage (but check with your carrier anyway). It measures 13.8 x 8.9 x 21.7 inches (35 x 22.5 x 55cm) and tips the scales at a svelte 9.9 pounds (4.5kg). Price is $239 and it’s available from Manfrotto today. Also available from Amazon. Or visit the official Manfrotto Store at amazon.com.
Want to Become a Better Photographer?
Begin by taking more pictures. Carry a camera everywhere you go and shoot even when you’re 100% sure the picture won’t turn out. Review all of your images with a critical eye and share them with others – and that includes posting the best on our Gallery. Subscribe to our newsletter (see sign-up form on our homepage) and bookmark Shutterbug as a Favorite on your browser so you can check back often. We’re in this for the same reason as you – we love photography, and we’re learning more about it every day.
—Jon Sienkiewicz
(As an Amazon Associate, Shutterbug earns from qualifying purchases linked in this story.)


