This hands-on review covers everything that you need to know about the Nikon Z 50mm f/1.2 S, an ultra-bright prime lens available for the Z System. Although it’s large, heavy, and expensive, there’s a lot to like where image quality and capabilities are concerned. Here’s how it measures up.
Dynamic Range is one of the most important photography concepts to understand, both with regard to a camera’s capabilities and how you edit your work. Some shooters don’t know exactly what the term means, but just about everyone knows they want more.
According to our friends at Adobe, “Dynamic Range describes the ratio between the brightest and darkest parts of an image—from pure black to the brightest white.” The maximum range of tones captured varies from camera to camera, but even the best pro models capture only half as much range as the human eye.
Insufficient Dynamic Range is a particular challenge when shooting in environments of high contrast. Expose for the highlights and shadows are crushed; expose for the shadows and highlights are blown out and devoid of detail. So, what’s one to do?
Instructor James Feaver make this promise: “In today’s video I’m going to show you how to dramatically increase the Dynamic Range of your photos in Lightroom.” The technique he describes is called Exposure Stacking, and it’s easy enough for anyone to accomplish—which is why it takes barely five minutes to explain.
In basic terms, all you have to do is take multiple shots of the same scene, each at a different exposure setting, and then merge them in Lightroom to create one image with expansive and balanced tones. Most times three shots are all that’s required, but in this lesson Feaver works with five.
The typical approach when working with three images is to capture one with a “correct” exposure, another that’s a stop under, and a third that’s overexposed by one stop. As you’ll see, Feaver’s five-step process just adds a bit more detail to the highlights and shadows.
Once you select all the images in your sequence, simply right-click and choose the Merge option in a dropdown that appears (there’s also an option for creating a panorama). Then a dialog box will appear with a variety of settings, and Feaver explains exactly what they do. He recommends that you always enable “Auto Align.”
There’s also a De-Ghosting amount setting that’s particularly useful when there are moving objects within your scene. This help a avoid “semi-transparent pixels” one the images are stacked. Mounting your camera on a tripod will also make the process more precise.
The merging process itself is super simple, and Feaver walks you through the straightforward step. The technique is not only fast and effective, but it’s also sort of fun. Be sure to visit Feaver’s instructional YouTube channel where there’s much more to learn.
And don’t miss the earlier tutorial we featured with another post-processing expert who demonstrates how to use Lightroom’s Presence sliders to create photographs with greater impact.
We all strive to capture photos in which the primary subject of a scene is full of detail and properly exposed. Today, however, you’ll learn a different approach whereby the subject is shy on detail but full of drama and impact.
Today’s tutorial is all about the visual power of silhouettes, whether you’re photographing birds, other forms of wildlife, or even landscape and seascapes with a compelling element against a bright sky. Instructor Paul Miguel is a versatile British pro whose portfolio contains everything from wildlife, nature scenes, and macro shots ,to amazing landscape photos captured in Iceland.
Miguel covers a lot of ground in 17 minutes, so you may want to jot down a few notes for future reference. He demonstrates what he considers the best exposure, focusing, and composition techniques to use, and how to use prevailing light to advantage. There are also a bunch of tips on how to become more creative with this unique form of photography.
Images of birds in flight are a classic example, especially when photographed against the sun at sunrise and sunset, and that’s where Miguel begins. His first suggestion is to find a location that’s nice and open, with an unobstructed view of the sky. As you’ll see in this behind-the-scenes video, the spot he chose fits the bill perfectly from first thing in the morning to just before night.
It’s not necessary to have the sun in your composition. But when you do Miguel explains why he prefers only a part of the sun encroaching on one side of the scene. A more common and easier technique to master is photographing the subject against a clear sky with the sun outside the frame.
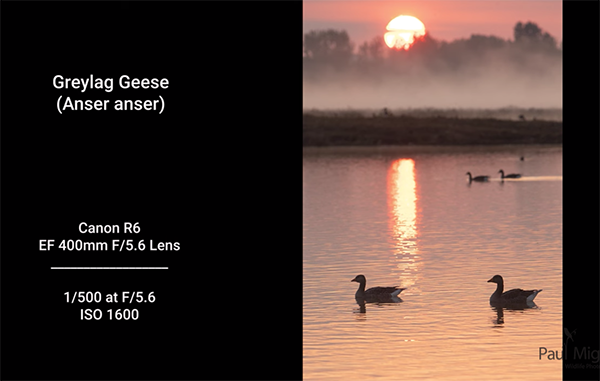
You’ll also see how a few clouds can heighten the effect if they’re positioned properly with regard to your subject. Miguel’s tips are illustrated with captivating photos that include captions with gear information and the camera settings he used.
The most important aspect of silhouette photography is arriving at a correct exposure, and Miguel demonstrates how to do that in various situations. One trick is exposing for the highlights. He also provides solid advice for nailing focus in the process.
The discussion also includes concentrating on strong shapes when wildlife subjects aren’t part of the game. Picking the best vantage point and camera angles are also worthy of consideration. Miguel concludes the video by demonstrating several post-processing techniques for refining your results.
This 12-minute tutorial from the Photography Explained YouTube channel takes a close look at the Raw vs. Jpeg debate so you understand when to go all-in on Raw, and when the Jpeg format is a better choice. You also learn about a couple other image formats that you may find unfamiliar.
Today’s unnamed instructor puts it like this: “After checking with the pros I knock about with, and many personal experiments, I’ve discovered the truth behind the two main formats once and for all.” So what’s the big deal with a Raw file? It represents the uncompressed data captured by your camera’s sensor. It’s sort of like the digital equivalent of a film negative because “nothing’s been done to it—no adjustments, no processing—just pure, unadulterated pixels.” And this means greater flexibility and control during post-processing.
Jpegs, on the other hand, are a compressed and processed version of the same data that can sometimes be used straight out of the camera. While significant enhancements can also be applied during the editing process “your camera has already done much of the cooking for you.” Jpeg files also take up much less storage space on whatever storage device you use.
The point here isn’t to completely dismiss the value of shooting in Raw and convince to always shoot Jpegs, but rather to explain the benefits and drawbacks of both popular formats. The way you intend to use the images you capture is another very important consideration.
The ability to rehabilitate severely underexposed photos is a big plus with Raw, while you may be out of luck with a Jpeg file and shadow detail could be lost forever. There are other post-processing advantages to Raw, like precisely correcting White Balance, getting sharpening right, fixing a “baked-in” profile, and others. And some of these issues can be irreversible when dealing with Jpegs.
OK, so why and when are Jpeg files actually preferable? Watch the video to find out. The bottom line is this: There’s no file format that’s perfect for every situation, and now you are well prepared to make the appropriate choice.
The Photo Explained YouTube channel is a great resource for straightforward shooting and editing advice that will significantly improve your photography skills. So be sure to pay a visit when you have time to explore.