Add Vignette & Grain Effects for Photos with a Unique Look (VIDEO)
We’re always on the lookout for straightforward post-processing tricks that will give images a unique look and make them stand out from the crowd, and this tutorial from Instructor Julieanne Kost does exactly that in less than five minutes.
Kost is an acclaimed expert at all things Adobe and a very accomplished educator, so when she speaks we tend to listen carefully (and so should you). In this episode she demonstrates how easy it is to add vignettes and grain effects to give a big boost to just about any photo you capture.
Simply put, a vignette adds impact to a photo and directs the viewer’s eyes by darkening the periphery of an image—either as a shadow, subtle blur, or sometimes both. This can happen by mistake due to incorrect camera settings or the wrong gear, but this lesson is all about using vignettes with intention.
You’ll learn two ways to create a vignette, with the first using the Vignette slider that’s found within Lightroom’s Lens Correction panel. Interestingly this technique was originally designed for removing vignetting caused by lens distortion. But as Kost reveals, this simple slider can also be used to add or increase the amount of vignetting in any image. As she says, “it does a great job of simulating an in-camera vignette effect.”
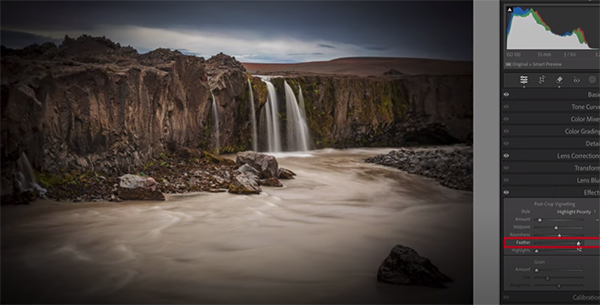
The second method involves using the Effects panel and the primary benefit of doing so is this: the vignette settings are applied to an image after cropping, and they’ll be updated if the cropping is altered. Kost demonstrates how to use three post-crop styles: Highlight Priority, Color Priority, and Paint Overly. She describes which method works best depending on the specific photo at hand.
As you’ll see, once you create the vignette of your choice there are a variety of Lightroom tools and masking adjustments that enable you to easily refine the effect. Next Kost returns to Lightroom’s Effects panel and turns her attention to adding a bit of grain, whether you’re working with a color shot or one that’s rendered in monochrome. This is a simple method for making an image appear as though it was captured on film.

Kost begins by zooming in on the image to make it easier to view the effects of the Grain sliders more accurately. Then she uses the Amount slider to control how much grain is introduced, the Size slider to determine how small or large the grain appears, and the Roughness slider to control whether the grain looks sharp or “rougher and more blotchy.”
It’s also possible to add grain selectively with the use of one or more masks. Be sure to visit Kost’s instructional YouTube channel where you’ll find more quick solutions to any problems you encounter in Lightroom or Photoshop.
We also encourage you to explore a beginners guide we posted recently with everything you need to know for processing Raw photographs in Lightroom from beginning to end.