Pentax 17 — Cool, New 35mm Half-Frame Film Camera

It’s a happy day for film fans! A new Pentax 35mm film camera. Ricoh Imaging Americas Corporation, the global technology giant behind the Pentax label, announced the Pentax 17, the first new 35mm film camera from a major manufacturer in several years.

Key Features
• 35mm half-frame (17mm x 24mm images on standard 35mm film)
• Default vertical format
• Magnesium alloy top and bottom covers
• 25mm f/3.5 lens (equivalent 37mm) 61° angle of view
• Lens design has 3 elements in 3 groups
• Zone focus (6 focus zones)
• 25mm minimum focus distance
Key Features (cont.)
• Seven AE modes including Bulb and Slow Flash Synch
• Shutter range 1/350 to 4 seconds
• Albada-type optical viewfinder with closeup frames
• Traditional film advance lever and manual rewind
• Selectable ISO plus Exposure Compensation (+2 / -2)
• Built-in flash, GN 6 (ISO 100 in meters)
• 40.5mm filter thread

Key Features (cont.)
• Film box top holder
• Three strap lugs to accommodate vertical or horizontal carry
• Compatible with optional CS 205 Cable Switch
• Requires one CR2 battery (not compatible with rechargeable CR2)
• About 10 x 72 exposure rolls per battery
• Measures 5.0 x 3.1 x 2.0 inches (127 x 78 x 52 mm)
• Weighs about 10.2 ounces (290 g) without film/battery

Focus & AE Details
The Pentax 17 compact film camera has six focus zones, 0.82 feet, 1.7 feet, 4 feet, 5.6 feet, 10 feet and infinity (0.25m, 0.5m, 1.2m, 1.7m, 3m, ∞).
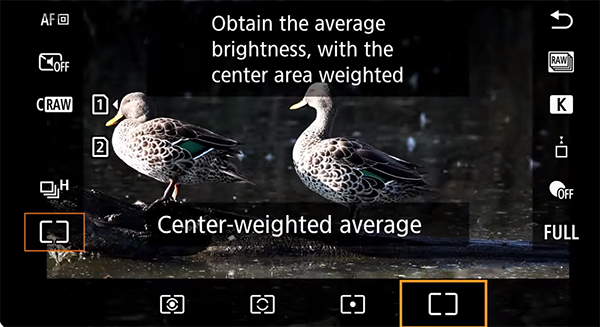
There are seven Auto Exposure modes:
· Full auto (Pan focus program AE, Auto flash)
· Standard (Program AE, Flash off)
· Slow-speed shutter (Slow-speed program AE, Flash off)
· Maximum aperture priority (Max aperture priority program AE, Flash off)
· Bulb (Bulb, Flash off)
· Daylight sync (Program AE, Flash on)
· Slow-speed sync (Slow-speed program AE, Flash on)

Price & Availability
The PENTAX 17 will be available late June directly from Ricoh and at Ricoh Imaging authorized retailers nationwide at the MSRP of $499.95.
A kit that includes a 2-year extended USA Limited Warranty, two rolls of film and processing envelopes will be offered exclusively from Ricoh’s web store for $599.95.
Visit the Pentax Store at amazon.com.
Find an authorized Pentax dealer in your area by visiting the Authorized Ricoh Imaging Americas Dealers database.

Backstory
The PENTAX Film Camera Project, which was revealed in December of 2022, drew from extensive consumer research and a careful selection of elite Ricoh engineers to devise the specifications and operational parameters of the new Pentax 17 compact film camera. In homage to Pentax’s long history as a 35mm and medium-format film camera maker, the Pentax 17 has a number of design details borrowed from historical models. For example, the typeface in the numeral “17” came from the Pentax 67, and the film advance lever was taken directly from the Pentax Auto 110. A more substantial adoption, the lens was partially derived from the Pentax Espio Mini and Ricoh Auto Half models.

Market Potential
Ricoh stated that recent research indicates that the compound annual growth rate of the global film camera market is projected to be 5.2% through 2030, and that hashtag #filmphotography on Instagram counts more than 42.6 million posts. Ricoh indicated they are targeting the 18-40 year-old market segment.

More Info for Film Shooters
Start Shooting 35mm Film – Here’s a Complete Guide
Shoot Film? Here are 5 Labs that Develop & Print
Film Shooters: The Film Photography Project is a Valuable Free Resource You Should Know
Become a Member of the Shutterbug Community
Register for a free account. Sign up for our newsletter. Spend five minutes (or less) uploading your best shots once every week or so. Potentially become a Shutterbug Photo of the Day winner. Enjoy viewing the fantastic work being done by thousands of photographers all over the world—and add your images to the enduring collection.
—Jon Sienkiewicz
(As an Amazon Associate, Shutterbug earns from qualifying purchases linked in this story.)