REVIEW: GRAMS(28) Camera Sling Offers Luxury of Fine Italian Leather & Meticulous Craftsmanship
Who can resist the sumptuous appeal of a finely-crafted, genuine leather bag? Combined with elegant styling and superb workmanship, the common camera sling can be elevated to an explicit work of art, an everlasting leather heirloom, even. GRAMS(28), a Hong Kong-based leather goods brand, offers the 172 Camera Sling, a gorgeous and roomy camera shoulder bag that delivers on these potentials. That said, some questionable construction decisions may mar its appeal to ardent photographers. Hear me out…
GRAMS(28) 172 Camera Sling Overview
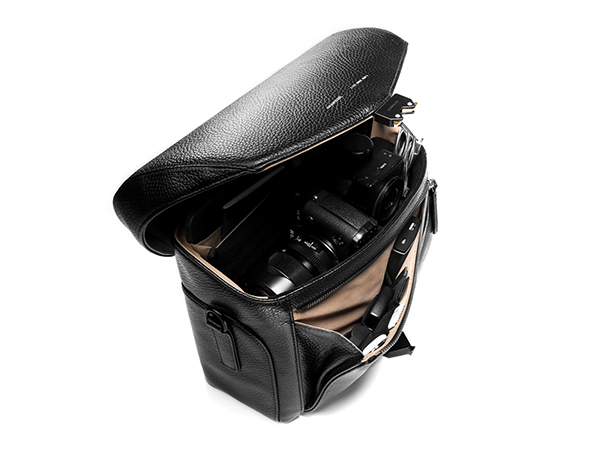
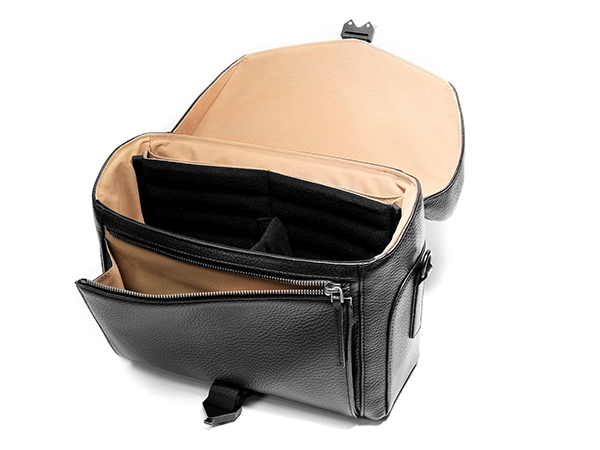
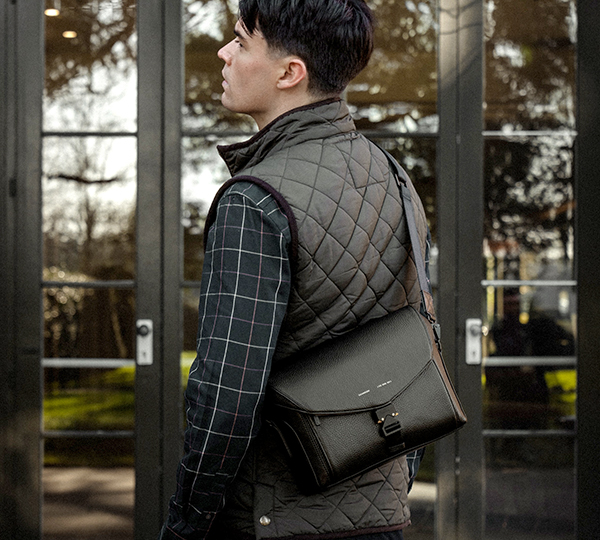
The 172 Camera Sling comprises the popular configuration that includes a rigid lid, repositionable internal dividers, a pouch for an 11-inch tablet and a zippered compartment on the back. The adjustable shoulder strap is removable but lacks a shoulder pad or slip resistance. There’s a roomy zipped compartment on the front that’s covered by the lid and is ideal for memory cards, batteries and the like. The interior fabric is light khaki color and soft to the touch. On the front, instead of a gaudy logo, there’s a tasteful single line of text that reads, “GRAMS(28) (172 0902 039),” stamped in white.

GRAMS(28) claims that the 172 Camera Sling can hold a full-size camera like a Fujifilm X-H1 and a lens like a Fujifilm 70-200mm lens, which at first I did not believe but assuredly confirmed. It’s much roomier than it appears, probably because of the sleek, roundish design.
Key Features & Dimensions
• Full grain pebbled Italian leather
• Finely crafted in Arzignano, Italy
• Leather tanned by carbon-neutral Gruppo Mastrotto
• Padded interior
• Removeable, adjustable dividers
• Slot for 11-inch tablet
• Pouches for memory cards and other small items
• Apple AirTag pocket
• Measures 12.5 x 8.6 x 4.7 inches (32 W x 22 H x 12 D cm)
• Weighs 1.96 pounds (890g), or 31.4 ounces
• Lifetime warranty & 30-day return option
• Free shipping to US
• Cost is $459 USD
Field Notes
The GRAMS(28) 172 Camera Sling is quite roomy despite its compact size, and comfortable to use. But the lack of slip resistance on the wide 1.5-inch (3.8cm) strap is annoying and, for me, means constantly struggling to keep everything from sliding off my shoulder. If you wear the bag cross-body style, this is not an issue.
It’s a trifle heavy when empty. It weighs nearly 2 pounds (31.4 ounces). In comparison, the $119 Peak Design 6L Everyday Sling Bag weighs 1.72 pounds (780g) (with dividers). Seems small but that’s a difference of more than 12%.

The aluminum latch that fastens the hinged lid is unique and moderately attractive, but it resembles a video game alien with brassy gold ears, wide mouth and a roughly textured tongue. It doesn’t bother me, but it bothers me. Know what I mean?
The galvanic plated zippers blend nicely with the overall design scheme, but frankly I prefer waterproof YKK zippers, the component GRAMS(28) uses on some of their other products. That’s just my personal fussy choice, but it’s based on years of experience with recalcitrant zippers.
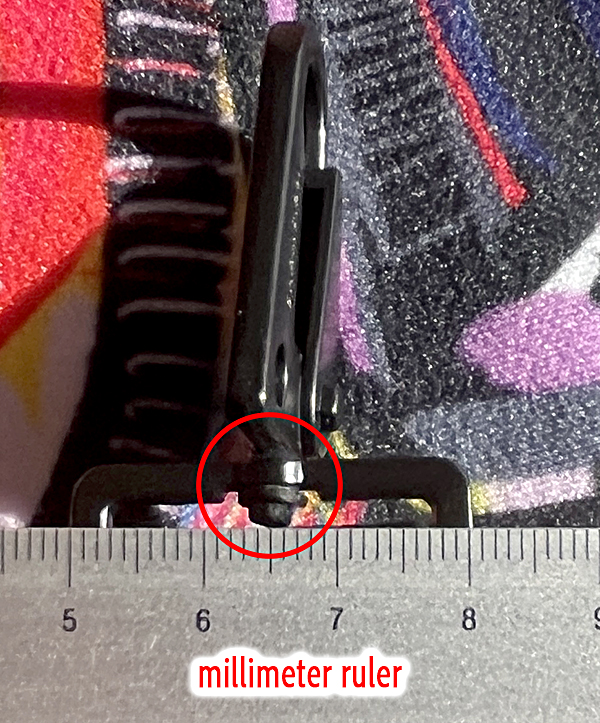
The biggest problem—and this is a deal breaker for me—is the very thin pin the connects the shoulder strap to the rotating buckle. It appears to be approximately 2mm in diameter, clearly less than 3mm (roughly 3/64 inches). Being unduly clumsy as I sometimes am, I’m certain I could accidently shear the pin with minimal force and (possibly) drop the bag. Aware of this, I never felt confident about the bag’s security.

Side Note – Identity Crisis?
The company name appears as “GRAMS(28)” with parentheses in multiple places on their website, but in the About Us section and on their official Facebook page the name appears without parentheses.
It gets better. On Instagram we find three variations: GRAMS28, grams28 and GRAMS(28)—all in the same place.

I decided to use the all-caps-plus-parentheses version to be consistent with their official logo. It’s none of my business, but I suggest that their marketing team picks one variation and hammers it home. Consistency is the mainstay of marketplace identity.
Conclusion
I really, really want to love this bag. The leather craftsmanship is superb and the overall design is attractively understated and highly functional. But I can’t love it for one of the reasons I delineated in the Field Notes above: the thin pin that connects the rotating buckle to the camera strap.
If I were to use this sling bag on a regular basis, I’d feel compelled to first replace the strap with something that had sturdier buckles. The lifetime warranty protects you if this component fails, but the bag could crash to the ground and damage its contents. What then?
Price & Availability
The GRAMS(28) 172 Camera Sling is priced at $459 and can be ordered directly from GRAMS(28). Shipping to the US is free and they offer a lifetime limited warranty and a 30-day return window.
—Jon Sienkiewicz


