Cover photo by Colin Lloyd on Unsplash.
So, your camera is weather-resistant, great! Is your lens? And just exactly how weatherproof is it? Don’t risk triggering an expensive repair—or turning your camera into a brick. The affordable RucPac Camera Rain Cover protects cameras and most lenses from rain, snow and dust, and it can save your bacon. This is a great (and thoughtful) holiday gift for the photographer in your life.
It’s a dilemma. The weather is terrible but you want to take pictures outside anyway. Or maybe the sky looked bright when you started your hike but somewhere along the way conditions deteriorated. You can protect your camera bag or backpack with a heavy-duty 30-gallon trash bag (never leave home without one). But how about your fragile camera and lens?
 The RucPac Camera Rain Cover
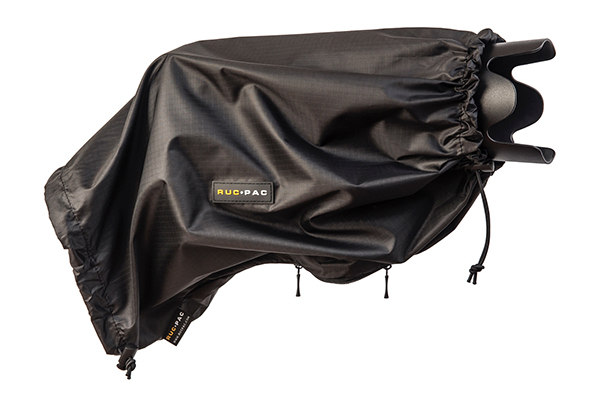
Crafted from durable and lightweight ripstop waterproof material, and weighting less than a sparrow (I’m guessing), the RucPac Camera Rain Cover might become your best friend with El Niño in the forecast.

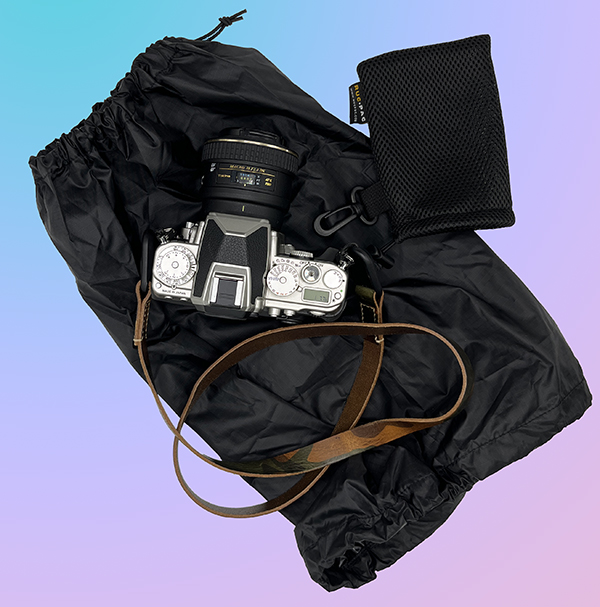
My Nikon Df DSLR sitting on a Medium-size RucPac Camera Rain Cover to give you a better idea of the size. The case, also pictured, is approximately 4 x 6 inches (10.2 x 15.2 cm). ©Jon Sienkiewicz
Small enough to hide easily in your camera bag until you need it, the RucPac Rain Cover is designed to protect your camera with lens attached while you’re using it. It’s available in three sizes as follows: Small is for setups where camera plus lens hood total length is between 2.0 and 7.9 inches (5-20cm), Medium for 7.9 to 13.8 inches (20-35cm), and Large fits 13.8 to 19.6 inches (35-50cm). These specs are a little misleading because you certainly can use size Large on a setup that’s only 9 inches total length.
The RucPac Rain Cover can be used with a tripod—that’s important.
On the front (lens end) there’s a stretchy quick-access drawstring that tightens down on your lens hood. On the other end, a stretchy drawstring provides protected access to operate your camera and creates secure closure when you’re not shooting. Along the bottom there’s a full two-way zipper so it’s easy to install and remove, and fast to deploy when using a tripod.
 The RucPac Camera Rain Cover comes with a black quick-dry nylon mesh pouch that measures roughly 4 x 6 inches. The pouch has a drawstring closure at the top (although you don’t really need it) and includes a plastic clip for attachment on the outside of your bag or on a strap (the clip is handy when you put a wet camera cover in it).
BTW, if you’re searching for a gift for a photographer friend, you just found it. It’s functional, affordable and very thoughtful. You don’t even need to know what brand camera/lens they use—the Medium RucPac Camera Rain Cover accommodates nearly every configuration.
Think You Evaded the Weather Nightmare?
A cautionary tale: even when you think you’ve successfully stared down a deluge with an under-protected camera, water damage can appear days or sometimes even weeks later. When moisture infiltrates a camera body, it often makes its way to a printed circuit board where it lies in wait until it short-circuits a solder trace. Zap! Instant brick.
The disastrous destruction of a lens often has a delayed fuse, too. A splashed lens can look fine for a long period—until fungus or mold has time to grow inside and create a fuzzy (but oddly beautiful) web of haze across one or more glass elements.
 Check the IP Specs
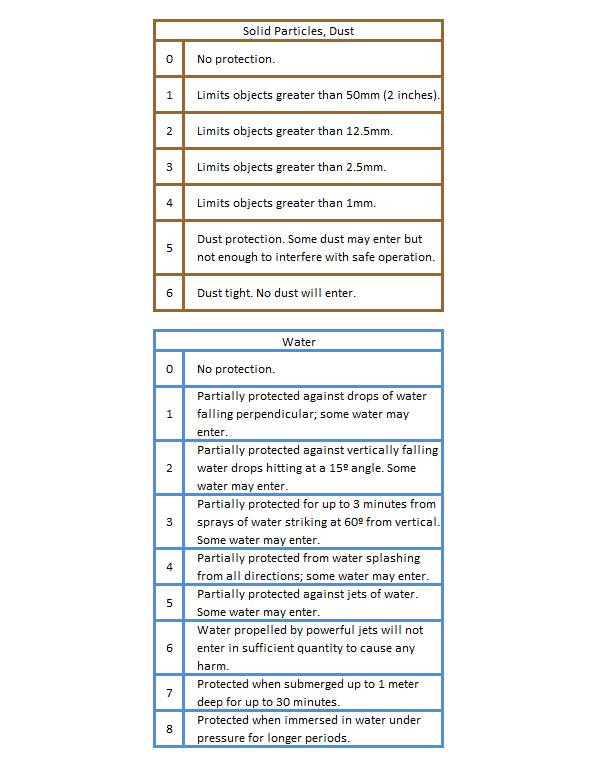
The specifications of some cameras and lenses include a two-digit IP rating. The first digit pertains to protection against dust, the second to moisture. IP is short for Ingress Protection, international standard IEC 60529. It objectively defines several levels of protection against solid particles and, separately, from water, and meticulously stipulates the testing procedures required to meet those standards.
For more information about IP ratings and other data, read, Is Your Weather Resistant, Splashproof, Waterproof Camera Impervious to Water & Dust?
 Conclusion
There’s a RucPac Camera Rain Cover to fit most camera/lens combinations and it works as advertised. It’s easy to attach, easy to remove, and can be used even when you’re using a tripod. You can launch it into action faster than you can say “cumulonimbus.” Plus, it’s small and light enough that you have no excuse for leaving it at home.
The RucPac Camera Rain Cover belongs in every photographer’s gadget bag. Period. It might be the most important accessory you ever purchase.
RucPac makes other outstanding camera accessories, including headlamps ideally suited for photographers, unique straps, and what are undoubtably the best photographers’ tech gloves we’ve ever worn.
Price & Availability
The RucPac Camera Rain Cover is a brand new item that will be on dealers’ shelves by early December. Price is $39.99 in size Small, Medium or Large.
If You Enjoyed This Article
Click here to choose from more than 500 reviews, how-to articles, quizzes, attempts at humor and other alleged insight into the world of photography written by yours truly.
Become a Member of the Shutterbug Community
Register for a free account. Sign up for our newsletter. Spend five minutes (or less) uploading your best shots once every week or so. Potentially become a Shutterbug Photo of the Day winner. Enjoy viewing the fantastic work being done by thousands of photographers all over the world—and add your images to the enduring collection.
—Jon Sienkiewicz


 The RucPac Camera Rain Cover
 The RucPac Camera Rain Cover comes with a black quick-dry nylon mesh pouch that measures roughly 4 x 6 inches. The pouch has a drawstring closure at the top (although you don’t really need it) and includes a plastic clip for attachment on the outside of your bag or on a strap (the clip is handy when you put a wet camera cover in it).
 Check the IP Specs
 Conclusion


