What is the oldest profession in the world? Although the most common answer to that question is… well, a different source of livelihood, I’m not far from the truth when I say it’s fishing. We can find depictions of fishing on cave walls, as well as in the tombs of the ancient Egyptians.
There are numerous reasons for poorly exposed photos when shooting in the field under difficult lighting conditions, including harsh light, dark foregrounds, and bright washed-out skies to name a few. When you’re faced with challenges like these, photos often turn out to be a compete mess.
Fortunately there’s a very effective solution known as exposure bracketing that easily solves the problem as you’ll see in the straightforward beginners guide below from the instructional Behind the Tripod YouTube channel. Thus, the next time you encounter difficult light you’ll know exactly what to do.
Instructor Steve Mills begins this episode with a question: “How often have you framed up a beautiful shot, only to find that the sky is blown out or the foreground has become a dark murky mess?” If this sounds familiar take heart because Mills explains why exposure bracketing is the easiest way to manage these frustrating situations.
Mills offers a quick overview of dynamic range, so you’ll understand why you got into the mess in the first place. Simply put, dynamic range describes the amount of tone that a camera’s sensor can record between full black and full white. That’s why a camera with high dynamic range can capture more shades of gray (and details) between the two extremes of brightness.
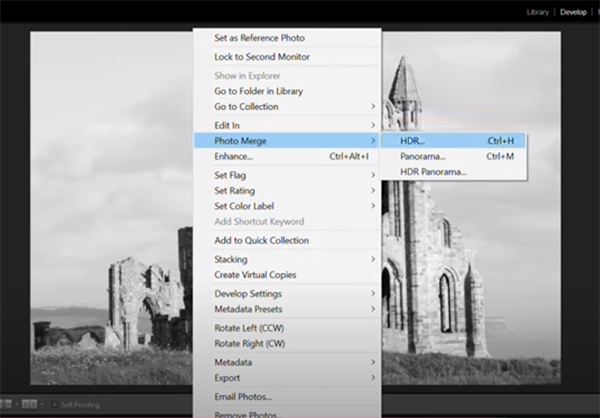
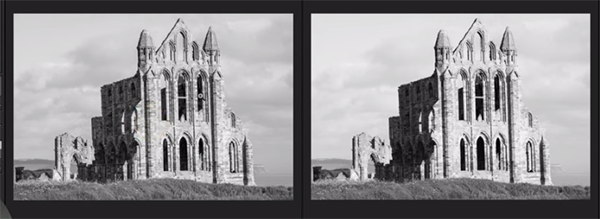
With this understanding under your belt you’re now ready for Mills’ quick primer on using exposure bracketing to get things right. This technique involves taking multiple photos of the same scene, each with a slightly different exposure setting, and then merging them together doing the editing process to arrive at one perfect shot.
Essentially what you’re doing with this method is increasing dynamic range to create an image with perfectly exposed highlights, shadows, and everything in between. Mills reveals the appropriate camera setting to use in various situations, and then he walks you through a simple Lightroom process for merging the images you shot.
For all but the most complicated scenes three differently exposed photos will suffice. This means making one shot at the setting recommended by the camera, as well as another underexposed by one stop and a third that’s equally overexposed. While this technique is typically employed by landscape photographers, it’s equally appropriate for arriving at perfect exposures when shooting other types of images indoors or out.
After watching this very helpful video we suggest paying a visit to Mills’ YouTube website where you’ll find more of the same.
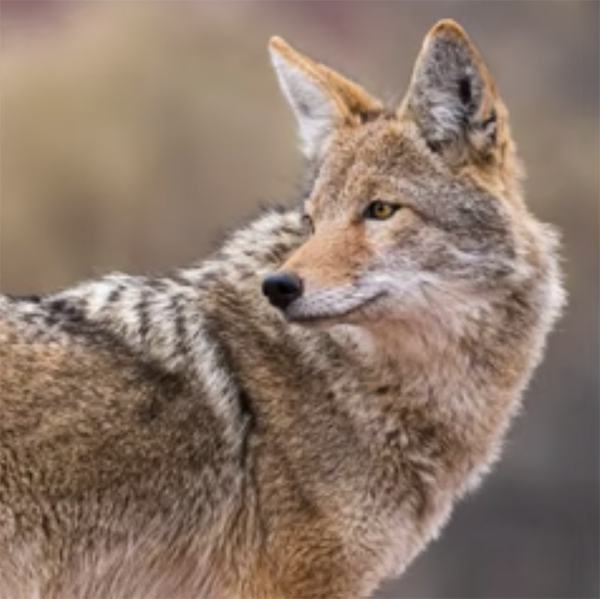
Your camera offers variety of shooting modes, each tailored to shooting different types of images, and it’s important to make the right choice if you what the best results possible. This tutorial from the folks at Light Benders Visuals is targeted at wildlife and nature photographers and provides solid pro advice for getting the job done.
Instructor Brent Hall says there are three mode of primary interest to wildlife photographers among the various options available on most cameras. Hall ignores fully automatic and program modes and concentrates on those that “enable you to shoot with more intent.”
The episode begins with a discussion of two commonly used semi-automatic modes, Shutter Priority and Aperture Priority. Hall says Shutter Priority is the most basic and easiest to understand—especially for less experienced photographers or those who aren’t fully acquainted with their cameras.
Hall says Shutter Priority makes a lot of sense for wildlife photography because subjects are often in motion, like birds in flight. By controlling the shutter speed and letting the camera set an appropriate aperture you can freeze action and make sure moving subjects are sharp. He also explains how EV compensation factors into the equation.
The next option is Aperture Priority mode, and Hall explains why it’s not typically his first choice. That’s because it’s the opposite of Shutter Priority in that you set the f/stop and leave it up to the camera to choose a corresponding shutter speed. That can work fine with stationary subjects, but not so much when it comes to freezing movement.
The advantage of Aperture priority is that it enables you to thoughtfully control depth of field. This can help isolate subjects from busy backgrounds by using a small aperture that provides a narrow range of focus to make the primary subject really stand out from the surroundings. Another factor to consider is that lenses with long focal lengths inherently provide less depth of field than wider lenses.
Another problem with Aperture Priority mode is that “cameras are kind of stupid” in that they don’t know what you’re shooting. Thus, if you’re using a long lens and set a narrow aperture, you’re likely to miss focus because of insufficient depth of field.
One solution to this problem, available in some cameras, is to dive into the menu and set a minimum shutter speed for the task at hand. That way the camera will increase ISO instead of choosing a shutter speed that’s too slow for optimum results. Doing this is also a good option when shooting hand-held in less than idea light.
As you may expect, shooting in Manual mode is the third option Hall recommends for wildlife photography, and it’s the one Hall prefers for reasons he explains. While this can initially be a bit more involved than either of the two semi-automatic modes, it become quite simple after a bit of practice, and there are specific benefits to be had.
Nikon just kicked off one of their biggest lens sales of the year! Some of the discounts look really appealing… others, not so much. I’ll break it down lens by lens with my recommendations below.