The world of 100mm macro lenses a crowded one. From name-brand to third party options, there are dozens of options for all budgets and requirements. Yet among that crowd, the TTArtisan 100mm f/2.8 ultra-macro tilt-shift stands out thanks to the wide array of features packed into the lens, including 2:1 macro capabilities, tilt and shift functionality, and even cold-shoe mounts built into the lens. Yet it only costs $389. Do all these features add up to a compelling package?
Panorama photos are a lot of fun to make and can really grab attention. Some cameras can automate the process by merging successive shots to achieve a pretty good result. Doing it this way may require a tripod for absolutely precise merging, and you’ll still need some post-processing to finish up the job.
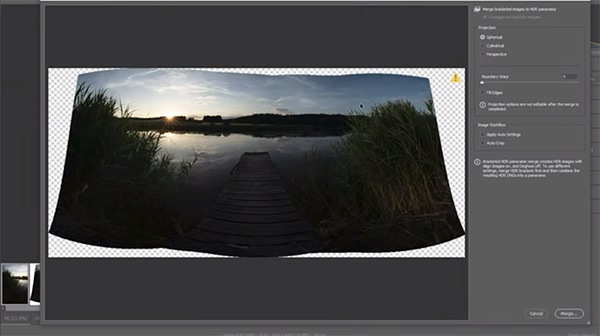
Oftentimes a better approach is to simply shoot multiple images, and then use Photoshop to both stitch the photos into a clean panorama and edit it at the same time. This is what you’ll learn how to do in today’s tutorial from the PHLOG Photography YouTube channel. Not only will your panorama look perfect, but this process is surprisingly easy to accomplish.
First you have to merge the HDR panorama which involves selecting all the images from your sequence, right-clicking on one of the thumbnails, and choosing Merge to Panorama from a dropdown menu. This process can take a while depending upon your system, so patience may be required.
A preview window appears with the merged image once this step is complete, and there are a few preliminary refinements that can be made—either automatically or manually if you wish. Then Mohrle makes several global adjustments to prepare the photo for the selective enhancements that follow to different portions of the scene.
These basic adjustments begin by changing the profile from Adobe Color to Adobe Landscape to increase overall saturation and make dark areas a little brighter. Mohrle then raises exposure, opens up shadows for more detail, and modifies White balance for more warmth. He also adds Clarity, Texture and Vibrance.
Now it’ time for the essence of the edit, with adjustments that are selective in nature. Here masking is the initial step to adjust exposure and other variables to different areas in the shot. Then Mohrle demonstrates the color grading technique he prefers to achieve the specific look he’s after.
With everything now looking really nice, Mohrle further refines the image with careful sharpening, a bit of dodging, and a quick fix to colors. You’ll also see how to correct any distortion that resulted from the merging process. Now the transformation is complete.
After watching this lesson head over to Mohrle’s instructional YouTube channel where you’ll find additional editing techniques for improving your outdoor photographs.
Most photographers know that Blue Hour and Golden Hour are great times to shoot because of the gorgeous colors at the beginning and end of the day. Last week we explained how to turn a dull landscape shot into a beautiful sunset image in Lightroom, and today you’ll learn a technique for making a boring Blue Hour photo jump off the page.
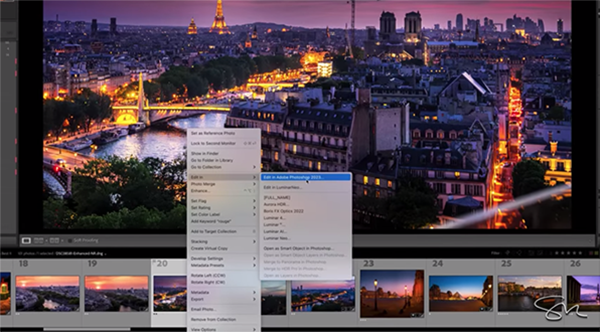
Instructor Serge Ramelli is an acclaimed French pro living in the U.S. who specializes in landscape and cityscape imagery. He just returned from a three-month trip photographing the streets of Paris, and this episode is all about using Lightroom to capture the light fantastic in the early morning.
Ramelli’s demonstration image was made from a high terrace at a new hotel in the City of Lights and it’s nothing very special, even though he was ready to go in time for Blue Hour. But watch what happens when he applies his “natural drama” technique to transform the photo into a spectacular, sparkling money shot.
The image is really dark so Ramelli zooms in and opens up the shadows to check focus and see exactly what’s going on within the frame. The hotel doesn’t permit tripods, so he had to shoot handheld at ISO 800. He begins the reclamation project with Lightroom’s new Enhance tool that has a powerful Denoise feature that works on the Raw level.
When shooting without a camera support in dim conditions, Ramelli suggests opening the aperture as wide as possible and using your camera’s self-timer to trip the shutter to avoid camera shake while holding the camera as steady as possible. Choosing ISO is the last setting he makes, because that’s determined by the f/stop selected and the slowest shutter speed you’re comfortable with given the effectiveness of your camera’s image-stabilization system.
Turning back to Lightroom, Ramelli opens the shadows and brings down the highlights which temporarily gives the photo a “weird HDR look.” He then crushes the blacks and opens the whites to enhance contrast. Now things are looking much better. The next step involves careful cropping to improve composition.
Ramelli moves on to other straightforward adjustments, first to deal with the overly bright sky. Next, he adjusts White Balance for better colors, and he explains the various options available in the panel. You’ll see how adding a bit more yellow and magenta makes a significant difference.
Not satisfied with the position of the Eiffel Tower, Ramelli crops the image further with the Rule of Thirds in mind. At this point many of us would be very pleased with the image. Ramelli is a perfectionist, however, so he demonstrates a few more enhancements to complete the impressive transformation.
Have you ever tried to imagine the outcome of a battle between two armies whose weapons and military strategies are separated by a century of development? Having recently got my hands on Nikon’s first full-frame flagship DSLR, the famous D3, I decided to try a similar experiment.