If you’re serious about capturing the essence of your subjects and taking photography to the next level, developing better composition skills is a great way to start. In fact, understanding how to best frame a scene is one of the essential fundamentals of our craft. That’s the topic of the quick tutorial below from the Camera Focus YouTube channel.
Instructor Terry Copper is a professional landscape photographer known for his adept visual storytelling. In today’s 11-minute episode he reveals secrets to his success, specifically those related to effective composition that deliver attention-grabbing images.
He begins with this question: “How can we effectively arrange the vital elements within a scene and establish a harmonious relationship with one another?” This pretty much sums up the critical nature of refined composition, and the answers he provides will greatly improve your imagery. He also covers the importance of depth of field, and the proper use of light and shadow.
Cooper discusses several “rules” of composition, and when to ignore them. You may have heard some of these before, like the Rule of Thirds and the Golden Ratio that Leonardo D Vinci used within his iconic paintings. There are other guidelines, however, that are less familiar but equally or more helpful.
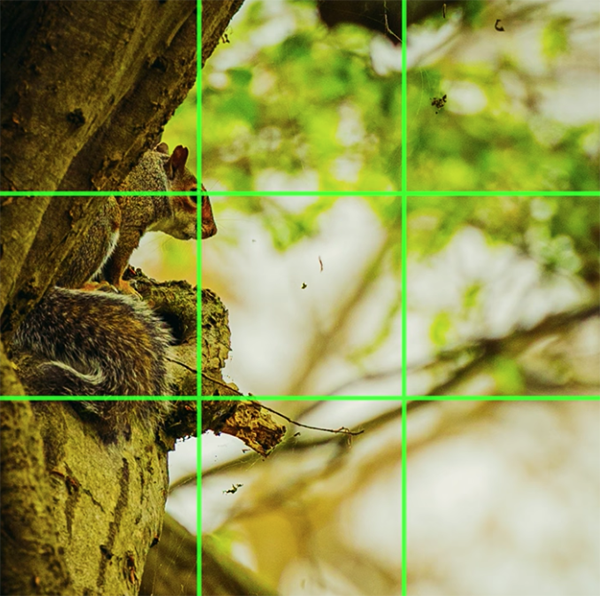
According to Copper, “composition is the language of photography, enabling you to tell your story, evoke emotions, and guide a viewer through your image.” He summarizes the most common concepts for the uninitiated, beginning with the Rule of Thirds. As you may know, this involves dividing an image into a three-by-three grid by drawing two equally spaced vertical lines and two equally spaced horizontal lines. The trick is to place key elements of a scene at the intersection points of these lines.
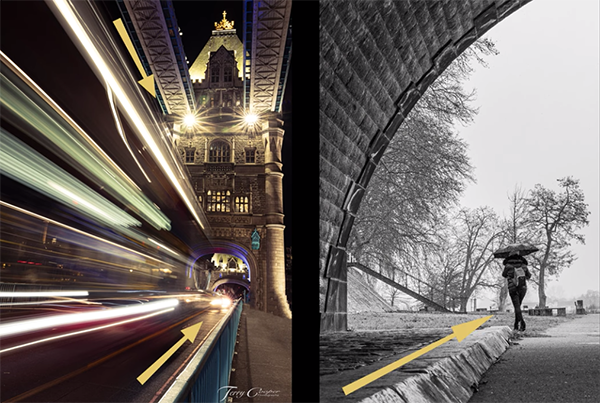
Another common method for composing compelling and dynamic images is to use leading lines within a scene that “direct a viewer’s eyes to a specific focal point or subject.” As you’ll see, by observing Cooper’s examples, these can either be physical lines or implied lines created by the arrangement of objects in the frame.
Things get even more interesting as Cooper delves into less familiar techniques for giving photos depth and adding a sense of movement and direction. He says these methods will “help create a visual journey for the viewer, leading them from foreground to background or from one point of the image to another.”
Cooper’s YouTube channel is a great source of information about outdoor photography, so be sure to take a look.
We didn’t want Lightroom users to feel left out, so today’s video demonstrates how to use Bridge with Lightroom—or even by itself. Instructor Matt Kloskowski is an expert at all things Adobe, and the emphasis of this episode is “five things Bridge has that Lightroom doesn’t.
Kloskowski admits that five years ago, like many photographers, he often poked fun at Adobe Bridge. He’s since changed his mind—now using Bridge for much of his wildlife images. He says he’s convinced that these days there’s room for both Lightroom and Bridge in the workflow of many photographers.
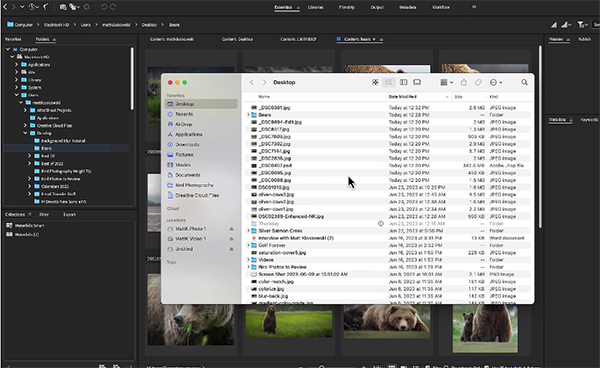
As Kloskowski makes clear, he’s not trying convert anyone from Lightroom to Bridge. Rather, by explaining the power of Bridge, you’ll be able to use both tools together to make editing a bit easier and more effective. One big advantage is you don’t have to import images into Bridge. That’s because they immediately appear once you click on a folder with the photos you want to edit.
With Lightroom, on the other hand, you have to go through the often-cumbersome import process before you can do anything. His second and related tip has to do with the fact that Adobe Bridge is a file browser, enabling you to quickly locate images within various folders on your hard drive.
While Bridge is a built-in component of Photoshop, things work differently with Lightroom, where Bridge is a free downloadable app that’s part of your Creative Cloud subscription. Metadata is another big advantage to using Bridge. Kloskowski notes that you’ll find basic Metadata on the right of the panel.
“Metadata nerds” have access to additional information by clicking the Metadata tab at the top of the screen. Here “you’ll be able to see Metadata at a glance, faster and easier for multiple photos”—with thumbnails of the images. And there are multiple view options from which to choose.
Kloskowski explains a few more reasons why you may want to give Adobe Bridge a try, including several customization options to make it best suit your needs. Here, he notes that Bridge “has a lot of flexibility that we wish we had in Lightroom.”
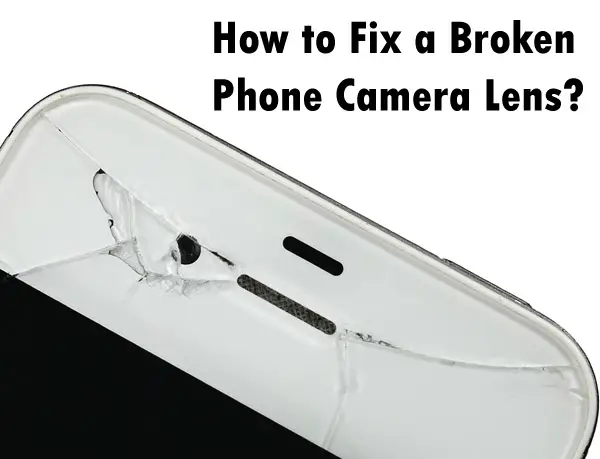
Looking to fix your broken camera lens? A damaged camera lens can prevent you from taking photos, videos, streaming or video chatting with your family scanning QR codes and a multitude of other everyday necessities. Its is not something to take lightly.
Fortunately, in this article we will discuss the many different ways to fix a damaged phone camera lens depending on the cause, damage type and lens type. Continue reading.
Let us start with solutions for scratches on a camera lens…
How to fix scratches on a phone camera?
Use rubbing alcohol
You can use a little rubbing alcohol to remove scratches on the camera lens. For your information, isopropyl alcohol (IA) is the main ingredient in rubbing alcohol. Most rubbing alcohol contains about 70% IA. However, do not apply alcohol directly to the camera lens as it may damage the lens. To continue, you will need a 3.5% alcohol solution. And you’ll need to mix 20 parts of water with one part of alcohol to get a smoother mixture.
Now take a clean cotton cloth and moisten it with the alcohol solution. Continuously rub the cloth over the camera lens. You will see the scratches fade away. Use a dry part of a microfiber towel to dry.
Use petroleum jelly
You can also use Vaseline to remove minor scratches on the camera lens.
Clean your camera lens with a fresh cotton cloth. Apply a very small amount of petroleum jelly to the surface of the lens, then gently rub it with a clean cloth until the lens is clear. While doing this, do not apply too much force and keep the corners of the phone grease-free.
Except for minor scratches, this technique is not always successful. Vaseline can reduce the severity of severe scratches and reduce their visibility.
Use a rubber
Use an eraser that hasn’t been used before. To start, gently move the eraser along the scratch on the lens. Continue doing this until the scratch starts to disappear. Use a soft cloth to clean the rest of the eraser. For more severe scratches, this technique can only reduce the appearance of the scratch. But it’s worth trying this method.
Use toothpaste
Toothpaste is a great way to remove scratches on a camera lens. Take a cotton swab and dampen it a little. Do not soak it in water. Apply a small amount of toothpaste and rub gently over the scratch. Do not apply excessive force to avoid damaging the camera lens coating. Wipe gently with a clean cloth.
Use bananas and baking soda
Here’s how to remove scratches from your camera lens using bananas and baking soda. Cut a peeled banana into three equal pieces. Soak the center part in baking soda. Now, use a wiping motion to brush continuously over the scratch. Continue for at least 2 minutes and change the direction of the fruit once the baking soda has been washed off any parts. Use a microfiber cloth to thoroughly clean the lens.
When you’re done, remove the banana.
Use a scratch remover or screen polish
Use the tip of a clean rag to take some polish, dab it on a flat surface, and wipe along the scratch. Wipe the screen with a fresh piece of microfiber cloth. Use the polish that has a protective nano-coating formula.
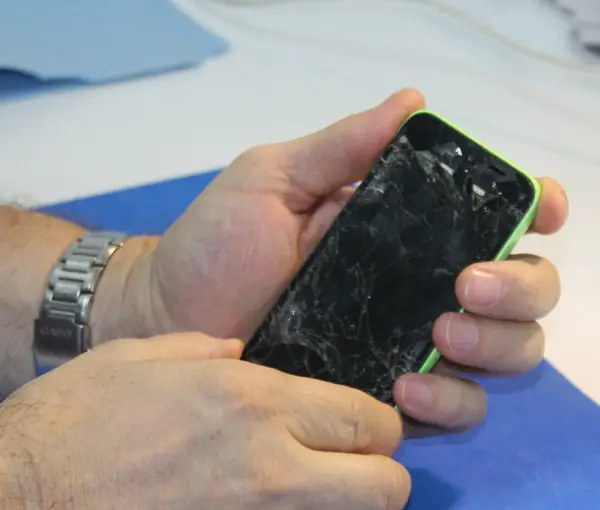
How to fix broken phone camera glass?
Check warranty status
Checking the warranty status of your device should be the first thing to do if you have a damaged phone camera lens. Your smartphone can be replaced or repaired if it is still under warranty. Call customer service or visit the device manufacturer’s website to check your warranty status. Otherwise it may be an expensive fix.
Self-repair
If your phone’s warranty has expired, you can try to fix the damaged phone camera lens yourself. You will need to purchase a camera lens replacement kit that includes tools to help you remove the damaged lens and install a new one. This is also dependent on whether you need to replace a front or rear facing camera lens.
Professional repair
You can take your device to a professional repair service if you don’t feel comfortable trying do-it-yourself fixes. Cracked lenses can be replaced by a qualified repairman who will restore your phone to normal working condition. Repair costs can vary depending on the cost of spare parts and the severity of the damage. This is also dependent on whether you need to replace a front or rear facing camera lens as front facing may involve the replacement of the phone screen.
Where to order parts?
There are a couple of options to take into account when deciding where to get camera lens glass replacement. The camera’s manufacturer is the best place to go for repairs since they have the knowledge and access to original parts. This can cost more money and take longer than other solutions, though.
Another choice is to visit a third-party camera repair store. These stores are experts in fixing cameras, and they could charge less than the manufacturer. Before selecting a repair shop, it is crucial to conduct research and read reviews to make sure they have a solid reputation and utilize high-quality parts.
Finally, depending on the store, some camera shops might provide repair services. It’s a good idea to inquire at the nearby camera store to see if they do repairs or can suggest a reliable repair shop.
What damages the phone camera lens?
Wear and tear
The phone camera lens may eventually stop functioning properly due to everyday use because use may result in scratches or other damage to the lens.
Water exposure
Exposure to water is another reason for phone camera lens damage. When water infiltrates the lens, it can cause it to become foggy.
Drops
Dropping or accidentally bumping the smartphone into a hard surface is one of the causes of the phone camera lens damage. The camera lens may develop cracks or scratches as a result, which could reduce the quality of the pictures.
How do scratches and cracks affect photo quality?
It all depends on the severity of the scratches and cracks. You may not notice a noticeable loss in camera quality if the damage is minor and doesn’t affect the camera lens directly. However, if the scratch or crack is large and obstructs the camera lens, it can lead to lens flare and blur.
Once the camera glass is cracked or broken, it is more likely that external elements such as dust and moisture will enter the lens. Dust on your phone’s camera lens can blur the videos and photos you take. If your phone’s camera lens is dirty, a quick brush with a lens cleaning pen will suffice. It is available in various shapes and sizes. You just need to use the correct size. Some cleaning pens have softer brush heads and some have thinner brush heads.
How much does it cost to repair the camera lens on an phone?
Depending on the phone model and the degree of damage, the price to repair an phone camera lens can vary, but it may likely be in the $100 to $200 range. It might be more cost-effective to replace the complete phone, though, if the damage is significant or the phone is older.
How to protect your phone’s camera lens?
Let’s look at some of the safety measures you can take to prevent the camera glass from cracking or getting scratched.
Keep your device away from sharp objects
If you plan to keep your phone in your pocket, keep it away from sharp objects, such as nails and keys, that can damage the glass. Also, if you often carry your mobile phone in your pocket, keep it free of small particles and sand.
Use a protective case with raised edges
Using a protective case with a raised frame is one of the best ways to protect the camera lens on your smartphone. A raised bezel is a slightly protruding edge or ledge on the top of the phone and acts as a barrier between the camera lens and any potentially flat surface it may come in contact with. This can prevent cracks and scratches that can affect the quality of your photos.
Furthermore, pay attention to the environment when using your device. For example, consider using a filter or protective case if you are shooting in a sandy or dusty environment to prevent dust and other particles from entering the lens.
Screen protector
Screen protectors can help prevent scratches on your screen and lenses. A tempered glass screen protector adds an extra layer of protection to your smartphone screen. Moreover, they can protect the camera lens thats on the screen side of the phone from cracks and scratches. These screen protectors are made from unique glass that is stronger and more durable than regular glass.
Camera maintenance
Take care of your camera lens. If dirt accumulates on the lens, wipe it off. keep your phone away from any chemicals. Every now and then take your phone out of its case and clean it thoroughly.
One last thing….
Keep your device software up to date. Smartphone manufacturers often roll out updates with security patches and fixes that can help protect your mobile phone from malware and other dangers. Make sure you only download apps from reliable and trustworthy sources. Click on the following link to learn how to make phone camera quality better.
Sony has just updated their popular 70-200mm f/4 G OSS with a new version that adds better close-focusing capabilities, faster autofocus, and more. With a 1:2 magnification throughout the entire zoom range – and support for Sony’s teleconverters – you can turn this lens into a 1:1 magnification 140-400mm zoom by simply using Sony’s 2x TC! Here’s what we know about the lens so far.