Billed as a crossbody bag, the Think Tank SpeedTop 10 and SpeedTop 15 bags can be slung over the shoulder, worn bandolier-style, or worn on a belt. But the list of attractive features doesn’t end there.
 Think Tank has added another pair of workhorses to its stable, this time in the form of crossbody bags. Crossbody is the safest way to carry expensive gear in questionable situations. Think Tank enhances the security aspect via covert styling, forward-opening top lid and a sturdy metal latch that secures the contents. It also features a neodymium magnetic lock that clamps the lid closed without fumbling and provides near-silent gear access.
Founded 17 years ago by Doug Murdoch, Mike Strum, Kurt Rogers and Deanne Fitzmaurice, Think Tank immediately became known for high quality photo bags carefully designed to fulfill the needs of photographers everywhere. Legendary for toughness, practicality and first class construction, Think Tank camera gear quickly became the personal choice of many working pros.
Key Features
The SpeedTop 10 is ideal for a small mirrorless system or a trio of lenses. The SpeedTop 15, about three inches longer and one-half inch taller, can also accommodate compact drone gear and larger lenses. Shutterbug evaluated the SpeedTop 10 specifically, but nearly everything said applies to the larger model as well.

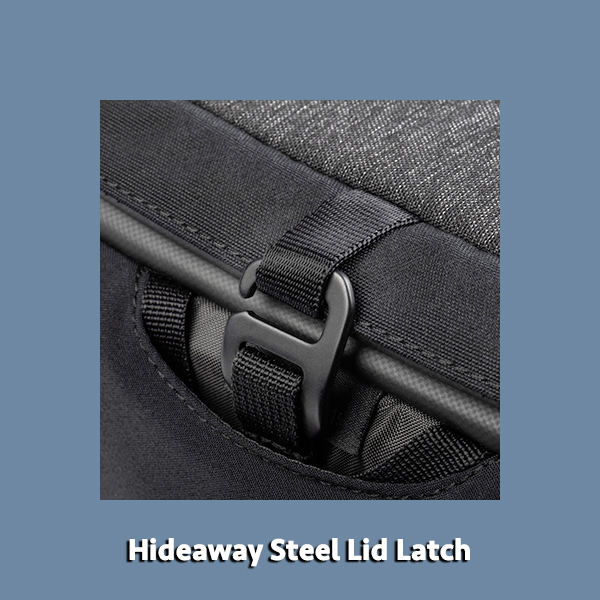
The neodymium magnetic top lid is the big story. It opens away from you, with the hinge in front, and the contents can be accessed easily with one hand. The lid can be secured with a steel latch that can be concealed if not needed.
The nonremovable shoulder strap features a pair of QuickCam adjustable buckles and has a built-in cushioned pad. The quick-adjusting strap facilitates wearing the SpeedTop conventionally over the shoulder or across the body like a bandolier. The SpeedTop can also be worn on a wide belt (like the Think Tank Modular Belt) thanks to a belt pass-through on the backside.
The top lid of the Think Tank SpeedTop 10 is gently sloped and features a grab handle in front plus a small loop at the rear. The inside of the lid has a large mesh pocket and below it a hidden pocket that’s secured magnetically. The hidden pocket has two small pouches to segregate small items like memory cards or batteries.
The fabric bottom is level and sits steadily on a table or other flat surface. On either end there is an expandable pocket that can be cinched tightly with a half-inch strap.

Inside we find a set of removable, adjustable, closed-cell foam dividers that offer adequate protection for the contents. Think Tank delivers the SpeedTop bags with a seam-sealed rain cover packed inside, too, in case inclement weather prevails.
The exterior of the Think Tank SpeedTop bags is made from abrasion-resistant Cordura that sports a DWR (durable water repellent) coating. The color is black with a subtle gray-on-black pattern in the center and on the bottom.
Specifications
SpeedTop 10
Exterior dimensions: 9.8 x 8.9 x 5.5 inches (25 x 22.5 x 14 cm)
Interior dimensions: 8.5 x 7.3 x 3.9 inches (21.5 x 18.5 x 10 cm)
Weight: 1.3 pounds (0.6 kg) including dividers and rain cover
SpeedTop 15
Exterior dimensions: 12.6 x 9.3 x 5.5 inches (32 x 23.5 x 14 cm)
Interior Dimensions: 11.2 x 7.9 x 3.9 inches (28.5 x 20 x 10 cm)
Weight: 1.8 pounds (0.8 kg) including dividers and rain cover
SpeedTop 10 In the Field
Flip the lid open by overcoming a comfortably strong magnetic catch and retrieve what you need—then move your hand and the lid cleanly snaps back shut. Very cool. And very secure. If you want to button it up tighter, simply lock it down with the hideaway steel latch. This setup worked perfectly for me every time. I like it. It’s faster than a zipper and more reliable than a standard lift-up lid.
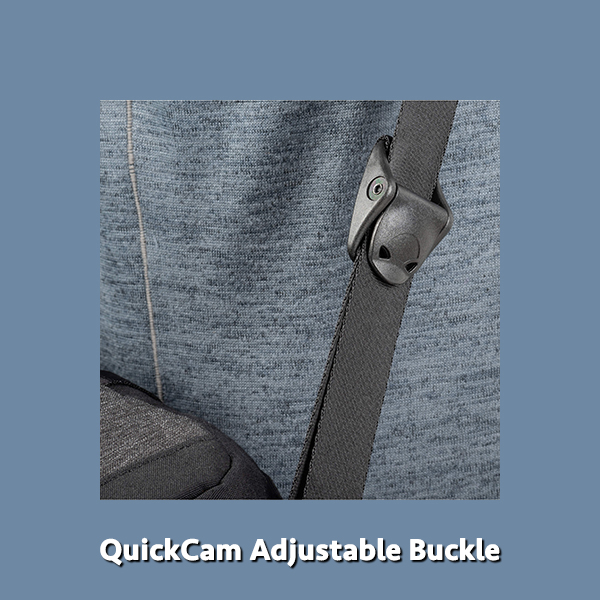
The two QuickCam length adjustment buckles on the inch-wide shoulder strap operate easily and fast. The ability to change the strap length without unshouldering the bag expedites switching from shoulder carry to crossbody. It’s also handy if you want to just tweak the length to find a more suitable carrying position. I did not use the Think Tank SpeedTop 10 as a belt pack, but I’m well familiar with the arrangement as a long-time Think Tank Modular Belt user and think it would be excellent in that configuration.
The expandable pockets on either end unfold to accommodate larger items like a shoe-mount flash or half a sub from Jersey Mike’s. The pockets can be cinched tightly with the built-in strap and are held flat by magnets when not in use.
I’m enthusiastic about the overall cosmetic appearance of the SpeedTop bags, although I wish the two-tone color scheme did not extend all the way through the bottom (I’d rather have a weather-resistant skid plate underneath), and I prefer detachable straps because they can be replaced.
My only serious gripe about Think Tank’s SpeedTop 10 goes to the interior dividers. They’re thick and protective enough, and the hook-and-eye tabs stick like a bear. There are two very small dividers, one mid-size and one large. It would be much easier to arrange gear inside if at least the largest divider were hinged near the middle so it could fold sideways. That layout would accommodate a camera body with lens and at the same time protect another lens under the folded section.

Conclusion
Think Tank has done it again. But that comes as no surprise from a company that enjoys a strong record of success stories. Compared to many small bags, the SpeedTop 10 is a battle tank, ready for rough treatment and committed to providing a comfortable carry solution for hours on end.
Price and Availability
Backed by Think Tank’s Limited Lifetime Warranty, the SpeedTop 10 is available now. Order from Think Tank or from Amazon for $129. Or visit the Think Tank store at amazon.com.
The SpeedTop 15 available for $149 from Think Tank, or you can order from Amazon.
How to Choose a Bag
How does one decide the best camera bag for their individual needs? In an article we ran a couple years back (link here) we listed 10 characteristics to consider when determining the right camera bag for you. This approach might also suggest some options you never thought about. The list is arranged in no particular order because what’s important to me may not be important to you at all, which is a significant fact of life when camera bag shopping.
Become a Member of the Shutterbug Community
Register for a free account. Sign up for our newsletter. Spend five minutes (or less) uploading your best shots once every week or so. Potentially become a Photo of the Day winner. Enjoy viewing the fantastic work being done by thousands of photographers all over the world—and add your images to the enduring collection.
—Jon Sienkiewicz
(As an Amazon Associate, Shutterbug earns from qualifying purchases linked in this story.)