Use Selective Color in Lightroom to Create This Unique Effect (VIDEO)
Lightroom’s Selective Color tools enable you to target and adjust specific colors independently of one another to accentuate or deemphasize certain elements within the frame. In this tutorial from one of our favorite post-processing experts you’ll learn a unique twist on this technique for transforming a color shot to b&w while retaining colors in the main subject of the shot.
Instructor Anthony Morganti is a NY-based photographer, workshop instructor, and professional retoucher with more than 400K subscribers to his globally popular YouTube channel, and in this episode he demonstrates a unique twist to the hybrid b&w/color transformation mentioned above.
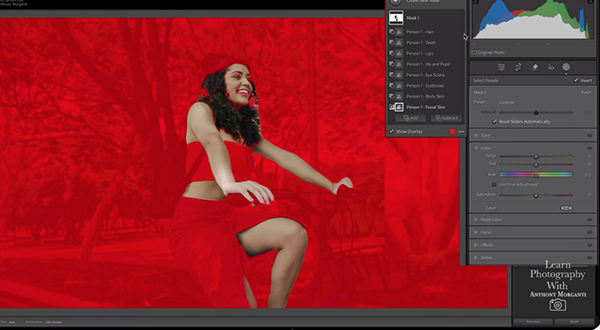
His goal for the demonstration photo of a woman riding a bike ride is to retain color in the subject and convert the rest of the scene to monochrome, but he does so in a way than differs from the typical approach. He explains the effect like this: “Typically, every part of the subject is in color, including their clothing,” but with this trick only the model’s hair, eyes, and skin retain the colors of the original shot.

Morganti recommends making all the basic edits to your original at the onset and saving the Selective Color modification until later in the process. Masking is used to separate the cyclist from the background. He clicks on People in the Masking panel where you’ll find several options for refining the selection, and he enables all of the parameters except Clothing.
The next step is inverting the mask because that’s the part that’s going to be in color. At this point the selection may appear imperfect, but Morganti demonstrates how the Subtract option enables you to quickly make refinements as needed. He also describes the best settings to choose for the various variables at your disposal.
Morganti is working in Lightroom Classic for this demonstration, but the method works equally well in the Cloud version of Lightroom and Adobe Camera Raw (ACR). The remaining steps are straightforward so we’ll let Morganti explain how they work.

Once the video concludes pay a visit to Morganti’s instructional YouTube channel where you’ll find a wealth of how-to videos that will greatly elevate your skills.
And don’t miss the earlier tutorial we featured with another post-processing specialist who demonstrates how to get the light right in outdoor photographs with a simple exposure-blending technique that’s appropriate for users of all skill levels.


