
Want Epic Outdoor Photos? Add Depth & Dimension with Simple Masking (VIDEO)
If you’re looking for a way to transform flat landscape photos into spectacular images that almost appear three-dimensional, today’s Lightroom tutorial from the PHLOG Photography YouTube channel will quickly get you where you want to be. In barely 15 minutes you’ll learn how to apply simple masks to add depth and dimension to all your outdoor photos, while retaining a realistic Look.
Instructor Christian Mohrle is recognized as one of Germany’s premier landscape and seascape photographers. He’s based in the south of the country near Lake Constance, and his post-processing tutorials are highly regarded by Shutterbug readers.
Masking can be as simple or complicated as you make it, and the approach you’ll learn today is quick, easy and effective. This 15-minute episode demonstrates how to accentuate foreground and midrange elements in the frame with selective adjustments to color, shadows, and highlights, and add drama to an overexposed sky.
As always, Mohrle provides a link beneath the video for downloading his demonstration Raw file so you can follow along and make the adjustments as they’re explained. He always begins edits with a few basic global adjustments to prepare an image for the local enhancements that follow.
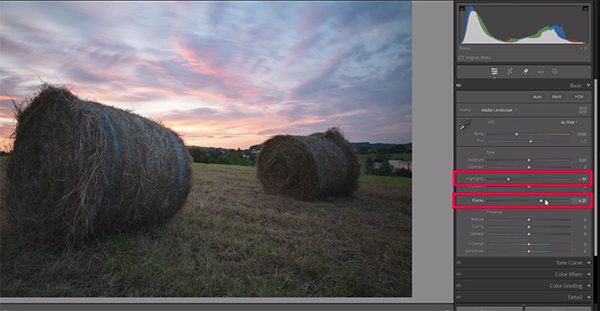
The goal is to accentuate the large hay bales in this interesting shot by brightening them up to separate them from surrounding areas, the background, and eye-catching sky. Preliminary modifications begin in Lightroom’s Basic panel by changing the Profile from Adobe Color to Adobe Landscape. Doing this immediately boosts Saturation and slightly opens up the bales to reveal more detail.
Other global adjustments include dropping highlights to enhance clouds in the overexposed sky and brightening shadows in the lower half of the frame. These two simple enhancements reduce overall contrast to give the base image a soft, dreamy look. Mohrle also warms up the shot by slightly modifying White Balance in a way that doesn’t bias blue tones in the sky

Mohrle further enhances detail by increasing Texture while reducing Clarity to maintain the soft feeling mentioned above. After a quick boost in Vibrance, the fun part begins with selective adjustments using simple masks for a very impressive transformation. And he walks you through the step-by-step process.
The lesson concludes with thoughtful color grading, sharpening, and a bit of cleanup in Photoshop. The power of this straightforward technique is readily apparent as soon as you compare Mohrle’s before/after images. There are other transformational techniques on Mohrle’s YouTube channel so be sure to take a look.
We also urge you to watch the tutorial we featured recently with another accomplished pro who demonstrates a handful of mind blowing hacks that solve Lightroom’s frustrating Clone tool limitations.


