3 stunning strawberry vases to shop now if you missed out on The Range’s TikTok viral sensation
Strawberry season is every season
Here’s a quick tutorial that demystifies the process of focus stacking; a technique many photographers avoid because of conventional wisdom that the technique is overly complicated to get right. In fact, it’s super easy if you follow the straightforward tips below.
Instructor Jalen Oban describes the essential principles of this powerful method that enables you to achieve maximum sharpness from foreground to background and everything in between. It’s a technique regularly used by experienced landscape shooters, and Oban guides you through a simplified step-by-step process in barely seven minutes.
Oban’s approach may be easy but it’s a structured technique that delivers very polished results, and he ensures that you won’t skip any critical steps. He covers everything from shooting on location to processing the images in Photoshop.

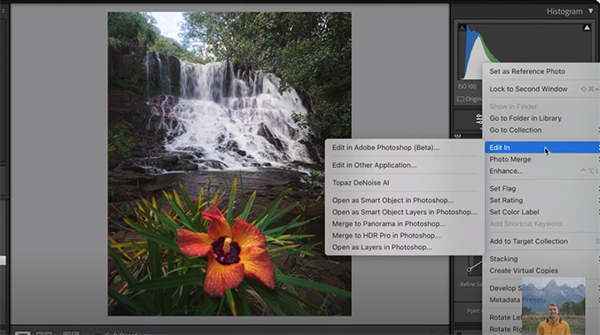
Put simply, focus stacking involves merging multiple images of the same scene, each with a different point of focus. Oban pulls up a beautiful landscape image captured in Hawaii that relies upon focus stacking for its dramatic impact. The challenge is that there’s a vibrant hibiscus bloom a few inches from the camera, with an eye-catching waterfall far off in the distance
Both of these elements are critical to the scene and there’s really no way to keep both critically sharp with a single shot in the camera. In this instance only two images were required to get the job done, because the midrange of the scene is devoid of important details. Thus, Oban captured one photo focused on the hibiscus and a second with the focus point on the waterfall.
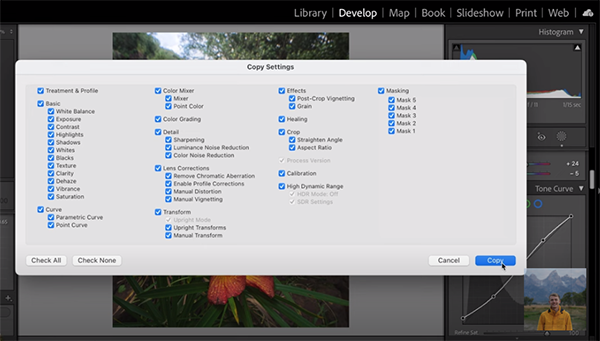
The edit works like this: You choose one of the shots and make whatever adjustments are necessary to the entire shot, like correcting exposure, contrast, and color enhancements. This is when you’ll also add a vignette if that’s part of your plan. Then you’ll learn how to copy these effects to the second photo in the sequence.

Now both images will look exactly the same, other for the different points of focus. Oban also provides a few tips for shooting these images properly for the stacking process that follows, the most important of which is to not move the camera before the first shot and others in the sequence.
As you’ll see, the image-blending procedure is surprisingly simple, as long as you load the photos into Photoshop as separate layers. Just follow Oban’s straightforward instructions and we guarantee that you’ll like what you see. There’s more to learn on Oban’s new YouTube channel, so pay a visit and check out.
We also recommend watching a tutorial we posted recently from another accomplished landscape photographer who explains how to avoid five landscape photography image-killing mistakes.
Most of us have shoeboxes full of old family photos, many of which have scratches, creases, faded colors, and other unsightly problems. Rehabilitating these precious memories has always been a difficult and time-consuming task—until now!
The tutorial below from the PixaGraph YouTube channel is all about using Photoshop’s new AI-powered Neural Filter that automatically restores old photos and delivers amazing results. After watching the video below you’ll want to dig out all those damaged photos and get to work.
Instructor Jeetandra Mishra is the founder of the channel that’s a great resource for post- processing techniques. In this episode he puts the filter to the test, explains how to get it, and also discusses how to use it in combination with Photoshop’s Remove tool. Best yet, all this takes barely three minutes to explain.

To get started you’ll need to go to the updated version of Photoshop Beta that includes all the latest features—including this powerful restoration filter. Then open the image you want to repair and make a copy of the layer. Next, click on the Filter tab atop the screen , choose the Neural Filters option, and turn on Photo Restoration at the bottom of the panel that appears.
Now you’re ready to go, and Mishra begins by increasing the value of Scratch Reduction to remove all unwanted lines. He then explains other key settings that can be extremely helpful, depending upon the condition of the photo at hand.
Mishra demonstrates how to effectively employ Photoshop’s AI-powered Remove Tool to refine your results once the neural filter works its magic. He provides an interesting example with his demonstration portrait by zooming in on one of the subject’s eyes. As you’ll see, there’s an unwanted line that he quickly removes while maintaining the shape and other elements of the eye.

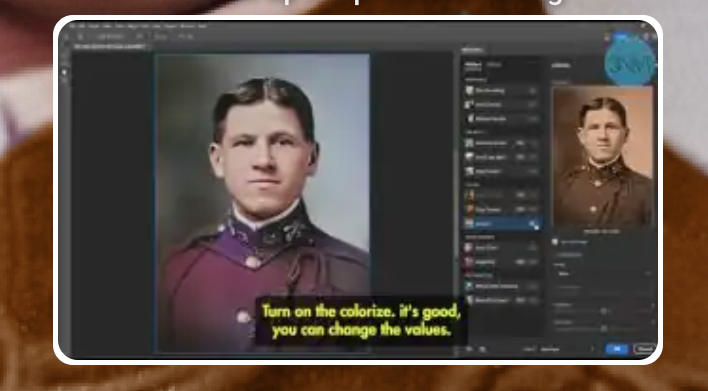
There are a few other tricks to learn, including how to instantly remove stray hairs and use Generative Fill to reconstruct missing areas. You’ll also see some incredible enhancements that occur as soon as you turn on the Colorize feature.
In this example Mishra changes the color of his subject’s uniform, enhances skin tones, and colorizes a number of other elements as well. It’s hard not to be impressed by the speedy results he achieves. After watching this lesson pay a visit to Mishra’s instructional YouTube channel for more interesting lessons like this one.
And be sure to watch the tutorial we posted recently from another image-editing expert who demonstrates how to give photographs a unique, stylized look with Photoshop’s “vintage” Threshold tool.
