Stacey Solomon’s spring collection with George Home nails this season’s prettiest colour trend
It’s a new spin on her much-loved neutral palette
Sometimes you shoot a color image and realize it would look more compelling by converting it to b&w because of the potential for awesome contrast and other characteristics within the scene. Today you’ll learn why you should avoid the common amateur approach, and use a method favored by a top pro that is still simple to accomplish.
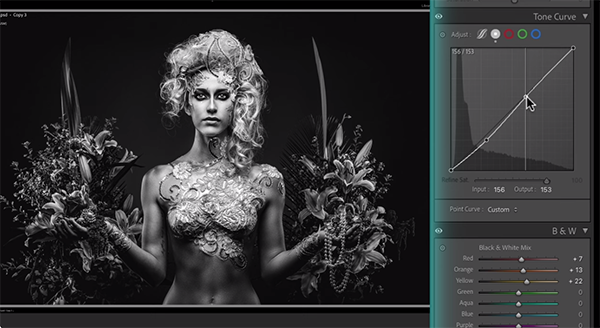
Instructor Doug Hall is an Australian professional who says, “I love b&w photography,” and credits his compelling imagery to the fact that he’s a very accomplished visual storyteller. In this 10-minute episode he urges you to avoid the easiest method of converting color photos to b&w, and Hall demonstrates the much more effective (and still very straightforward) approach he uses in Lightroom to get the job done.
The easy way out, typically employed by inexperienced Lightroom users, is just clicking on the Desaturate and then grabbing your morning cup of coffee. That’s about as fast as it gets, but there’s a much better way if you’re interested in superior results.

Hall’s method isn’t the only option available but it works really well to tailor the effect to a specific image. By following his advice you’ll be able to imbue the conversion with whatever style that you prefer. Hall pulls up a colorful portrait and illustrates how it looks after using the one-click “amateur” approach. Then he compares the uninspiring result to the same photo converted with his professional technique.
Hall first duplicates the image because he never works on originals. He then takes the amateur version and makes a few minor adjustments in Lightroom’s Develop module to the image as a whole. The color version was already edited so there’s not much to do other that boosting contrast, dropping highlights, increasing Texture and Clarity, bringing up shadows, and modifying blacks and whites.
The image now looks much better, but there’s more work to do. Halls jumps to the B&W Mix panel and uses simple sliders to adjust the tones of various colors. Now it time for Curves adjustments and a bit of Dodging and Burning that enhance the shot even further—paying particular attention to skin tones, edges, details and “muscle tone.”

The transformation is now complete, and if you compare the amateur and pro versions we’re confident of this: if you make b&w conversions it pays to spend a few minutes to get the job done right. There’s much more to learn on Hall’s instructional YouTube channel so be sure to pay a visit.
We also encourage you to watch the tutorial we posted with another serious pro, explaining a new way to eliminate noise from all the photos you shoot in the great outdoors.
If you’ve never used Photoshop’s Liquify tool to manipulate an image or create unique effects, now’s the time to give it a try. The following guide from the How to Use YouTube channel demonstrates everything necessary to start using this technique today.
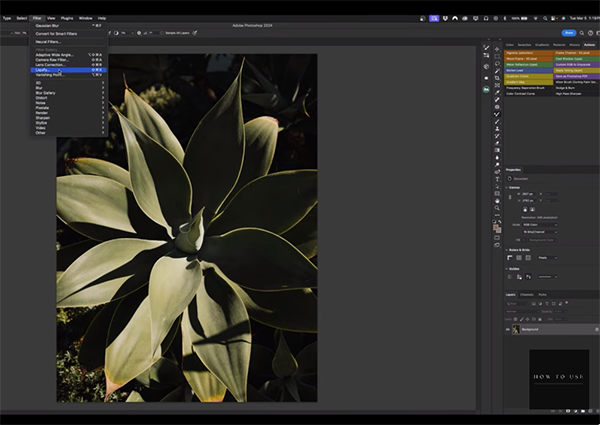
Adobe explains the interesting filter like this: “Liquify lets you push and pull pixels like they’re water to move elements very slightly in one direction or another.” In practical terms this enables you to accomplish subtle retouching tasks like smoothing out wrinkles in clothing or fixing rough edges. You can also use the tool to tweak facial features in portraits—or as with this lesson, modify the shape of a plant.
In essence the Liquify filter is a distortion tool, and instructor Nathaniel explains how it works in less than four minutes. He pulls up an image and gets right to work by clicking on Filters atop the screen and choosing the Liquify option from a dropdown menu that appears.

For his first basic example Nathaniel uses the Pucker tool to shrink the center portion of the plant. If you don’t like what you see, simply revert to the original image by clicking on Restore All. It’s easy to further modify a portion of the image, like one of the leaves, with Photoshop’s Forward Warp tool to push an element one way or another, as well as enlarge or shrink it in whatever way you desire.
Nathaniel says he often takes this approach for subtle adjustments that make an image “more esthetically pleasing,” and sometimes these small moves make a big difference in the impact of a photo. He then explains a couple more tools that are very effective for further enhancing your results.
One of these, for example, is the Restructure tool. Nathaniel explains that with this approach “Photoshop takes its best guess as how the image should look.” Clicking on Preview lets you examine the before/after effect. And, once again, it’s possible to Restore and try something else if you don’t like the result.

As you’ll see, this is just the beginning and there’s much more you can do, like swirling the image with the Swirl Clockwise tool. Nathaniel urges you to not go overboard with this effect if a natural-looking image is your goal.
There’s much more to see on the How to Use YouTube channel, so be sure to pay a visit when you have time to explore.
We also suggest watching the recent tutorial we posted from another image-editing expert who demonstrates how to harness the power of Photoshop’s two new Gradient modes.
When you’re out and about with nothing but your iPhone and come upon a striking scene, this tutorial from the iPhone Photography School provides the “exact blueprint” for capturing breathtaking imagery. It’s all about choosing the appropriate camera and app settings so you never miss a great opportunity again.
Today’s instructor Tom is a professional photographer who says he often shoots with his iPhone and achieves impeccable results. He kicks off the episode with this promise: “Whether you’re capturing sunsets, portraits, landscapes, or everyday moments we guarantee that you’ll never see your photos the same way again.” In other words, no more missed opportunities.
Tom uses his new iPhone 15 Pro to demonstrate the camera settings he recommends, but much of what you’ll learn applies to older devices as well. He also explains several key settings on Apple’s iPhone Camera app that will assist you in creating incredible imagery.

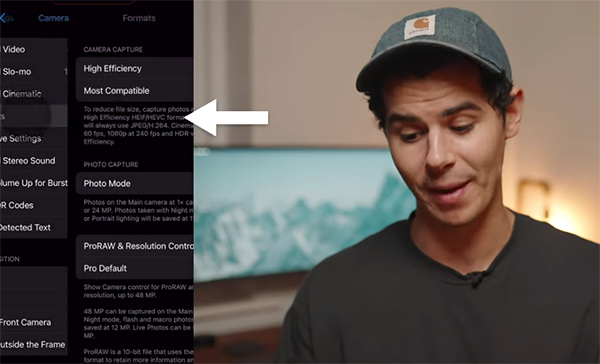
Along the way you’ll gain a better understanding of the best formats for different type of shots, and how to choose between high-efficiency and JPEG formats to save space without sacrificing quality. He also explains the concept behind ProRaw and how to employ this mode to for unparalleled image quality and post-processing flexibility.
There’s more to this lesson than camera and app settings, however, because Tom also reveals other camera tools and shooting techniques. He provides very helpful advice on composition that will enable you to frame your shots perfectly every time.
Tom ignores the iPhone’s video capabilities in this lesson and concentrates solely on configuring the phone for still photography. These options appear lower down on the Camera Settings page. Tom says that Format settings are extremely valuable because “it’s where you control “massively important” image characteristics like Resolution.

Resolution is particularly key because of the small sensors in your phone, as compared to those in the “real camera you left at home. You’ll also see how Tom shoots in Raw and the techniques he employs to edit these files for maximum impact.
Another important discussion has to do with the iPhone’s Preserve Settings feature. This is because it’s one thing to configure the camera, and quite another to save your settings so that they’re always at your fingertips for every shot.
The foregoing is just one small taste of the all the “essential” iPhone and app settings covered in the video, so be sure to watch until the end. Then take look at the iPhone Photography School YouTube channel where you’ll find a wealth of tips and tricks for improving your mobile photography.
