This JYSK shelf is going viral on Instagram as a clever solution to neatly display mugs in a kitchen
It’s both functional and beautiful
Today’s very helpful Lightroom tutorial begins with this quote from one of our favorite young photographers Austin James Jackson: “I’ve seen enough Lightroom catalogs to know that there are a lot of people who struggle to organize. In this video I’m going to help you solve that problem.”
So here’s the deal: If you’re late with spring cleaning, it’ time to sort out your mess. Jackson is a Utah-based landscape pro whose photographic wisdom belies his age. In this timesaving episode you’ll learn how to efficiently and effectively organize a sloppy Lightroom catalog through the use of collections and smart collections—and even how to import your photos into Lightroom Classic.
Jackson promises that by following the steps he recommends, “you’ll avoid missing images, trouble finding photos, and frequent headaches while navigating your Lightroom catalog.” Jackson begins with an important reminder that Lightroom doesn’t actually store any of your photos. Rather, it just holds on to the previews and keeps track of the locations where the actual images are kept.

So if you get a message indicating “the original file can’t be found,” that means you may have made a mistake when you told Lightroom where the original image lives. And in this case the preview in Lightroom won’t do you much good.
As you’ll see, Jackson’s external drive contains three primary photo folders: One he uses for YouTube, another for Instagram, and a third that’s labeled “Lightroom.” Jackson explains why he recommends keeping the all-important Lightroom folder on a portable drive rather than on the internal drive of your computer.
The key is to make sure that your Lightroom catalog resides within this Lightroom folder on the external drive. Of course this is just the beginning because most of you will want multiple images folders, as well as folders within folders, depending upon what types of photos you shoot and how they are identified.
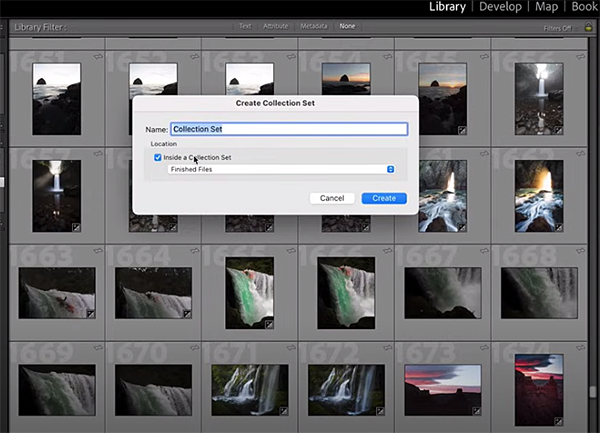
So you may have one Folder labeled “Travel” with subfolders inside for each of the destinations you visit. Likewise wildlife photographers my organize folders by species. Jackson describes “the problem with folders” so you do all this in the proper way.
You’ll also learn about the difference between Collections and Smart Collections and pick some solid advice for properly deleting images. So pay close attention, take a deep breath and a few notes, and then clean up you Lightroom mess before you run into a jam.
Jackson’s popular YouTube channel is full of helpful shooting and post-processing tricks, so be sure to pay a visit and see what’s available. We also recommend watching an earlier tutorial we posted, demonstrating how using Lightroom’s Auto settings can save the day (and a lot of time).
There’s a lot of hype about the “superiority” of full-frame cameras these days, and it’s important to separate the marketing chatter from the difference in sensor size as pertains to your particular style of photography. If you’re thinking about “stepping up” we encourage you to watch this video before making the switch.
Instructor Vlad Manea is a Romanian pro based in Germany whose straightforward tutorials are geared toward novices and evolving photographers. In this episode he explores a variety of sensors sizes so you can make an informed choice on an upgrade—or keep the camera you already own and use your cash to invest in better glass instead.
Most discussions on this topic limit their focus to a comparison of full-frame vs. APC-C sensors, but Manea takes a more comprehensive view and includes other sensor sizes as well. After all, there are excellent shooters (some of them pros) who use micro four thirds (MFT) to capture their spectacular imagery.
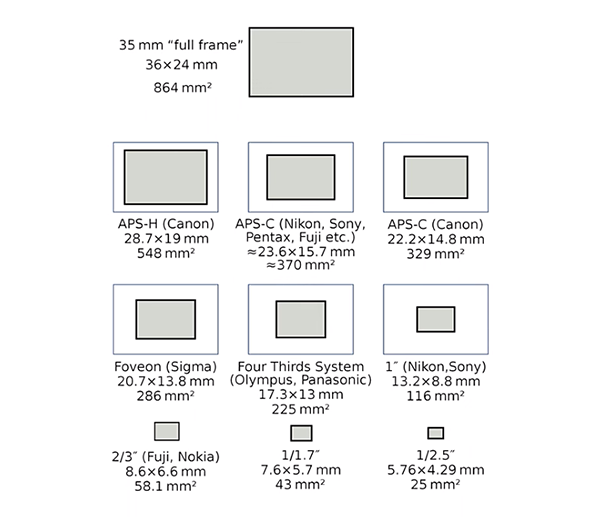
And what about high-end compacts with one-inch sensors, or medium-format cameras with sensors that are much larger than full-frame. And even though it may be difficult to admit, it’s possible to capture beautiful photographs with a camera phone—despite its tiny sensor.
The bottom line is that the choice you make has a lot to do with the type of photos you shoot most. Landscape photographers, for example, gravitate to cameras with the largest sensor they can afford, while sports shooters, photojournalists, wildlife photographers and other are often more concerned with burst rate and processing speed than sensor size.
Budget is another consideration because full-frame (or larger) models are typically more expensive, as are the lenses these cameras require. And if you don’t own a juiced-up computer, the larger files captured by full-frame models can really bog down the image-editing process. Storage limitations also factor into the equation.
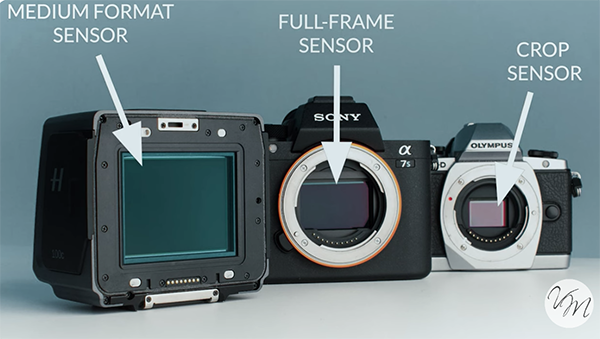
If you do a lot of strenuous hiking in the backcountry, lightening your load and the size of your pack can be a critical concern that may rule out a big, hefty full frame camera. And even photographers who own high-resolution full-frame models often prefer a full-featured, pocketable compact when traveling or on vacation.
By now it should be clear why many of us own more than one or two cameras; namely because there’s no one model that will do it all. So pay attention to Manea’s advice and remember this: What you want and what you really need, aren’t always the same.
Manea’s popular YouTube channel contains many more valuable insights like these, so be sure to take a look.
And for all you mobile photographer out there, don’t miss an earlier tutorial we posted that explains the best camera and app settings for capturing stunning photographs with an iPhone.
Many photographers shoot in Raw rather than Jpeg for a variety of reasons, not the least of which is that this unprocessed format captures the maximum of detail. Another advantage is the greater flexibility Raw files provide during post-processing.
If Raw is your file format of choice you may have noticed that colors may appear flat and dull straight out of the camera. There are a variety of methods for restoring photos to their original hues, some more complicated that others, and this tutorial from the PHLOG Photography YouTube channel demonstrates a quick and effective method for getting the job done to perfection.
Instructor Christian Mohrle is a German pro specializing in landscape photography, a genre in which accurate color is an essential component of every great shot. We encourage you to download Mohrle’s demonstration photo with the link beneath for video so you can follow along in real time—making the changes yourself as they’re explained.
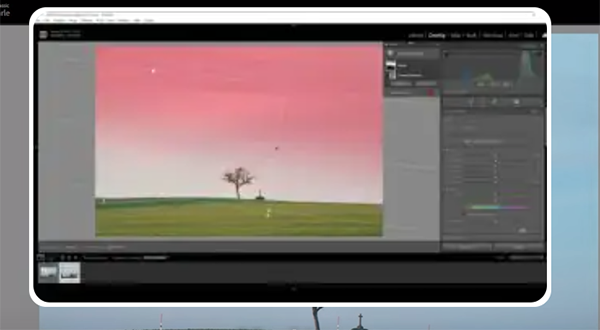
Mohrle recommends starting an edit with basic global adjustments to best prepare the image for the selective masking, color grading, and sharpening enhancements that complete the task. Mohrle explains why the sample photo looks so dull: “It almost looks like a black-and-white image because I was using a strong ND filter to be able to create a long exposure.”
The preliminary adjustments begin in Lightroom’s Basic panel where Mohrle changes the profile from Adobe Color to Adobe Landscape, and this immediately boosts base saturation. Unfortunately there’s an unwanted blue cast that you’ll see how to fix by playing around with White Balance settings using the Tint and Temperature sliders. He also adjusts exposure, contrast and other variables to balance out tones in the entire image.
Now it’s time to for selective enhancements targeting specific portions of the scene in various ways with careful masking. Masks are applied to bright and darker areas of the sky, as well as to the foreground and other portions of the shot.
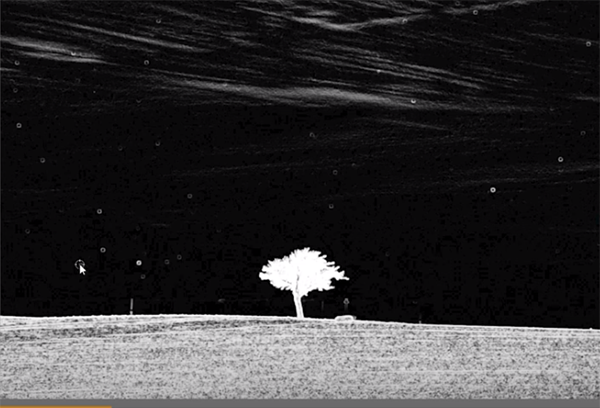
The image is now far more compelling and the next step involves using Lightroom’s Color Mixer to further accentuate colors while retaining a realistic look. This is a simple task once you determine exactly how you want the image to appear. The tutorial concludes subtle sharpening and a bit of final cleanup.
Mohrle’s instructional YouTube channel is a great source of information for outdoor photographers of all skill levels, so pay a visit when you have time to explore.
We also suggest watching the related tutorial we posted with another expert who offers a great method for editing sunset photos so they look just as spectacular as they did through the viewfinder.
