
3 Standout Features in the Lightroom Classic Update Version 13 (VIDEO)
Adobe recently updated Lightroom to version 13, adding a bunch of new capabilities and workflow enhancements. Rather than overwhelm you with a detailed analysis of everything that’s included, today we’ll take a look at what one expert says are three standout features.
We often turn to image-editing expert Anthony for his professional expertise whenever new software is introduced. For this episode he dug through “lotsa stuff” to identify and explain a trio of new Lightroom Classic features that he finds particularly useful. Morganti prepared this report using a pre-release version, so what you see may look a slightly different than the official release.
Morganti says that much of what’s new in Lightroom Classic v.13 is relatively minor, and we’ll save that for a future lesson. In this video he concentrates on three major new additions, demonstrates two of them in depth and providing an overview of the third until he’s had more time to take a deeper dive.

The first prominent feature is something called “Lens Blur,” and he pulls up a photo of a romantic couple embracing on the trolly tracks (something we wouldn’t advise doing if you’re concerned with your (or your partner’s) safety. Morganti explains that an image like this with a strong subject is a perfect choice for this new tool—especially if you don’t like how the background is blurred in your original shot.
The Lens Blur tab is found in the upper right corner of the Develop module, and it’s very easy to employ. All you have to do is click a small box, and then Lightroom will quickly examine the photo, identify the subject(s), and automatically blur the background in an instant. Morganti provides before/after example so you can see the impressive results.
Lightroom by default sets the Blur slider to a value of 50, but you can lessen or accentuate the affect at your whim by moving the slider in either direction. This means you have total control of the bokeh in the shot. Another reason this image is such a good example is because of the pointed light sources within the frame, and Lightroom includes additional control of exactly how these out-of-focus highlights appear.
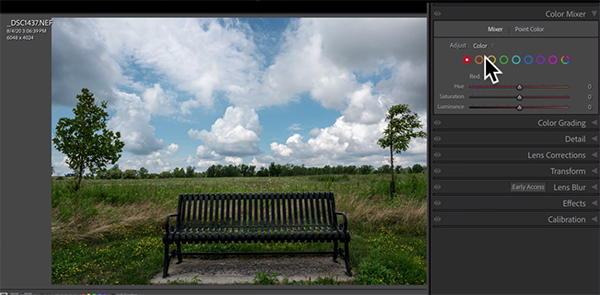
The second feature that Morganti deems worthy of discussion is a new Color Mixer that replaces the earlier HSL Color tab, and it appears in the same place. All of the controls that were in the previous tool are available in the Color Mixer, so there’s nothing you’ll miss. But Adobe added more control and flexibility.
The primary addition is what Adobe calls “point color,” and Morganti demonstrates how this works to enhance a landscape scene with a bench in the foreground. As he says, “this feature is a better way to get a targeted adjustment.” This tool can be used with the Eyedropper to click on any color in your shot. Then you’ll see a swatch of that color in the panel that can be modified by dragging sliders for Hue, Saturation and Luminance.
Morganti goes into considerably more detail on taking advantage of these two new features. Then the lesson concludes with an overview of the third. Be sure to check out Morganti’s popular YouTube channel, as well as another tutorial we posted that explains how to improve outdoor photos with a fast Dodge and Burn Lightroom technique.


