
6 Photo Tips to You Get Started or Make You Better
Improving your snapshots or transitioning from a smartphone to a digital camera is easy if you follow these tips.
A friend of mine recently stepped up to a high-end Canon point-and-shoot digital camera, a PowerShot SX600 HS to be exact. It’s not a new model, but it features a 16-megapixel CMOS sensor, superb 18X, 24-450mm zoom (35mm equivalent) with Image Stabilization, Smart Auto with 32 scenes, Wi-Fi connectivity and a handsome 3-inch LCD. It also has a Creative Shot mode of limited value, but that doesn’t detract. In short, it is fully-featured.
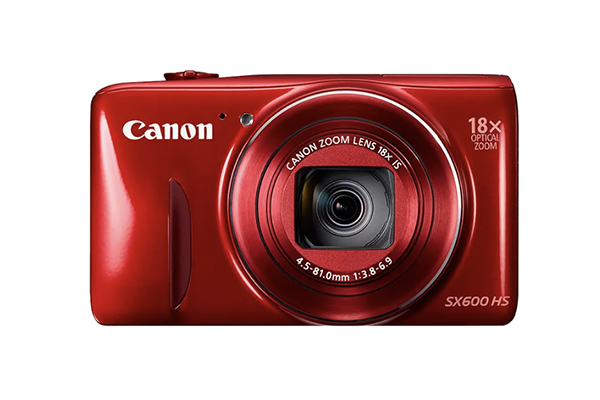 I’ve used this particular Canon model and gotten excellent results, so my advice is based on experience, not theory or generalizations. Moreover, I know the camera is capable of creating stunning images with very little coaxing.
Initial Camera Settings
If you’re relatively new to digital photography, or if you haven’t used your camera for a while, make sure the battery is fully charged and the camera is set correctly.

These are my recommended initial camera settings, followed by the corresponding page number in the Canon PowerShot SX600 HS owner’s manual. All can be set by pressing the FUNC SET (Function Set) button on the camera back.
• Program Mode (page 52)
• Evaluative Metering (page 53)
• ISO Auto (page 54)
• Auto White Balance (page 55)
1. Hold Steady
The number one reason for disappointing photos is camera movement during exposure. Even the slightest jiggle can cause unsharpness. The Canon PowerShot SX600 HS has built-in Image Stabilization that compensates for some slight motion. It’s a great assistance but not an absolute solution to camera shake.
Whether you’re focusing on the LCD on through the viewfinder, hold the camera firmly with two hands and glue your elbows to your sides. Imitate the body posture of a Tyrannosaurus rex—steady trunk, short little arms. Breathe in, out, in and then hold the breath. Gently press the shutter release button. Repeat the process in case the first try turned out to be unsuccessful.
Tripod? A good idea, especially table top tripods (see below), but don’t let it become an obstacle to casual, spontaneous shots. After you’ve mastered the ability to hold the camera steady you’ll have plenty of time to explore new tricks with a tripod.

2. Read the Manual
Yeah, yeah, we’ve heard all the cutting remarks about Americans never reading manuals. That’s not true; Americans read manuals when they hit a snag, but rarely before then. When you’re in a jam, reading the manual becomes an emergency sprint, not an educational stroll.
Sit down with your camera and the owner’s manual, which these days is usually a PDF rather than a printed booklet, and scan page by page. Read the advice about battery charging and storage, memory cards and general precautions—like avoiding rain and dusty conditions. Although you may not realize it, you’re accumulating knowledge via the “spiral learning” process. Even if a section of the manual seems unfathomable at first, rest assured that it will be understandable later on when you encounter it for the third or fourth time.
While you’re at it, read the section on White Balance. Auto WB is recommended for many situations, but learning how to set a Custom White Balance can make a world of difference on indoor shots under artificial lighting. Canon explains the procedure on page 55 in the PowerShot SX600 HS manual.
Later, after you’ve mastered Custom WB, I encourage you to do something really crazy. Intentionally set the wrong White Balance. Find out what happens when you set WB for indoor lighting and take pictures outside, and vice versa. This accomplishes two things. First it makes it easier for you to understand why some shots fail. Second, it teaches you a way to create a bluish or brownish mood if so desired.

3. Concentrate on One Subject Initially
Collaborate with a pet or partner that can sit still for 10 or 15 minutes, preferably outdoors in good lighting, and ideally on an overcast day where shadows are muted or absent. Start at a comfortable distance and carefully frame the subject on the LCD, practicing the T. rex method of holding the camera steady.
Change your position, camera angle and composition frequently. Try various zoom settings. Rule to remember: the farther out you zoom, the more difficult it becomes to handhold the camera. But try the longer zoom settings, too, just to learn what to expect. Shoot at least 40 images, examining each briefly as you shoot.
Don’t expect any masterpieces, but you might get some strong shots while practicing.

4. Experiment with Special Features
Virtually all high-end point-and-shoot cameras are loaded with special features that must be discovered if you’re going to derive full enjoyment from your camera. Canon calls them “Special Effects” and describes a few of them on pages 42-50.
A good way to learn what these effects do is by paralleling tip 3 above. Choose a stationary subject (plant, vase of flowers or tree) and shoot every special effect from the same distance and with roughly the same composition. Not all effects are applicable for all distances, but try them anyway. Shoot at least 40 images, examining each briefly as you shoot.
Although not a special effect per se, the Close Up setting, sometimes labeled “Macro,” allows you to get closer to your subject. As with the telephoto, moving closer increases the chance of unsharp images, so brace yourself or use a table top tripod. Check out our recent story, Table Top Tripod Roundup Review for some buying advice.
5. Give Yourself Assignments
Walking around looking for suitable subjects is great—in fact, it’s recommended—but sometimes you should narrow things down a bit and focus on a self-assignment instead of a perchance encounter. For example, when visiting a familiar area, commit yourself to capturing “something purple.” Or perhaps, “make a moving object appear to be standing still.” Nothing too complicated, nothing impossible.

Shooting food is always fun and often productive. If in a restaurant, sit near a window for better lighting. Use the table to support your hands for a steadier shot. Do not get pasta sauce on the lens; it leaves a mess.
By removing the pressure to find a “great shot” you free your mind to instinctively discover, compose, shoot and review.

6. Shoot and Save, Don’t Delete
Next only to the immediate gratification digital cameras deliver, the ability to delete bad shots is their biggest advantage over shooting film.
But don’t delete.
Even the worst images can teach you how to shoot better ones. Download every image to your computer and carefully study each one. If it’s a great shot, ask yourself what makes you think so. If it’s terrible, try to figure out what went wrong. Sounds like a lot of work, but it’s the only way to improve. If you have a partner or friend who has reasonable photography chops, get a second opinion—but only if they know what they’re talking about and provide honest, objective appraisals.
A year from now, maybe sooner, revisit the then-older images and conduct the same examinations. You may be surprised by how much you’ve developed your technique and creativity.
Become a Member of the Shutterbug Community
Register for a free account. Sign up for our newsletter. Spend five minutes (or less) uploading your best shots once every week or so. Potentially become a Photo of the Day winner. Enjoy viewing the fantastic work being done by thousands of photographers all over the world—and add your images to the enduring collection.
—Jon Sienkiewicz


