
Add Drama to Landscape Photos with a Dark & Moody Edit (VIDEO)
When most landscape photographers edit their images they strive for a bright and vivid effect, especially during autumn when beautiful warm, golden tones are just about everywhere you look. But how about marching to the beat of your own drummer by giving images a dark and moody effect that’s full of eye-catching drama?
German landscape photographer Christian Mohrle is the man for the job, and in this 12-minute photoshop tutorial he demonstrates how to create photos with unique a look that will really stand out from the crowd. We recommend downloading the demonstration image with the link beneath the video so you make the adjustments yourself as Mohrle walks you through the step-by-step process.
Mohrle always begins his transformations with a few global adjustments to create a solid base image for the magic that follows. Today’s photo is a forest scene that he crops heavily so two large trees on either side of the scene perfectly frame the dirt path running through the middle. This also gives the image a nice sense of symmetry.
His preliminary enhancements also include switching the profile from Adobe Color to Adobe Standard which contributes to his final goal by immediately lessening contrast and preparing the shot for the foggy look he applies later. He also cools off the shot by carefully dropping Color Temperature and increases Tint by a notch for more natural colors. Next he significantly drops exposure, being mindful that he’ll later use masking to selectively reintroduce light in specific portions of the frame.
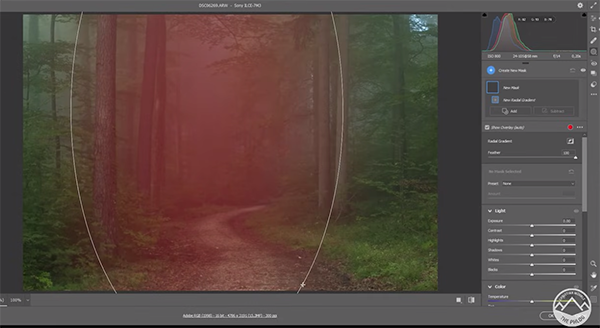
After a couple more basic adjustments it’s time for the masking to begin. Because the center of the photo is nicely framed by the trees, Mohrle accentuates that area by brightening it up with a large Radial Gradient. He also uses this selection to add light entering the center of the frame from above.
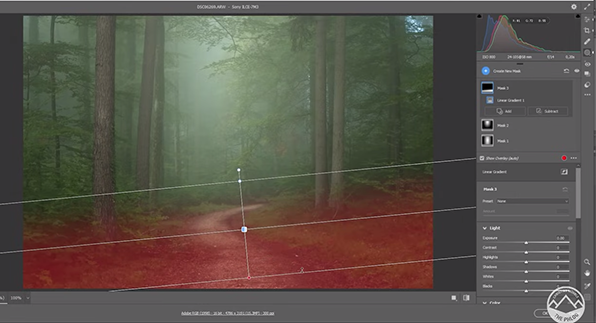
Next comes a Linear Gradient over the bottom portion of the image used to darken the foreground and surrounding areas. Mohrle pays close attention to the histogram to avoid going too far. After applying a couple more masks to achieve a balanced exposure and subtle vignette, color grading is next on his list.
This step with Photoshop’s Color Mixer is really simple, as Mohrle pushes the Saturation of the orange, yellow, blue, and green tones. He also makes use of Spit-Toning tools within the Color Grading panel. All that’s left to complete the impressive transformation is a bit of dodging and cleanup.
You can find more lessons on giving photos a unique look by visiting Mohrle’s instructional YouTube, so take some time to explore if you haven’t done so in the past.
And be sure to check out the recent tutorial we posted with another processing expert, explaining an easy technique for using Luminosity masks that provides ultimate control of exposure and color.


