
Camera Basics: Why You Should Expose for the Highlights (VIDE0)
Exposing photos for the highlights can be a valuable technique for shooting during the day, and even more essential after the sun drops below the horizon. This tutorial provides two examples of the power of this technique and includes editing tips for quickly perfecting your results.
Instructor Jason Wong puts it like this: “Your camera isn’t dumb, it’s just doing its best like the rest of us” and often needs your help—especially when photographing under tricky light. He illustrates this point with a nighttime street scene full of bright lights and glaring electronic billboards.
Wong says, “In this situation your camera just wants to expose for the shadows.” As a result, whatever details and colors that exist in the highlights are quickly blown out and lost. Worse yet, this missing information is often impossible to recover during the editing process, even when shooting in Raw.
According to Wong the solution is simple: “We expose for the highlights, shooting for the details and color information in the super bright areas. He explains how easy this is to do, with or without a tripod, to get the job done to perfection.
Wong begins shooting in Aperture Priority mode at f/4, the widest aperture on his lens, with ISO 100. In this instance the resulting slow shutter speed isn’t a problem because his camera is mounted atop a tripod. He says this approach “ensures we get the least amount of noise in the shadows later.”
Take note because Wong’s next point is very important: With the Metering mode set to Multi, Wong dials in EV Compensation of -1 stop. After examining the result you may even want to go a bit lower depending upon the scene at hand. Because this results in long exposure, it’s helpful to use the camera’s self-timer to make sure there’s no camera movement when the image is captured.

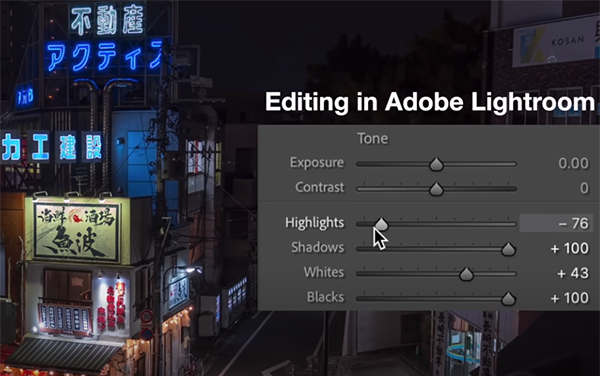
The highlights now look great but, as you’d expect, the rest of the image is overly dark—with crushed shadows everywhere you look. But relax, because Wong demonstrates how easy it is to restore these areas in Lightroom. All this requires is moving a few sliders to achieve perfectly balanced tones.
But what about accomplishing this when shooting without a tripod? For this task Vong rotates the mode dial to Manual and walks you through all the steps that follow. His result is equally as impressive as the first, and not difficult to accomplish.
There’s much more to learn on Vong’s popular YouTube channel, so be sure and take a look at what he has to offer. And on a related note, don’t miss the recent tutorial we posted from another expert who explains how to use Exposure Bracketing to give any photograph whatever look and feel you want.


