
Convert Raw Photos to DNG Files & Save Tons of Storage Space (VIDEO)
Experienced photographers tend to shoot in the Raw file format because of enhanced image quality and greater flexibility during the editing process. But shooting Raw comes with a penalty because these files are significantly larger than Jpegs and other available formats.
What if you told you that you can take advantages of the benefits Raw files provide, and still save on file space so your storage devices don’t burst at the seams? In the quick video below from the FJH Photography YouTube channel you’ll learn how to enjoy the best of both worlds by converting Raw files to the DNG.
Instructor Francisco Hernandez is a professional photographer specializing in portraiture and lighting. But the conversion process he describes in today’s lesson will be a huge benefit to anyone with a camera—regardless of the type of images they shoot. Best yet, this method is so fast and easy that it takes less than five minutes to explain.

If you’re unfamiliar with the term DNG, it’s simply an abbreviation for “digital negative”—an alternative Raw format from Adobe. Hernandez describes the pros and cons of making the conversion, and in his mind the drawbacks aren’t significant. One thing to keep in mind is that some image editors, other than all Adobe products and Capture One, aren’t compatible with DNG files.
Another consideration is that DNG files don’t include “all the extra metadata” like GPS location data that you receive with conventional Raw files. If you unconcerned with these two caveats, converting to DNG is a great way to go. And you’ll still have key metadata like the camera and lens used, all important settings, confirmation if a flash fired, time and date, and just about everything else you expect.
Hernandez always shoots in Raw for reasons he explains. He pulls up one of his family photos and walks you through the simple step-by-step procedure for converting the file to DNG. He also explains a safety procedure if you’re initially wary of getting the job done so you don’t have to worry about making a mistake and losing one of your favorite shots (which is extremely unlikely) until you get the hang of it.
Once you’re in Lightroom’s Library module simply double click on the image on your screen, and you’ll see a selection of your photos in Filmstrip mode. Then you can select any image you want to keep in the conventional Raw format when converting the others to DNG. To make the conversion just tap on the Library tab atop the screen and then choose the Convert to DNG option from the dropdown menu that appears.
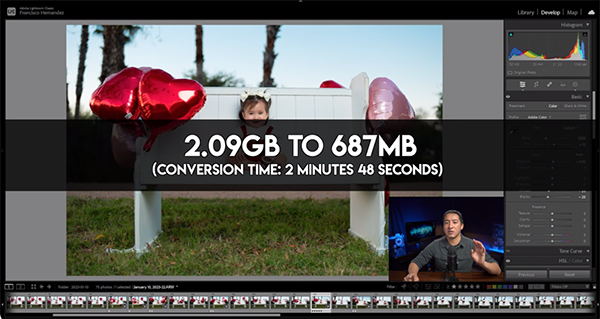
You’ll then see a window with the various settings available, which you can modify to your liking. For example, you can change whether the file extension appears in upper or lower case and determine if you want the original file deleted after it’s converted to DNG. That’s about it. As you’ll see, the demonstration image shrunk from 2.09GB to 687MB once the conversion was complete.
After watching the video take a peek at the FJH YouTube Channel to see all the other lessons from which to choose. And don’t miss another helpful tutorial we posted recently, explaining how to print photos at home with consistently great results.


