
Create Photos with Amazing Light When Conditions Let You Down (VIDEO)
We’re all at the mercy of Mother Nature When shooting in the field, and that leaves us three options when arriving at a beautiful location and are faced with flat, uninspiring light. We can sit around and wait until conditions improve, give up and return another day, or capture the best images possible and enhance them during the editing process when we return home.
The tutorial below from the popular PHLOG Photography YouTube channel is dedicated to the latter and walks you through a step-by step Lightroom procedure for transforming a drab photo into an awesome Golden Hour masterpiece. We recommend using the link beneath the video to download the sample Raw file so you can make the adjustments yourself as they’re explained.
Instructor Christian Mohrle is an acclaimed German landscape photographer who’s just as adept sitting at the computer as he is behind the viewfinder. As he explains, the demonstration image is an HDR file, meaning he has plenty of dynamic range to work with during the straightforward rehabilitation process.
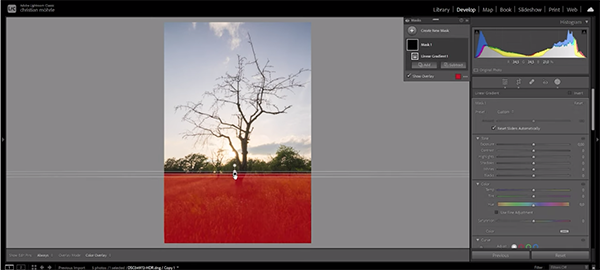
Mohrle begins in Lightroom’s Basics panel and adjustment the overall photo to prepare it for the selective enhancements that follow. He changes the profile from Adobe Color to Adobe landscape which automatically adds a bit of base saturation and brightens up the darkest portions in the frame. He then modifies White Balance in keeping with the warm look he has in mind.
He then improves the exposure that suffers from dark shadows and blown highlights. Other preliminary adjustments include dropping Clarity and Dehaze while slightly increasing Texture. He also bumps up Vibrance to further enhance the saturated look he desires.
Now it’s time for the fun part of the process that relies upon masking to create Mohrle’s soft Golden Hour Effect. He places a Linear Gradient over the grass in the foreground and increases exposure, adds some contrast, reintroduces Clarity, and adds more Texture to enhance details in this portion of the scene. This also and improves the appearance of the highlights.
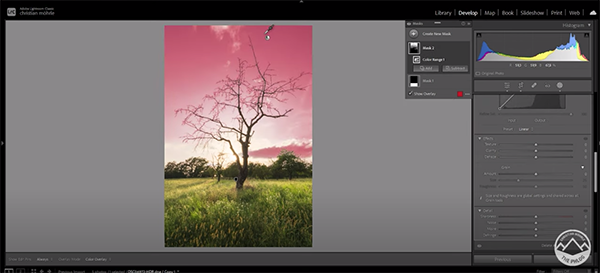
The sky also needs some work and Mohrle uses a Color Range mask to target and adjust the blue tones and achieve a smooth gradient from the horizon to the very top of the image. He then places a Radial Gradient over the entire width of the image, and add a soft, dreamy glow to the center of the shot.
Mohrle now goes into Lightroom’s HSL panel for some simple color grading, beginning with Saturation. He walks you through other the color modifications, and after some very careful sharpening the transformation is complete. You can watch more of Mohrle’s quick-and-easy edits by paying a visit to his instructional YouTube channel.
Don’t miss the tutorial we shared from another processing expert recently, demonstrating what he says is “Lightroom’s most powerful tool” for editing landscape, wildlife, and nature photographs.


