
Edit FASTER: Save Tone Curve Settings You Made to Other Photos (VIDEO)
Most photographers prefer to be out in the field with their cameras, rather than sitting behind a computer processing photos. That means finishing up your edits as soon as possible without sacrificing quality.
The two-minute tutorial below from image-editing impresario Anthony Morganti reveals a relatively unknown Lightroom trick for doing just that when Curves adjustments are part of your process. This only works in certain situations, but when it does it’s a boon to your workflow.
Morganti explains that there are actually five different Tone Curves in Lightroom: The Parametric Curve, Point Curve, and the three Color Channel Curves—read, green and blue. What he demonstrates today falls under the Point Curve, and the technique applies to those of you who often employ relatively complicated Curves when editing your work.
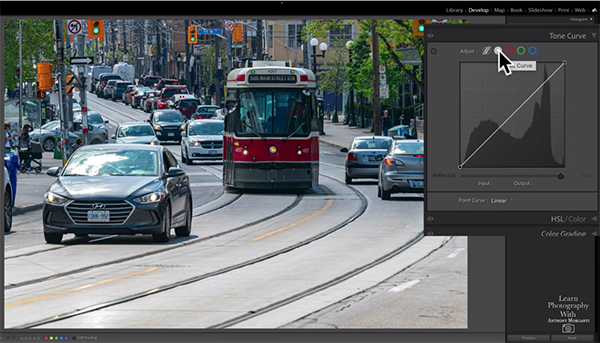
The goal for Morganti’s demonstration image is to give it an old, vintage appearance, and he uses a complicated Point Curve to create the effect. He really likes this look and uses it often but doesn’t want to recreate the Curve every time he does. The solution: save a Tone Preset that can be used over and over again.
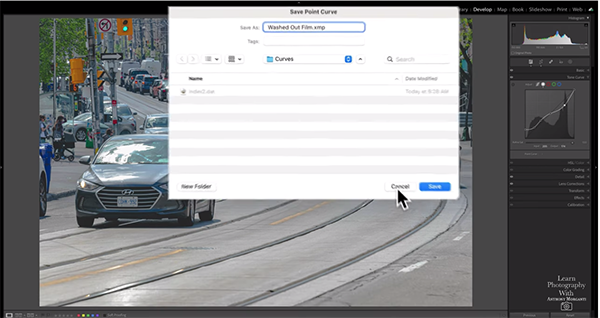
This task is super easy to accomplish, and you can do it right within Lightroom’s Tone Curve tool. As you’ll see, all you have to do is tap a button beneath the Tone Curve, choose the Custom option from the dropdown menu, and click “Save.” Then give your preset a name in the window that appears—in this case Morganti calls his preset “Washed Out Film.”
You can create as many presets as you want for the Tone Curve adjustments you use regularly and doing so will really streamline your workflow. Then the next time you’re working in Curves, just click the dropdown and your presets will immediately appear and you won’t have to redraw the Curve once again.
This oft-ignored trick is about as easy as it gets, and we suspect you’ll use it often. Morganti’s instructional YouTube channel is full of tips and tricks like this, so be sure to pay a visit and check back often.
We also suggest watching another tutorial we posed recently, demonstrating five helpful features in Adobe Bridge that you won’t find in Lightroom.


