
Fix Distortion & Chromatic Aberration When Editing Images in Photoshop (VIDEO)
If you’ve been following our image-processing tutorials you likely understand that this task often comprises a number of small, simple enhancements. But when taken as a whole, these seemingly minor adjustments can have a huge effect on the look of your work.
One minor tasks that can help transform a photo is the use of Photoshop’s lens corrections to eliminate distortion and chromatic aberration. This straightforward skill is simple enough for all users, and that’s exactly what you’ll learn how to do in today’s instructional video from photographer Barry Beckham.
Beckham regularly posts tutorials for amateur shooters with an emphasis simple methods for improving image quality. In barely seven minutes he demonstrates how to harness the power of Photoshop’s Lens Corrections to rid photos of elements that detract from their impact.

Both of the problems discussed are caused by the distortion within all of our lenses. Fortunately, because these are familiar issues, they can be easily corrected with image-editing software. In fact, Beckham says resolving these problems should be one of the first things you do, just like cropping the photo to refine composition.
All you have to do to get started is open Lightroom’s Optics panel and focus your attention on two of the several tools. Beckham begins by clicking on Use Profile Corrections and you’ll see how his before/after images illustrate the immediate improvement. The change is often subtle, but it’s more apparent with photos captured with wide-angle lenses that may impart a curved horizon.
The second option, and one that Beckham considers more important is Remove Chromatic Aberration. Before demonstrating how this works he explains the concept of chromatic aberration and illustrates the effect it can have on an image. By zooming in on the branches and twigs in a tree against the bright background of his shot you can see clearly cyan and magenta fringing that shouldn’t be there. This is a common concern in areas of high contrast.
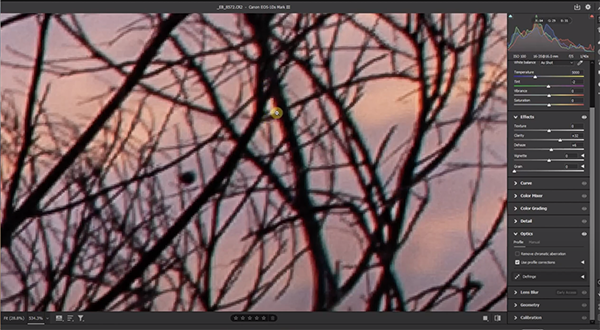
This problem becomes even worse if you increase Vibrance and Saturation during the editing process. But here’s the trick: when you click on Remove Chromatic Aberration, the ugly artifacts are effectively removed. In fact, Beckham says that he has so much confidence in the two aforementioned adjustments that he routinely ticks these two boxes and proceeds with his edit.
Interestingly, Beckham always does this without closely examining a photo because it works so well. If you enjoyed this quick episode pay a visit to Beckham’s instructional video where you’ll discover more simple tips and tricks.
And be sure to take a look at another image-processing tutorial we posted in which the instructor provides free Lightroom presets, an explanation on how to use them, and several powerful tips for editing sunset and sunrise photos for maximum impact.


