
Give Nature Photos a Unique INFRARED Effect: No Special Gear Required (VIDEO)
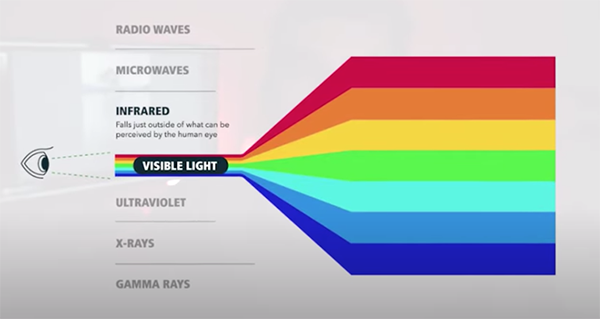
You’ve no doubt marveled at mind-blowing photos with pink foliage and other weird colors that look like scenes captured on another planet. These unique images owe their popularity to a resurgence in infrared photography.
Some photographers tackle the task by paying to convert a spare camera for this specific purpose, but there’s also a “free” way to mimic this effect by using the processing technique described in the Lightroom tutorial below. The infrared look works particularly well on images containing plenty of lush foliage and blue skies, and it only takes a minute or two to accomplish.
It’s important to note that the effect you’ll achieve in Lightroom shouldn’t be confused with “real” infrared images captured with specialized equipment. Yet getting the job done on the computer is easy and a lot of fun, and your images are certain to grab attention—and may even add a new style to your repertoire.
Instructor Neil Borg is a is a self-taught landscape and travel photography pro who specializes in straightforward videos for turning outdoor image into “captivating masterpieces.” He makes a few basic global adjustments and color calibration tweaks to his sample photos to prepare them for the otherworldly infrared transformation that follows.
Preliminary enhancements to his first shot include cutting highlights, reducing overall exposure, and significantly opening up shadows. He then pulls up Lightroom Calibration tab, moves the Red slider all the way to the right, and the Green and Blue sliders completely to the left. At this point the green foliage now looks quite orange.
The magic begins in Lightroom’s Color Mixer panel where he uses the Point Color tool to transform the orange tones into a pink value to mimic the infrared effect. Once you achieve the approximate new color it’s easy to refine the tones by moving the Range slider to the left or to the right.
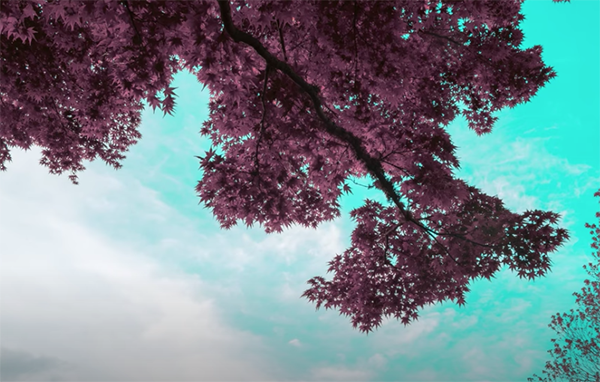
As you’ll see, even colors in the shadows are included in the selection. Increasing Saturation and Luminance takes things even further. Then Borg turns his attention to the sky and transforms that portion of the shot. He then pulls up a second (and much different) photo and repeats the process in a slightly different way, so you’ll understand how to give various types of images a spell-binding infrared effect.
Borg’s very popular YouTube channel is a great source of image-editing lessons, so be sure to pay a visit and explore what’s available.
We also suggest watching the tutorial we posted recently from another post-processing expert who explains how to enhance, rather than replace, boring skies with a quick two-step Photoshop editing transformation.


