
How a Camera’s HISTOGRAM Can Save Your Photos: A 3-Minute Explainer (VIDEO)
Yesterday we featured a primer on exposure bracketing, explaining how to get the light right by shooting three images of the same scene, and merging them during the editing process. Today you’ll learn how nail exposure in the camera by using the oft-ignored histogram that you can set to appear on the rear LCD.
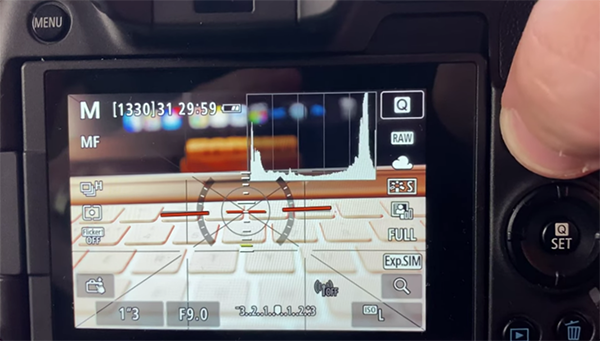
Histograms are available in modern DSLRs and mirrorless cameras, and even with some full-featured compact models. Today’s tutorial discusses how a camera’s histogram works, make sure it’s available on your display, and use it to take the guesswork out of properly exposing photos in all kinds of light.
Instructor Darren J. Spooley is a seasoned Irish pro, specializing in landscape photography, who says the easy-to-use histogram is one of the photographer’s best friends. Despite the utility of the powerful tool, it only takes Spooley three minutes to explain “how it’s going to help you save your photos.”
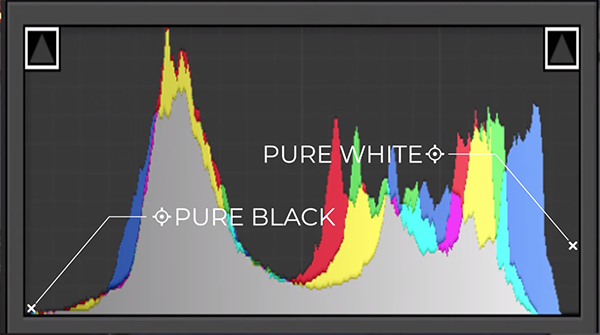
Spooley describes the histogram as a graph that provides “a visual representation of the pixels on a sensor in the scene that you’re shooting.” It indicates the brightness of your image with pure black on the left, pure white on the right, and everything else in between.” Spooley notes that. “the taller the bar, the more pixels exist in that particular area.”
What all this means when shooting in the field is this: if you notice that the histogram is leaning to the left, it’s a sure bet that your photo will be underexposed. Conversely, overexposure occurs when the histogram trends to the right side of the graph. Armed with this information, it’s easy to use EV compensation to arrive at a “correct” exposure—with the histogram appearing as a “mountain on the graph,” sloping to either side.
Sometimes, however, a so-call “proper” exposure isn’t what you want. Perhaps you’re after a dark moody effect, or a bright-and-airy look. Spooley demonstrates how the histogram can still be used in such cases to quickly arrive at an exposure that reflects your creative vision.
Spooley says using the histogram will help you nail exposure every time. Or as he puts it, there’s “nothing worse” than wrestling with an over- or under-exposed image during the editing process.
We encourage you to visit Spooley’s YouTube channel for more helpful advice like this.
And be sure to check out the exposure bracketing tutorial mentioned above.


