
How to Control Highlights for Better Landscape Photos (VIDEO)
Highlights and shadows can be the bane of landscape photographers who often confront scenes with a wide range of tones that exceed the density range of their camera. Today’s quick tutorial from the folks at How to Use concentrates on the former, with a straightforward Lightroom method for eliminating blown-out areas within the frame.
While this Lightroom technique is helpful for editing all sorts of photos that include overly bright elements, it’s particularly useful when photographing sunset and sunrise scenes when a prominent sun makes it difficult to arrive at a correct exposure throughout the frame.
Photographer Nathaniel is Lead Instructor at the How to Use YouTube channel, and he puts it simply: “Highlights are crucial to fix” if you want to create compelling outdoor photos with perfectly balanced tones.
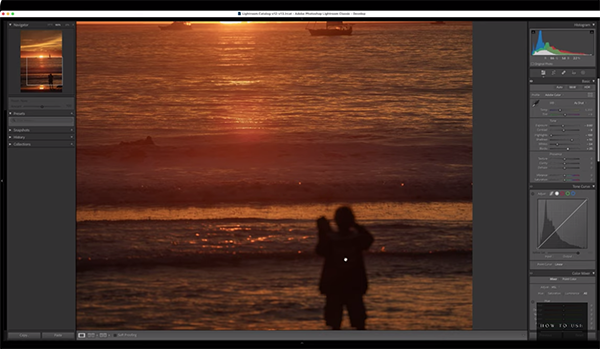
Nathaniel’s sample image is a sunset scene captured on the beach in beautiful Venice, CA. It looks really good except for a common problem—the sun appears almost white and is totally devoid of detail. The first thing to do is pull up the histogram and evaluate the exposure from highlights to shadows and everything in between.
The shadow areas look fine, and Nathaniel walks you through a straightforward process for pulling details out of the sun. Slightly dropping the highlights is the initial step and you’ll notice details beginning to appear in the sun—both in the sky and in the foreground reflections. At this point it’s important to use a gentle approach and avoid taking things too far.
Next Nathaniel carefully reduces overall exposure and contrast, while slightly boosting the shadows that have become darker. Now you can pick out a surfer in the waves. He also adjusts the whites and slightly modifies blacks. Nathaniel explains why he doesn’t employ Lightroom’s Tone Curve for this specific task.

The image is significantly improved, but the transformation is only halfway complete. Nathaniel turns to the Color Mixer for a few quick enhancements that keep the image looking very realistic. He pumps up the reds tones, reduces saturation, and adjusts Luminance to further improve the effect.
Now it’s time to dig into Lightroom’s lens corrections, and you’ll see how enabling Profile Corrections makes a huge difference in how the image appears. He also uses Lightroom’s Color Calibration panel to further refine the reds. As with all of his adjustments, Nathaniel reveals the specific settings he uses.
Many of us would be pleased with the image as it now appears, but Nathaniel is a perfectionist and makes several more quick adjustments to perfect the edit to his satisfaction. Quick, easy, and very effective.
There’s much more to learn on the How to Use YouTube channel, so pay a visit and elevate your skills. We also suggest watching the recent tutorial we posted, explaining how to use the Eyedropper for perfect Curves adjustments in Lightroom.


