
How to Set Up a Pet Photography Studio?
Did you know animal/pet pictures have been one of the most popular internet searches of all time? And it seems like the public’s love for some cute pet photos isn’t going to die out soon.
You’re reading this article so that means you’re about to set up a photography studio for pets or you’re looking for tips to improve one. Fret not! We got you covered.
Generally, to set up a pet photo studio, choose a quiet, animal friendly neighborhood that is at reasonable distance from your home unless you’re opting for a home photography studio. The space should be enough for the equipment, model and movement. A modern camera with decent lenses and lighting that isnt harsh on little animals with interesting and washable backdrops are the things that you need.
The term “pet photography” refers to the practice of photographing domestic animals. Pet photography is the most popular type of photography right now. It documents the pet’s personality, habits, and some of their special moments. Pet photography is difficult because pets do not pose in the same way that humans do.
Location
The location of your pet photography studio is determined by your comfort and ease as well as the neighborhood. It’s a good idea to do some research on potential studio sites and find out what the current rent costs are. Make sure to account for transportation and scaling-up costs as well. You should calculate the amount of money you might make with a professional studio.
Distance from your home
So the first question you should ask yourself is whether or not this location is at a reasonable distance from your home? Is it comfortable for your teammates to get to the location? Because you don’t want your studio to be 50 miles away from your home.
So, once you’ve found a location that’s convenient for you and your teammates, the next question to consider is:
Is the neighborhood animal friendly?
If you decide to open a studio in a neighborhood where people aren’t fond of pets or aren’t friendly to dogs or pets in general, your studio’s entire purpose will be defeated because not only will you not get many clients, but even clients from other communities will be hesitant to bring their pets here.
So consider the neighborhood before you set up your studio.
But what if you’re setting up a home pet photography studio?
After making sure that the neighborhood is animal friendly, consider the sorts of portraits you’d like to take and how you’d like them to look. Do you like to work in natural light? Then you’ll need a home studio with plenty of natural light. Preferably a house with big windows.
Or if you’re a photographer who uses flash then, for studio photography portraits, an empty wine cellar or basement is ideal.
Space required
When deciding on a size for a photography studio, there are numerous factors to consider, including the amount of studio equipment required, as well as the types of photoshoots the studio specializes in. The studio will be cramped and unpleasant to potential clients if there isn’t enough room for different kinds of equipment as well as guests. So, what is the ideal size for a photography studio?
While a photography studio should be at least 625 square feet (58.06 square meters), this is not the ideal size. The larger the studio, the better it is, as long as it fits within your budget.
Factors that you need to consider while selecting the size of your pet photography studio:
- Space for the model
- Space for the studio equipment
- Space for movement
Space for the model
Unlike portrait photography, pet photography is a little trickier. Shooting a playful pet or a hyperactive dog who isn’t interested in staying still or posing well for you isn’t always easy. In fact, it can be quite challenging. That is why even for a tiny pet you’ll need space.
On the internet, photos that show pets in action are far more popular than the ones where they are still. Clients often ask for such photos and for that you need space despite the pet itself not taking too much space.
Space for the studio equipment
You must also consider the photography equipment you will need in your photo studio when determining the size of your space. You’ll need to assess and measure how much area your setup will take, as well as plan how you’ll set up the equipment in regard to your shooting. If you don’t have much experience with photography studio equipment and how much room it may take, you’ll need to leave enough space in advance.
Space for movement
You also need to consider the space in the pet photo studio in which you as well as the pets or pets can move. You don’t want to be squeezed into a photo studio together with the model and a slew of photography gear which would include flashes, stands, and reflectors. A cramped pet photo studio is also highly unappealing to clients as well.
Lighting
In the studio, lighting a pet differs from lighting people. With only one light, you can often illuminate a person and get a decent shot, but that’s not true for pets. When it comes to pets, it’s best to use a key and fill light in almost equal proportions to one another, with a relatively small difference in intensity between the two lights.
Why is having a good lighting setup essentially important in pet photography?
The reason is very simple: pets do not stay in one place for long periods of time, requiring the use of high shutter speeds while photographing them. And that’s only possible if the lighting is favorable.
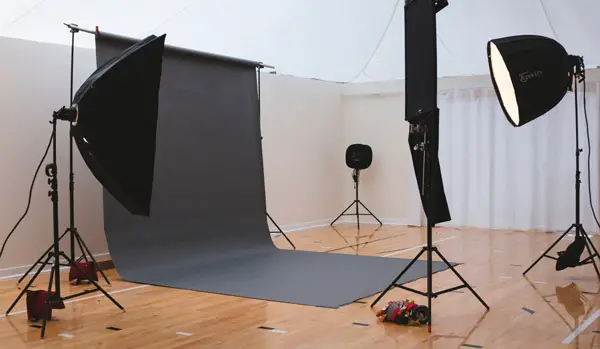
Lighting Setup:
For a decent lighting setup, you’ll need at least three midsize softboxes. Generally, the softbox should be around the same size as the subject.
- A key light at 45 degrees on one side
- A main light at again 45 degrees on the other side
- A hair light coming from above and behind the pet
The pet will be lit evenly from all sides with this setup and you will be able to capture some amazing shots.
Precautions:
You’ll need to find out if the animal is sensitive to flashes before you start using strobes. While strobe lights are the brightest lights available, their brightness can be a problem if the animals are sensitive to them and dislike them, or if they are easily startled.
Manually firing the strobe while setting up is the quickest approach to check if they react badly to the strobes.
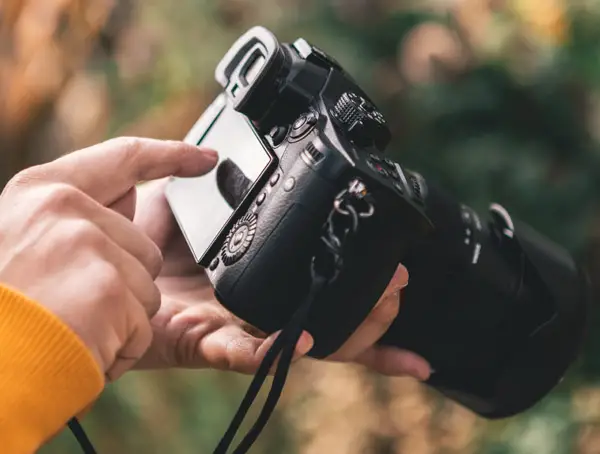
Camera
Most of the digital cameras of today’s technology will do the job just fine. A pet photography studio or any photography studio would need multiple cameras with various lenses to capture the perfect shot.
However, there are a few aspects that you need to consider while choosing a camera:
Autofocus:
It should have a continuous autofocus feature to focus quickly because the model won’t wait for the camera to adjust. Animal Eye AF is a feature included in many current cameras that helps you capture high resolution pictures even when your pet moves across the frame.
Fast frame rates:
If you’re trying to capture a hyperactive pet in action, then you need to be careful about the frame rates. To get a good range of motion, you’ll need at least 12 frames per second, but some cameras can go even faster, which is fantastic news. This is especially useful when you want to photograph them doing something they enjoy, like chasing a ball.
Adjustable screen:
When photographing your pets, one of the best tips I can give you is to get down to their level for the most natural shots. It’s a lot easier if you have an adjustable angle LCD screen because you won’t have to scramble around on the floor to compose your photos.
Look for models which offer more than just a fixed screen for the best captures.
Lenses
The selection of lens actually depends on the model. For example, if the pet you’re photographing is shy around strangers, then a long lens is preferable since it allows you to shoot from a comfortable distance. A different lens will be required for pet portraits than for action shots.
Here is a list that I have compiled that will help you in choosing the perfect lens:
Standard Lenses: 35-70mm
Generally, 35-70mm lenses that are also known as standard lenses are an ideal choice for a pet photography studio as they are
- Lightweight
- Compact
- Inexpensive
- Have fast shutter speed
- Produce sharp images
Standard lenses create an image that is the most similar to what the human eye sees. To the viewer, the image appears natural.
Wide Angle Lenses: 16-35mm
Wide-angle lenses, 16-35mm, as their name suggests, provide a far wider field of view than standard lenses. These lenses allow creativity with angles and perspective changes.
On the other hand, these lenses can be more difficult to operate due to the degree of distortion. The wide perspective is captured by curved or rounded glass so it creates an unnatural look when the pet is not at the perfect angle.
Telephoto Lenses: 70-300mm
Because telephoto lenses have a long focal length, shooting the pets from a distance is easy. For pet photographers, these have become a must-have!
While taking shots with a lens 70-300mm, the photographer can sit far back and not bother the pet. Telephoto lenses are also very useful for photographing pets in action.
What are the most used lenses by pet photographers?
My personal favorites and two of the most used lenses for pet photography are:
Props
Pet portraits and pictures of them in action are great, but the secret behind capturing the best and most entertaining photos is the use of props. Every studio photographer keeps a collection of props as these items help add a lot of interest to a photo.
Some of my personal favorite prop ideas are as below:
Chairs:
Chairs are an excellent way to add scale to your pet photos. To begin with, we all have chairs on hand. Second, chairs are available in a variety of styles, allowing you to easily adjust the look and feel of a pet portrait. Finally, and maybe most importantly, placing a pet safely on a chair can lower their wiggle pace, giving you a better chance of getting a great snap.
Their favorite toy:
Almost every pet has a favorite toy and their love for these items stays the same until even when they reach adulthood. These toys prove to be excellent props as the pets will have fun playing with it and there will be no awkward posing.
Blanket:
You can wrap the pet in a blanket like a taco or you can wait for them to go and snuggle in. Either way blankets are a great way for scaling and to capture cozy pictures.
If you think about it, everything can be used as a prop. Be inventive and experiment with everything you come across!
Backdrops
Choose backdrops that aren’t too distracting, such as neutral, solid-colored backdrops, so that your subject is the focal point of your images. Fabric is fine, but seamless paper backgrounds are preferable because they are less expensive and can be simply discarded after each session (in case of any potty-related mishaps).
However, if you perform studio shoots frequently, using paper can be both wasteful and costly. A vinyl backdrop can be the greatest option if you want something that is both robust and recyclable. It’s wrinkle-free, non-reflective, and easy to clean.
Use bright or fun colors that will help in bringing out a pet’s unique personality.
Composition
Composition is, in my opinion, the most important aspect of photography. Because if there’s no interest, no balance, and no outstanding composition, the shot could just as well be a single shade of grey. At its best, composition can cement a photo and sell it on its own.
Control the background
Pay attention to what’s going on in the background. As you shoot, keep in mind that you do have control over the positioning of the camera and, in some cases, the location of your pet. In the studio, I personally prefer black as my first background’s color choice.
Keep an eye on the color
One of the most common photo composition recommendations is to plan your colors. Colors should generally match; however this is a personal preference. The trick is to recognize that colors play a significant role in every shot you take.
The eyes should be the main focus
The eyes are the soul’s windows. It’s the same as photographing people. Above all things, your subject’s eyes are the key component of the shot.
Make sure you concentrate on the eyes to ensure that they are razor-sharp. Nothing is more unpleasant than a portrait of a pet or a human with out-of-focus eyes.
Bonus: 5 tips and tricks for a perfect pet photo
To capture motion, use the burst mode on your camera
Continuous photography (burst) mode is ideal for capturing spectacular and amusing pet pictures. You won’t be able to “create” a specific shot throughout your session because active pets are unpredictable.
Burst mode is a useful function that allows you to capture a large number of photos in a short amount of time. You’ll be able to record a variety of angles and expressions when your pet is running or playing.
For sharp portraits, use manual focus
Autofocus isn’t always the best option for photographing pets. When your pet is sleeping or walking calmly, you can utilize manual focus.
This will help you to get exceptionally sharp portraits by focusing on the right areas of the face while being able to control the depth of field, which can make any photo that much more pleasing.
Use natural light to create eye-catching pet portraits
As a photographer, natural light is the most accessible and useful tool you’ll ever have. You may use it to create a variety of attractive pet photographs because of its ever-changing nature.

Stay away from intense, direct light as much as possible. The midday sun casts unattractive shadows and makes you squint!
For creative pet photos, use the panning technique
Panning is a common method for emphasizing movement and creating textures. This unique approach to pet photography will appeal to those who appreciate abstract photography.
You must have a rough concept of where the pet will run in order for this to work. Move your camera in the direction your pet is running and push the shutter when you’re ready.
Photograph the pet from various perspectives
You can obtain excellent high angle shots by photographing pets from eye level downward. You can capture pretty good photographs without distortion if you get down to their eye level. You are looking at the world through the eyes of the animal, since you are at their height.
Here is a useful video on pet posing tips:
Final thoughts
Keep the above tips in mind and you’ll be able to master the art of pet photography in no time. When it comes to the struggle, lighting setup, and other equipment used, this sort of photography is no different from any other. The only catch is that when it comes to pet photography, you must be receptive to the behavior and gestures of the animal that you are about to photograph.
If you know you have the required talents, your photography is good enough, and you like your cuddly clients, you’re already on the right track. Wishing you the best of luck as you begin your pet photography studio!
Click on the following article to learn more pet photography tips!


