
Is This Lightroom’s Most Powerful New Tool? Here’s How it Works (VIDEO)
Early last week we posted an overview of what one image-editing expert considers three standout features in the recent update to Lightroom, one of which is the new Blur tool. Today were taking a deep dive into that powerful feature, courtesy of the experts at the Park Cameras YouTube channel.
Park Cameras is a leading retailer in the UK that posts weekly tutorials on shooting and editing techniques, and in this episode lead instructor Gareth Evans explains everything you need to know about using Lightroom Classic’s exciting Blur tool in less than 10 minutes. As he says, “this will add a little something to your images.”
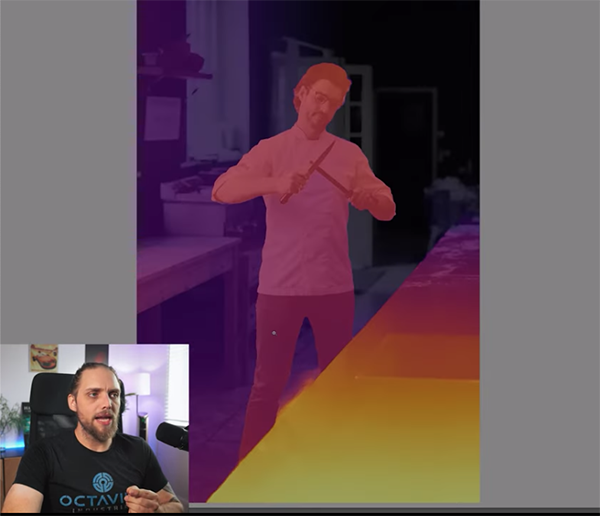
Evans pulls up a tasty photo of a chef, captured at the Kent Cookery School. It’s an interesting casual portrait that he greatly improves by blurring distracting elements in a way that wasn’t accomplished in the camera. Evans explains where to find the Lens Blur panel and gets to work. As you’ll see, this tool is similar to Photoshop’s Depth Blur filter.
The initial step is to click on the Apply button, then Lightroom locates the main subject in a photo—which is very straightforward in this example. Lightroom then quickly applies a depth-of-field effect to the image. Evans explains that this quick technique seems to work best with photos that already have a bit of background blur.
The Blur tool doesn’t really change focus, so you can’t pull things into focus that were originally unsharp. What it does do, however, is further soften out-of-focus areas for better bokeh and an enhanced look and feel. As you’ll see, Lightroom does this in a very sophisticated way.
Evans discusses a number of very helpful control within the panel that help you refine the effect, including a Depth Map of the image that Lightroom create automatically. Other options enable you to modify the amount of blur that’s applied. You can go from subtle to intense and the results appear quite realistic.

If you examine the image closely you’ll see that the blur is variable—stronger in the background and less so in areas closer to the subject—just as you’d expect when relying upon depth of field. Other controls let you modify the shape of “bokeh lights” and other key characteristics to achieve exactly the look you want.
Most of the magic of the new Blur tool has to do with the Depth Map mentioned above, and Evans explains how it works to dramatically transform an image. While you can’t control how Lightroom builds the map, there’s a visual representation that’s very helpful when making any adjustments.
There’s much more to learn on the Park Cameras YouTube channel, where new lessons are posted every week.
We also suggest taking a look at the earlier tutorial mentioned above, explaining what another pro considers the three standout features in the latest Lightroom update.


