
Lightroom’s Color Profiles Deliver the Best Photo Edits Possible (VIDEO)
Today’s eye-opening tutorial begins with a question from instructor Mark Denney: “What Raw Color Profile do you use when editing photos in Lightroom?” The answer from many photographers often begins with a blank stare, followed by something like this: “Uh, I guess I use the default or the Standard Profile.”
Even Denney himself, who is a very accomplished landscape pro, admits that “Color Profiles are something I didn’t pay attention to until recently, and I feel like I might have been missing out all this time.” He notes further that these built-in Profiles open up a whole new world for processing images. If you’re unaware why certain profiles are better suited to some photos than others, it’s time you got up to speed.
One reason this powerful feature is often ignored is that it’s hidden among the myriad of Lightroom’s photo-editing tools and sliders. Denney illustrates where the Profile Browser resides, and how easy it is to use to achieve the specific effect you desire—whether that’s bright and vivid, dark and moody, or something else.
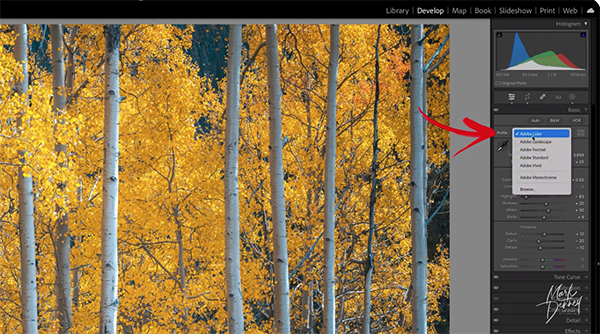
But here’s the best part: all it takes to switch from one Profile to another (like switching from Adobe Color to Adobe Landscape) is a single click of your mouse. And Denny says that with a bit of subjective experimentation, Color Profiles can be fun to employ to achieve very different looks.
As you’ll see, there are a variety of options and Denney provides a tour of everything from what he refers to as Raw Color Profiles, Camera Matching Profiles, Artistic Profiles, and Modern Profiles. There’s also a discussion of B&W Profiles and those that are intended to imbue images with a vintage look.
Denney covers a lot of ground in 13 minutes, and he explains how to choose an appropriate Raw Color Profile for the specific task at hand, but there’s no need to take any notes. That’s because he thankfully provides a link to his free Color Profile Guide in the description beneath the video, and we encourage you to refer to it regularly.

There are many more helpful shooting and editing tips for landscape photographers on Denney’s instructional YouTube channel, so be sure to take a look at what’s available.
And don’t miss another enlightening post-processing tutorial we posted recently, explaining why another top pro says that Lightroom’s Stack-and-Subtract technique is “the best masking trick” for editing landscape photographs.


