Professional photographers spend years studying, practicing, and refining their shooting and editing techniques before really hitting their stride, and this video from an accomplished pro is intended to shorten your learning curve by revealing five “huge mistakes” made by self-taught shooters.
Once you understand this handful of errors and the solutions required, your outdoor photography skills are sure to grow by leaps and bounds. Steve Arnold is an Australian pro whose goal is to “help landscape photographers level-up their in-camera and post-processing techniques to create their best imagery ever.”
As he says, “in this video I’ll explain five mistakes that cause landscape images to be dull, boring, and amateurish.” He then demonstrates solutions to each scenario that will dramatically increase your odds of success. And he does so in barely nine minutes.
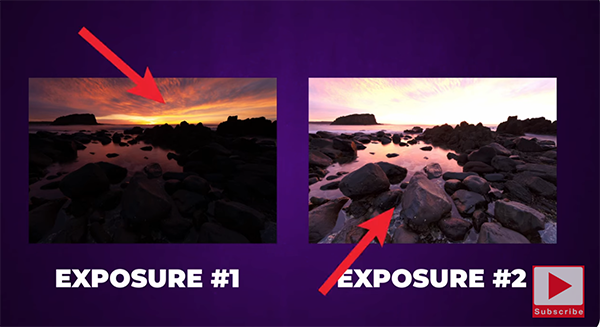
Arnold begins with a “massive” mistake that can hold you back and even destroy the credibility of your work. He puts it like this: “There’s a small Goldilocks Zone between under- and over-processing photos.” In short, if adjustments fall outside this zone of awesome editing you can expect your photos to be wreaked.
According to Arnold, the trick is understanding how far you can go during the editing process, and when it’s time to stop. His examples prove the importance of a thoughtful and oftentimes subtle approach to making enhancements that imbue images with a look that’s compelling, realistic, and believable.
Arnold’s discussion begins with “external” factors that need to be satisfied for optimum results. These include time of day, the ambient light available, any glare or reflections on the screen, and the color of light that illuminates the room where you process your work.
In other words, if you finish your edit in a dark room it will appear bright, colorful, and vibrant. But look again in the morning with sun streaming through a window and the same image may look dull and flat as though it needs more work..
Then there are “internal” factors that must be considered if you really want to get things right. Arnold says these “happen in your head because the human brain doesn’t perceive things the same way all the time.” This phenomenon occurs because we tend to become desensitized by consistent stimuli over time.
The remainder of this nine-minute lesson is devoted to helping you overcome these external and internal obstacles so that the only thing that’s consistent is the quality of your work. There’s more great stuff on Arnold’s instructional YouTube channel, so set aside time to explore.
And for some high-level insight on upping your skills further, be sure to watch the tutorial we featured with a successful National Geographic photographer who demonstrates the magic of backlighting for spectacular nature and wildlife photography—and even environmental portraits that stand out from the crowd.
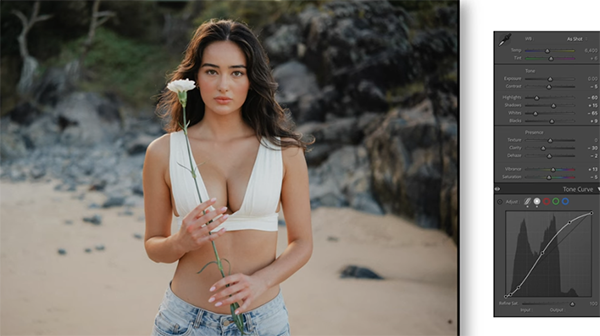
The most common practice among many inexperienced Lightroom users is to start with the Basic adjustment and Tone Curve tools. And some photographers only take one approach or the other because of a misconception that they both do the same thing.
That’s because the Basic adjustment and Tone Curve tools enable you to modify highlights and shadows, as well as blacks and white points to optimize contrast and exposure for a well-balanced image. But here’s the deal: According to instructor Gerrard Needham, there’s a “massive” difference in results if you employ these tools together rather than individually.
Needham is an eclectic pro whose YouTube channel offers straightforward tutorials spanning the gamut from landscape and sports photography techniques to those for portrait and fashion shooters. This episode explains when and how the powerful tools mentioned above behave differently and why “they are only truly effective when they’re used in combination.”
These explanations and intsructions are based upon Needham’s personal experience as well as input from experts at Adobe and other professional sources, and he walks you through his workflow for using Basic Adjustment and Curves tools “to enhance dynamic range in my Raw files and achieve tone and contrast that’s similar to film.”
Of course, you can apply his approach to achieve just about any effect, mood, or look that’s appropriate for the particular task at hand.
Be sure to stick around through the end of the video where Needham switches gears and demonstrates two post-processing techniques for boosting Color Contrast to make photographs far more compelling. There’s a simple approach for novices, and an advanced method that provides more control for experienced users. So just pick an option that works best for you.
Bottom line: In the next 15-minutes your guesswork will be a thing of the past if you follow Needham’s step-by-step advice. Be sure to check out his YouTube channel once you’re done where you’ll find a wide array of instructional videos like this one.
And if, like most of us, you want photographs that exhibit perfect sharpness every time, don’t miss a tutorial we featured with another post-processing expert who demonstrates a fast-and–foolproof workflow that performs with precision.
The Tamron 50-400mm f/4.5-6.3 is a budget telephoto zoom which offers an impressive range of focal lengths. This $1300 lens is available both for Sony E and Nikon Z, and as soon as it was announced, our readers immediately started asking me to review it. I’m happy to bring you our full tests today.