
Photoshop Basics: Make Eyes Sparkle in Portrait & Wildlife Photos (VIDEO)
Portrait and wildlife photographers have at least one thing in common: they understand why it’s essential to focus on a subject’s eyes. But just because the eyes are sharp doesn’t mean they sparkle and are full of life, and that’s what you’ll learn how to in the quick Photoshop tutorial below.
Instructor Mark McGee is an experienced pro specializing in portraiture who says, “I love producing videos about what I do.” While the examples in this episode pertain to human subjects, much of what you’ll learn is equally valuable when processing photos of animals when you want to accentuate their gaze.
McGee uses portraits of two attractive models to illustrate his simple three-step editing process. In barley nine minutes he demonstrates how to make eyes sparkle, create amazing catchlights, and get professional skin contrast using Photoshop’s Gradient Maps.
The first example would be a very nice portrait, were it not for the fact that McGee’s subject has flat, dead-looking eyes without any hint of a twinkle. The rehabilitation process begins with the Pen tool which McGee uses to select the whites of the model’s eyes. He notes that it’s also possible to use the Lasso or Quick-Selection tools.
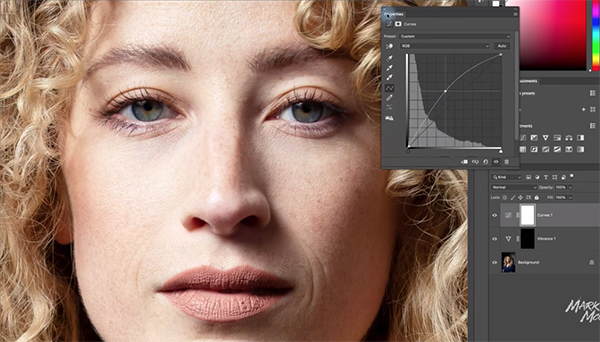
He then creates a Vibrance adjustment mask and reduces Saturation which is prelude to a few further enhancements using a Curves adjustment layer. You’ll see the Brush tool settings that McGee recommends for feathering the effect to achieve a very realistic effect.
McGee says Step #2 is “my favorite,” and it involves creating attention-grabbing catchlights that bring his model’s to life. It’s a quick and simple technique and he walks you through every step of the process. Here he employs a brush that’s the same size as the pupils, and he explains how to precisely position the catchlights within the eyes.

The final stage of the process with the first portrait is to brighten the iris of the eyes to give them a “real wow factor.” He explains why resetting the brush color to white before proceeding typically provides optimum results. McGee also reveals the appropriate brush size for these adjustments as well. After a few quick enhancements this impressive transformation is complete, and McGee’s before/after images illustrate the significant improvement.
McGee isn’t finished, however, because it’s time to edit his second portrait, and this process includes a few more tricks, including the aforementioned Skin Gradient Map technique that’s really interesting to watch.
Be sure to explore McGee’s popular YouTube channel when this lesson concludes, because there are many more great tips like those in this video.
And don’t miss the tutorial we posted recently on a related topic, in which another accomplished photographer explains how he sharpens images in Lightroom by using the correct tools and techniques during the editing process.


