
Photoshop Basics: Using Layer Blend Modes for Much Improved Edits (VIDEO)
Layer Blend Modes are straightforward tools that deliver superior results when working with layers. Unfortunately, they are frequently ignored—either because some photographers don’t know they exist, or because of a misconception that they’re difficult to employ.
In basic terms, tools Blend Layers based upon any combination of Saturation, Luminosity or hue, and they do so in a non-destructive manner—meaning they modify output without changing pixels. In other words, a redo is always possible if you don’t like the results.
Using this approach is among the fastest and most effective ways to create really amazing images. Moreover, Blend Modes are available outside of layers and can be found in Painting tools, Smart Filters, and elsewhere in Photoshop.
In the tutorial below from German photographer, author and respected educator Rainer Hoffman you’ll learn the basics of how Layer Blending Modes work, the various options available, and how to put them to use. If you want to take a deeper dive after watching this primer, check out the link in the description beneath the video.
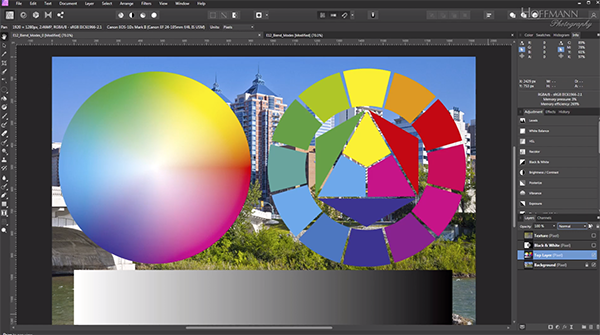
There are numerous Blend Modes from which to choose, and rather than listing them all here, we’ll let Hoffman run you through everything that’s available. As you see, the “Normal” default setting provides two color wheels with a grayscale bar underneath. In this mode all opaque pixels of the top layer are, well, opaque. Therefore, they simply block the view of corresponding pixels in the background layer that contains the image you’re working on.
Hoffman explains why things get far more interesting when you skip the default setting in favor of other Layer Blend Modes. That’s because the Luminosity and color of the pixels on the top layer are combined with the corresponding pixels in the background layer, “according to pertinent mathematical rules” (that we won’t bore you with here).
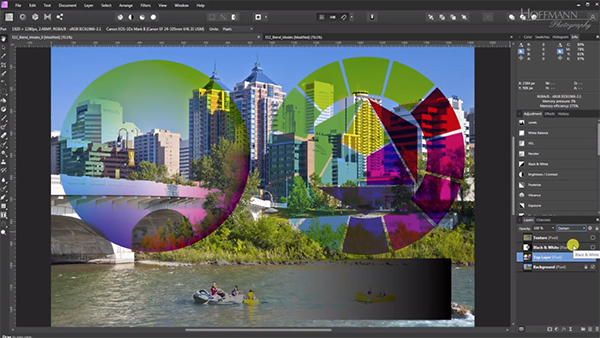
Let’s just say that, depending upon the mode you choose, values may be added, subtracted or multiplied. In some cases, what happens under the hood may be more complex than that. What’s more important than these theoretical considerations, is the difference between the various Layer Blending Modes, and how they affect the look of an image.
And that information is exactly what Hoffman provides, with the use of easily understandable graphics. By the time you’re done watching, you’ll be inspired to give these tools a try. And once you do there’s a good chance that Layer Blending Modes will earn a permanent place in your image-editing workflow.
Hoffman’s instructional YouTube channel has much more to offer, so be sure to pay a visit when you have time.
We also encourage you to watch the earlier tutorial we posted, explaining why some subjects look much better when shot in b&w—with pro tips for getting the job done.


