
Remove Color Contamination in Photos: Lightroom’s New Point Color Tool (VIDEO)
We’ve been working through all the new capabilities of the latest Lightroom update, and today’s tutorial from the Photoshop Café YouTube channel demonstrates a powerful new feature that is nothing short of “stunning.” In less than eight minutes you see how the new Point Color tool works.
Instructor Colin Smith is an expert at all things Adobe, and in this episode he demonstrates the use of Point Color in Lightroom and Adobe Camera Raw to fix difficult color issues and remove tonal contamination in your images. As he says, “this would have been so difficult before, but now it’s easy.”
Smith begins with a quick explanation of how Point Color works, before jumping into a step-by-step demonstration of using the new tool. To get started he selects the Color Mixer where the Point Color option appears at the top right of the panel with a number of sliders underneath.

The first step is grabbing the Eyedropper and selecting a color within the photo that’s confirmed in a swatch above the sliders. In this case he chooses a green tone from the hedge in the foreground of his image. Now you can use sliders to adjust Hue, Saturation, and Luminance.
One helpful trick becomes available when you hold down the Option key on your keyboard. Then as you move the sliders you’ll see that the areas that are in color are those being adjusted, while the portions of the shot that appear in b&w will be unaffected by your adjustments. This makes it really easy to keep track of what you’re doing.
There’s a fourth slider beneath the Hue, Saturation and Luminance options that’s called Range. This one enables you to refine the enhancements you’ve made. Pulling this slider all the way to the left narrows the range of the selection. Conversely, moving the slider to the right does the opposite. And there’s a button that enables you to visualize whatever range you select.
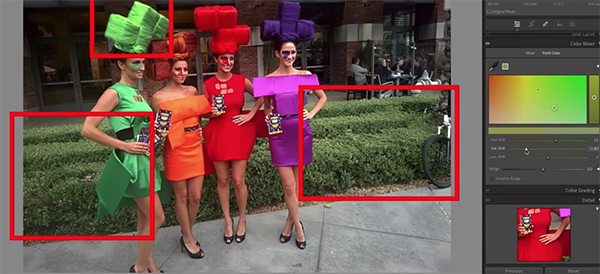
With these basics out of the way Smith turns to a practical demonstration of how to isolate specific colors and enhance them in various ways. The lesson wraps up by illustrating the simple steps necessary for fixing unsightly color contamination to achieve an image with beautiful tones.
There’s much more to learn about editing your work on the Photoshop Café YouTube channel, so be sure to take a look.
And don’t miss the tutorial we posted recently from another image-editing expert who reveals what he considers “Lightroom’s most powerful tool” and explains how to use it.


