Selective Exposure: The Key to Stunning Landscape Photos (VIDEO)
We regularly preach the importance of taking a selective, rather than a global, approach to processing your images. This simply means limiting your adjustments to specific portions of a scene that really need work, instead of making enhancements to the image as a whole.
This technique applies to whatever modifications you make to color values, texture, exposure, and other key variables. By doing this you’ll be able to transform good photographs into great ones, with ideal characteristics that really grab attention. Nowhere is this more important than when editing complicated outdoor photos with a multiple elements and a broad range of brightness values throughout the frame.
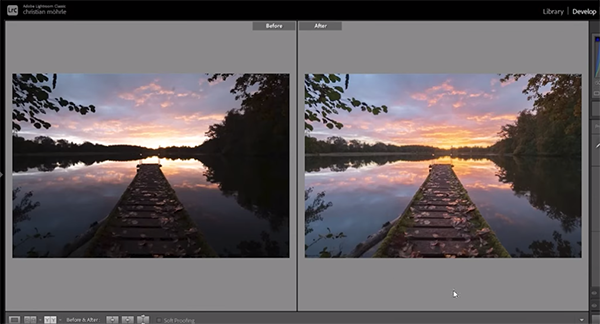
The following video from the PHLOG Photography YouTube channel deals exclusively with selective adjustments to exposure, and what you learn in barely 13 minutes will have a big impact on every image you shoot outdoors. These tips, like other selective image-editing techniques, require the use of simple masks, but the precise results you’ll achieve are well worth the extra effort.

Instructor Christian Mohrle is a professional German landscape photographer who really know his way around the computer. As with all tutorials he posts, you can download the demonstration Raw file using a link beneath the video and make the adjustments yourself as the necessary steps are explained.
Mohrle always begins with a few basic overall adjustments to prepare an image for the magic that follows. For today’s lakeside sunset scene that means changing the profile to Adobe Landscape which immediately bumps up the shadows and adds more saturation to the shot. Then Mohrle works his way through Lightroom’s Tone panel and uses sliders to increase exposure, bring down highlights to avoid a blown-out sky, and open up the shadows.
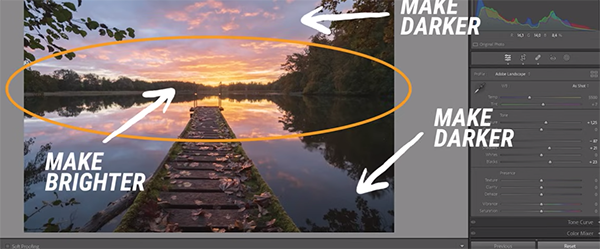
Now the image looks quite balanced with more intense colors, and it’s time for selective exposure adjustments that refine exposure to perfection. As Mohrle explains, the goal is to “brighten or darken the image in certain parts in order to create more depth and interest.” His point is that this task can’t be accomplished effectively by making global adjustments like he did with the preliminary enhancements described above.

Mohrle walks you through the step-by-step masking procedure for getting the job done, and once you understand this technique it will be easy to make selective adjustments to other variables in an image. This versatile method transcends editing landscape photos and can be used with equal effectiveness to improve other type of images shot outdoors.
The lesson wraps up with some straightforward sharpening and color grading, and we’re confident that you’ll be impressed when you view the final result. You can find more powerful editing tips and tricks by paying a visit to Mohrle’s very popular YouTube channel.
We also suggest that you check out an earlier Lightroom tutorial we posted, with a two-minute trick for using the Texture tool to make photos jump off the screen.


