New Tech Eliminates Bottlenecks in Pros’ Workflow
What exactly is a “workflow,” and how does the right advanced technology increase efficiency, conserve resources and improve the consistency of the end results?
“Workflow” defines the steps taken to complete a project from start to finish. For professional photographers, and for all image-makers who share their work in any manner, the essential steps are capture, cull, edit, deliver. There are intermediate steps, but they all fall into these four buckets.

Capturing is fun; delivering is gratifying. During the editing process, most photographers express their creative talents, and that’s wholly enjoyable yet extremely time consuming. But the culling step, although necessary, is challenging. An essential part of the overall post-processing segment, weeding out the bad (or least-good) images and collating the keepers, successful culling requires viewing and evaluating every shot.
The Bad Old Days
Back in the last century, when we all used film and physical tools like lightboxes and red crayon marks on contact sheets, culling was an excruciating chore at best—but it was unavoidable, so we all grinned and bore it. Admittedly, the grinning part was intermittent.

When digital cameras matured to professional levels, and pros mastered computers, all of the workflow steps improved. However, digital photography brought its own baggage: instead of dozens of rolls of film to soup and proof, photogs now had to deal with a couple thousand—or more—image files from a single session. At 15 seconds per image, it takes 250 minutes to properly scrutinize 1,000 images. And a lot of eyedrops.

Harnessing the Power of AI
Photographers benefit from AI in many ways. The right AI-powered editing software can learn precisely how you edit and reproduce your actions. And it’s substantially more economical and faster than training an assistant, or apprehensively outsourcing the responsibility.
Nowadays, modern photo culling tools—like Imagen—allow photographers to cull images with speed and consistency because Imagen learns and replicates the thought processes that mimic the human brain, swiftly selecting the best shots based on the photographer’s individual style and preferences. Advanced tech allows us to reimagine the traditional workflow to make it more efficient – such as in the case of edited previews where photographers can now cull their photos while previewing what they would look like edited. Less time culling means more time running your business, more throughput capacity and—very likely—expanding your customer base. These advancements free up photographers to focus on the more creative aspects of their work while maintaining full control over their selections. One of the leading solutions is Imagen.
Imagen is an all-in-one platform that lets you cull, edit, back up and deliver your photos more efficiently. Hundreds of thousands of photographers use Imagen to process hundreds of millions of photos annually, saving countless hours of tedious steps that hold them back from reaching their true potential.
One critical component of Imagen, one that can be of value to all, is AI Culling.
AI Culling
Imagen’s AI Culling is an upgrade to your workflow, not a disruption or massive change that requires learning new software or techniques. Experienced photographers who already have tried-and-true post-processing procedures don’t need a complete overhaul of their workflow (although it’s always good to consider new ways). But even the most expert pro can definitely benefit from a smarter way to do what they already do.
Imagen’s desktop app, available for both Mac and PC, integrates effortlessly into your existing workflow and is fully compatible with Adobe software, including Lightroom, Photoshop, and Bridge.
You can get started by creating your own Personal AI Profile for a completely tailored editing experience based on your personal style and past edits. Not enough photos for training? Try the Lite AI Profile for a quick start using a preset and get editing right away or explore the range of Talent AI Profiles created by notable pro photographers from around the globe to apply the unique styles of top photographers.
Main Features of Imagen’s AI Culling
AI-powered Photo Selection
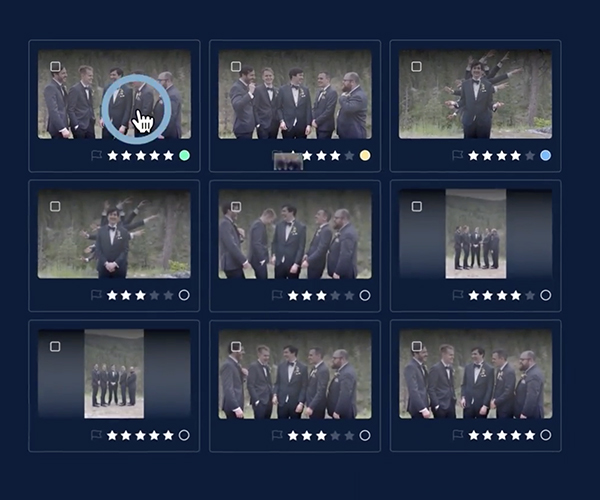
Imagen changes the way photographers cull by using AI to mimic their selection process while keeping them in full control. It doesn’t replace their judgment; it automates it. It automatically detects and groups photos by duplicates, sharpness, closed eyes, expressions, and even composition quality. It filters out unintentional blurry shots, misfocused images and accidental goofs instantly.
Edited Previews – Cull with the End in Mind
With the Edited Previews feature, Imagen enables you to see how your photos will look after editing while you’re making culling decisions. It works with your AI Profile of choice to reflect your desired editing style, helping you choose the best photos from the start. Of course, the freedom is always yours to fine-tune and enrich the process.

This feature is especially beneficial for professionals who often work with custom presets and/or AI profiles, because it helps them immediately identify which images align with their overall vision and style and allows them to preview them before committing to the edit. And it eliminates the frustration of keeping photos that won’t work well in the final edit. Your vision and style is your brand, so consistent output is invaluable.
Noted photographer Tommy Reynolds said that Imagen changed the way he looks at photos as he finds himself including photos he otherwise wouldn’t have – thanks to the new perspective of seeing it edited.
Final evaluation is fast and easy. The entire experience is customizable – you can also decide how strict you want the AI to be with the grouping. Photos are auto-grouped by similarity, so you can review and choose the best in seconds. Also, you can set custom preferences for AI-based ratings (stars, colors, flags) to simplify your workflow.
Seamless Integration into Your Workflow
AI Culling works within Imagen’s app, so you can move directly from culling to editing, storing and delivering to clients. The results sync seamlessly with Adobe Lightroom, Photoshop, and Bridge; no extra steps are required. Throughout, manual overrides are possible at any stage, ensuring you’re always in control.

For true, end-to-end “Edit to Delivery” facilitation, you can incorporate Pic-Time into the final step.
Imagen AI Culling Pricing
Imagen is available on a monthly unlimited subscription for $18 a month, billed monthly, or $144 for an annual unlimited subscription.
Join the thousands of photographers who are enjoying the benefits of Imagen and AI Culling. Upon signing up, new users are gifted 1000 free edits to experience the editing suite.
∞ Shutterbug Staff