
The Benefits of Aperture Priority Mode for Photos with a Creative Flair (VIDEO)
If you’ve been shooting in Auto of Program mode and your images lack that special something, the tutorial below from the Photo Genius YouTube channel will solve the problem. In barely 14 minutes you’ll learn the many benefits of Aperture Priority mode and pick some useful tips for capturing images with a creative flair.
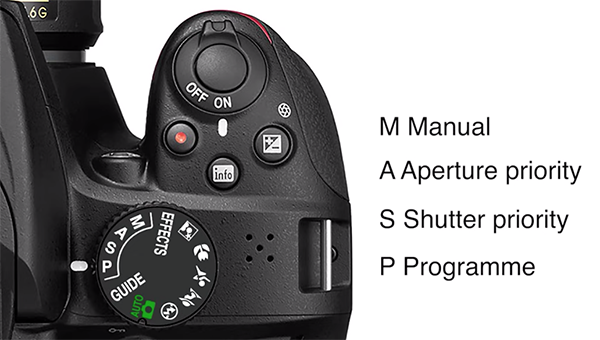
Beginners often think that rotating the camera’s mode dial off Auto requires a steep learning curve, but there’s nothing further from the truth. That’s because, despite the superior results you’ll achieve, this approach is well within the reach of beginners. In fact, in barely 14 minutes you’ll learn everything necessary to get started today.
Instructor Paul Farris is an accomplished pro who’s been teaching workshops and posting straightforward tutorials for over a decade. In this episode you’ll discover why serious shooters, including maby experienced pros, regularly use the Aperture Priority mode as their default exposure setting.
Farris kicks off today’s lesson with this: “Aperture Priority is a camera mode that you can use to create softer, blurry out-of-focus backgrounds—a very popular look that’s easy to achieve.” He further explains that this creative mode can also be used to achieve a broader zone of focus throughout a scene, like when photographing landscapes.
The key to this technique is that it enables you to control depth of field, rather than letting the camera make decisions than may not deliver the look you’re after. It’s also a very effective way to draw the viewer’s attention to a specific spot within the frame. Importantly, the f/stop you choose in this popular mode interacts with the ISO setting and the corresponding shutter speed provided by the camera.
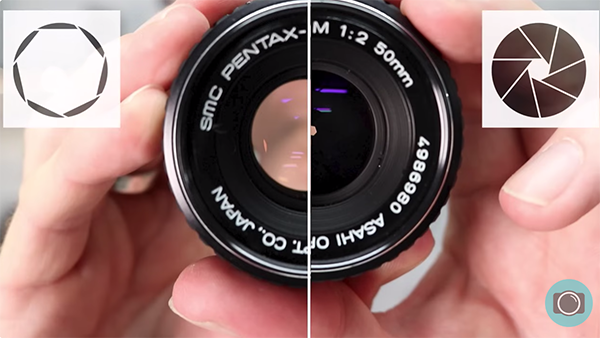
Farris explains that aperture is a feature of the lens, not the camera. Simply put, “it’s a mechanical opening” of the lens diaphragm that’s calibrated in f/stops—indicated in numerical values like 1.4, 2, 2.8, 4, 5.6, 8, 11, and 16. The size of this opening determines the amount of light that will pass through the lens—in much the same way that the pupil in your eye determines how much light reaches the retina.
With the theory out of the way Farris moves on to practical examples of how the f/stop you choose effects the look of a photo. He also explains why and how different aperture settings are called for depending on the subject at hand, ambient light levels, and whether or not a subject is stationary or in motion.
Once you get the hang of this, and it doesn’t take long, shooting in Aperture Priority will become second nature. And the impact of the images you make will be greater than ever before. You can find more simple tips and tricks by paying a visit to Farris’ instructional YouTube channel.
Image sharpness is a key component of all good photos and we encourage you to watch the tutorial we recently posted on this topic—specifically designed for achieving fast and precise focus when shooting landscape and wildlife imagery.


