
Using Lightroom’s AI Denoise to Save Underexposed Photos (VIDEO)
Adobe included plenty of great improvements in the last Lightroom update that make image editing faster and more effective than ever. One of the new features we haven’t covered in detail is how to use the new AI Denoise tool, and that’s what you’ll learn about in the quick tutorial below from the popular PHLOG Photography YouTube channel.
German landscape photographer Christian Mohrle is a favorite among Shutterbug readers who appreciate his straightforward processing tips, and in this episode he walks you through a step-by-step procedure for using Lightroom’s “phenomenal” Denoise AI tool to “save all your photos.” We suggest downloading his sample Raw file with the link beneath the video so you can make the changes yourself as they’re explained.
Mohrle’s image is intentionally underexposed, so you’ll appreciate the power of this quick fix based upon artificial intelligence. As always, he begins with a few basic adjustments to the overall scene to prepare it for the selective enhancements that follow,
The conventional approach is to go to Lightroom’s Basic tab and bring up exposure while trying to maintain as much detail as possible. But as you’ll see, even though this brightens the image ugly noise immediately begins to appear in the darkest portions of the shot—even though the photo is still too dark.
Mohrle continues the preliminary steps by bring up the shadows and hoping for the best. The photo looks better until you zoom in close to discover that noise is still a huge problem and the image is pretty much unusable as is. He then drops the highlights to recover detail in the bright area of the sky and increases the blacks to “introduce more softness to the image.”
The next step is significantly increasing color temperature to introduce more warmth. Mohrle then adjusts the tint to mimic a twilight look, increases Texture, and drops Clarity and Dehaze. After pumping up Vibrance it’s now for selective masking and color grading that initiate this impressive transformation.

Mohrle drops a simple Linear Gradient over the everything above the horizon, and a smaller Linear Gradient over the very top of the sky. As Mohrle explains, using two Gradients in this manner “give us a very natural fade from the brightest to the darkest area of the sky. You’ll see all the tools he uses with both Gradients to achieve a dramatic yet natural looking effect.
Color grading is next, and Mohrle makes significant improvements here too. He does some quick calibration, applies split toning and few other adjustments to differentiate colors in the sky from those in the water, and “really change the atmosphere of the image.”
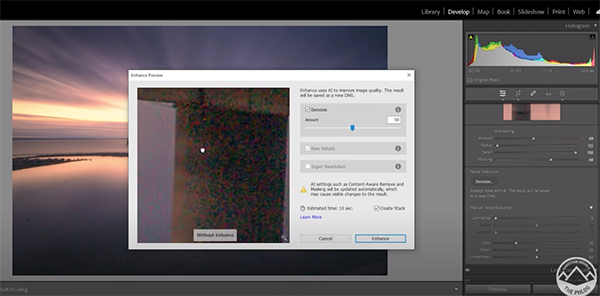
Now the “fun part” of the technique is revealed by clicking on the Detail tab within Lightroom’s Develop Module. This is where you’ll discover AI Noise Reduction and learn how it works it’s magic while carefully applying sharpening during the process. This approach really works wonders as you’ll see by comparing Mohrle’s before/after image.
There’s much more to learn about shooting and editing landscape photos on Mohrle’s YouTube channel. So pay a visit when you have time to explore. And be sure to check out the tutorial we posted from another pro recently, explaining a foolproof method for creating and refining masks in Lightroom.


