
Want Landscape Photos with More POP & Deep Colors? Use This Oft-Ignored Technique (VIDEO)
Today you’ll learn how to elevate your landscape photography game by using an oft-ignored Lightroom tool to process images that need a bit of help. The method known as “midtone contrast” is both easy and effective, and it’s guaranteed to add impact to just about every image you edit.
This lesson come from Signature Edits, a great source of hands-on tutorials for beginners and experienced shooters alike. This episode explains how to unlock the secrets of midtone contrast in lightroom, and the difference between this approach and other contrast adjustments you’ve likely used in the past.
Instructor Ryan, founder of the channel, walks you through this game-changing method in barely 13 minutes. He provides a clear step-by-step explanation of editing images with this Lightroom adjustment-layer masking technique. Once you get the hang of it your landscape images will have more POP and deeper colors than ever before.
Ryan’s goal is to give the demonstration image more punch, but the conventional approach to adjusting contrast in Lightroom blows out the sky and crushes shadows in the foreground—leaving both areas devoid of detail. You’ll then see how to add contrast to the rest of the scene, while leaving the top and bottom of the frame unaffected.
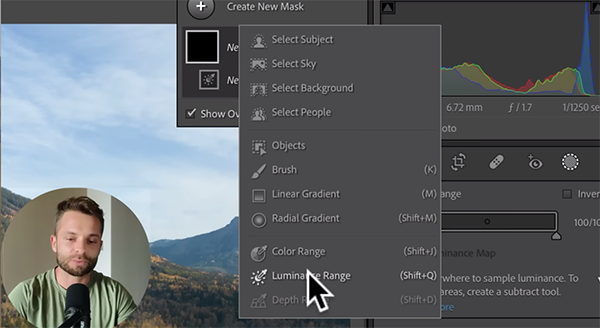
The trick involves selecting Create New Mask and choosing the Luminance Range option from the dropdown menu. An Eyedropper then appears that you’ll use to target an area in the image that’s neither super bright nor too dark—in other words, somewhere in the midtones. One the selection appears, simple sliders enable you to refine the range up or down.
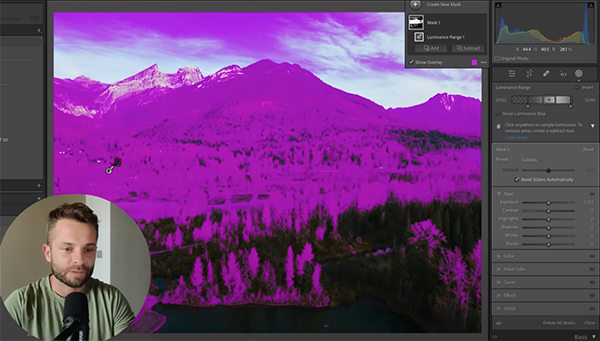
Here’s the big takeaway: now you can selectively use Lightroom’s Contrast slider to pump up the image only where it needs it, while the sky and shadows remain untouched. The foregoing is just a quick summary, so watch the video for some great advice for completing the task to perfection.
The key here, like with most post-process adjustments, is to avoid a heavy-handed approach so that your final result not only looks great but appears realistic as well. You can find a variety of powerful shooting and editing tips with a quick visit to the Signature Edits YouTube channel, so make a point of doing that when you have time.
We also suggest watching the tutorial we posted recently from another image-editing expert, explaining the best way to install, manage, and organize Lightroom presets for a smooth and effective workflow.


