
What Pros Know About Aperture That Amateurs Ignore (VIDEO)
Most photographers understand that the f/stop they choose is an important component of arriving at a correct exposure. But this setting affects other attributes of a photo that novices often ignore to the detriment of their images.
The tutorial below from instructor Jason Vong clears up several misconceptions regarding aperture and explains how to make the best choice for the specific task at hand. According to Vong, “The way most beginners understand aperture is simply that’s it’s a setting that gives a blurry background; AKA bokeh.”
In other words, we’re taught that the lower the f/stop the blurrier the background we can achieve to make a key subject closer to the camera really stand out. While wide f/stops may improve the look of an image, they can also create a lot of problems—one of which is the struggle to achieve sharp results.
Another misconception is that prime lenses with fast maximum apertures are the only way to go, and slower lenses are just a waste of money. In barely seven minutes Vong corrects these and other confusions and demonstrates several pro tricks for using various aperture settings to shoot the best possible photos.
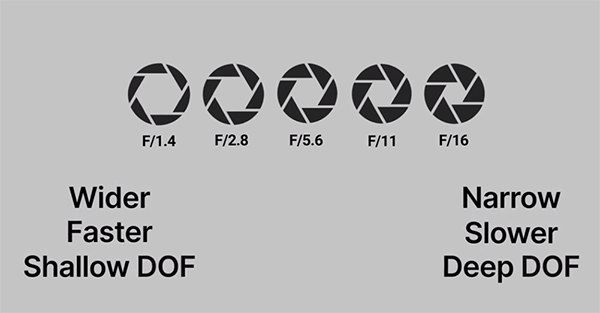
Vong starts with the basics of “big hole vs. small hole,” explaining that the f/stop you select controls the amount of light hitting the camera’s sensor and how this affects other key settings like shutter speed and ISO. Put simply, “the larger the hole the more light that comes in, while the smaller the hole the less light enters the camera.”
Vong then describes how to stop missing focus by choosing an aperture that optimizes depth of field for the subject at hand. He explains why “this is where most people mess up on aperture and fail to get sharp images.” You’ll see how very shallow depth of field gives you a razor-thin zone of focus. Sometimes that may be exactly what you want if your focusing skills are really good, but in other situations a bit less depth-of-field provides better results.

You’ll also learn how to achieve pleasing, soft backgrounds with just about any lens you use, even if it lacks the f/1.4 or 2.0 maximum aperture of costlier glass. That’s because focal length has a lot to do with blur. He provides a helpful example of just how this works.
Similarly, Vong describes how camera-to-subject distance factors into the equation. In essence, the closer you are to the subject, the blurrier the background will be—regardless of the f/stop in use. And if you think that always shooting wide open is the best way to go, Vong will quickly change your mind.
There’s much more to learn on Vong’s instructional YouTube channel, so take a look and see what he has to offer. And on a related note, check out the earlier tutorial we posted from another accomplished pro, debunking the myth that f/11 is the best f/stop to use for landscape and nature photography.


