
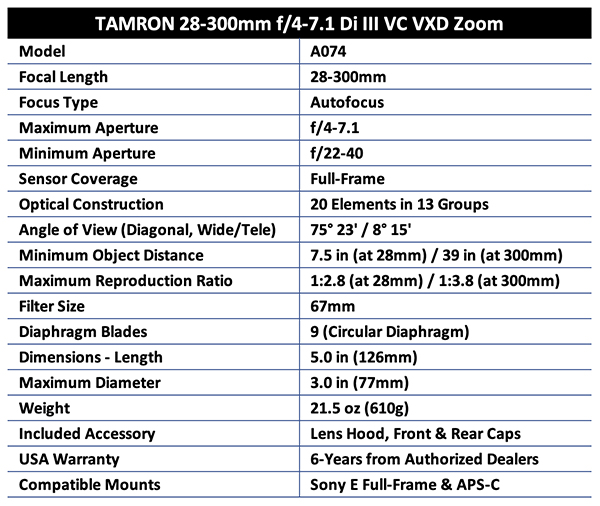
Tamron just released the 28-300mm f/4-7.1 super all-in-one zoom lens for Sony full-frame mirrorless cameras, and Shutterbug was allowed to field test one of the earliest samples. Reaching Authorized Dealers’ shelves as you read this, the lens weighs just 21.5 ounces (610g) and focuses as close as 7.5 inches.
Overview & First Impressions
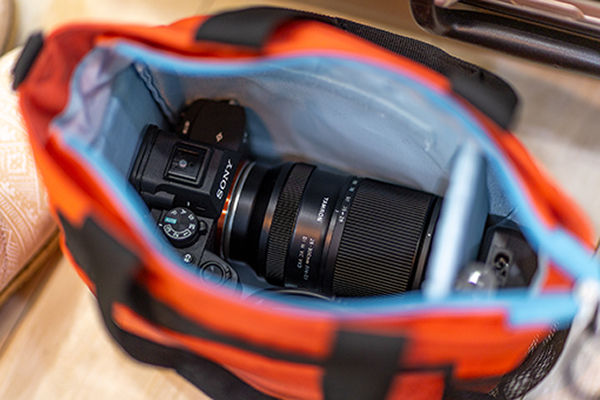
The Tamron 28-300mm f/4-7.1 Di III VC VXD zoom for Sony E-mount, model number A074, impresses by its small size (5-inch length, 3-inch diameter) and feels really great in the hand. It balanced well on the Sony Alpha 7-series camera I used during this review and was comfortable to hand-hold, even at the maximum 300mm zoom setting.

Initial snaps were convincing. I did a few quick max-wide to max-tele shots and noted the significant difference. I immediately thought of situations where I could have used the increased range—without sacrificing the all-important 28mm wideangle starting point. You know: travel, walk arounds, street scenes, nature walks.
Tamron’s 28-300mm super zoom has a USB-C port. Connect it to a computer via a compatible cable and run the Tamron Lens Utility software tool (free download) to update firmware when needed, and to assign various photo and video functions to the Focus Set Button. Additionally, when using the Android-only mobile version, functions unique to that app can be performed remotely without touching the lens.
I reviewed the earlier Tamron 28-200mm zoom for Sony mirrorless about four years ago (you’ll find the review here) and gave it high marks. I was struck by how close in size the two zooms are: 5 x 3 inches for the 28-300 and 4.6 x 2.9 for the 28-200. In the dark you could confuse one for the other. Even the weight is close: 21.5 vs 20.3 ounces respectively.
But a recurring fear nagged me. There must be a tradeoff, no? Agreed, the maximum apertures are different, but only by one stop at the wideangle position. So I set out to rigorously evaluate the Tamron 28-300mm super zoom, determined to find the flaw. Spoiler alert; try as I might, I could not find any.
A Tiny Bit of Background
The characteristic look and feel, construction quality, and image quality of so-called aftermarket lenses compared to those made by camera manufacturers have been on convergent paths in recent years. In simpler terms, the quality and performance of lenses from Tamron, Sigma and sporadically a couple other brands, in most cases, is equal to or even better than those of from the big camera makers. Consider the disparate price differences and let this sink in.
It’s not really surprising since, historically, there has been more than a little cooperation and crosspollination among all of the players. A lens offered by big camera maker A may have been manufactured by aftermarket lens maker B, and frankly that’s a common occurrence. This is a positive thing for all, and consumers have a wider range of options as a result.
I could continue with my opinionated history rhetoric, but I fear you’ll recognize me to be a nattering old man, and that’s a secret I prefer to keep. I’d love to add comments about the hoard of truly brilliant, mostly manual-focus brands originating in China, but I’ll save that for another day, and I’ll warn you first.
In light of the above, I’m always delighted when I find a lens that breaks out of the traditional categories and offers something more—particularly when it’s priced reasonably. The Tamron 28-300mm f/4-7.1 Di III VC VXD lens for Sony mirrorless cameras is a perfect example. It’s a traditional “28 to something” all-in-one zoom, but it shatters the paradigm by zooming to 300mm, making it a 10.71X instead of the relative standard 7.14X. That’s a significant increase in reach, and kudos to Tamron, the recognized originator of the all-in-own zoom lens category many, many years ago.

Key Features
10.7X Super All-in-One zoom
28-300mm zoom range on full-frame Sony mirrorless
42-450mm zoom range on Sony APS-C mirrorless
f/4-7.1 to f/22-40 aperture range
Minimum focusing distance of 7.5 inches (19cm)
20 elements in 13 groups
9-blade diaphragm for enhanced bokeh
Tamron’s BBAR-G2 Coating
Length of only 5 inches (126mm)
Weight of 21.5 ounces (610g)
Tamron’s time-proven VC image stabilization mechanism
Tamron’s top-level VXD linear motor focus mechanism
Compatible with camera-onboard features (Fast Hybrid AF, Eye AF etc.)
Compatible with proprietary TAMRON Lens Utility™ software tool
Focus Set Button for lens function customization
Key Features (cont.)
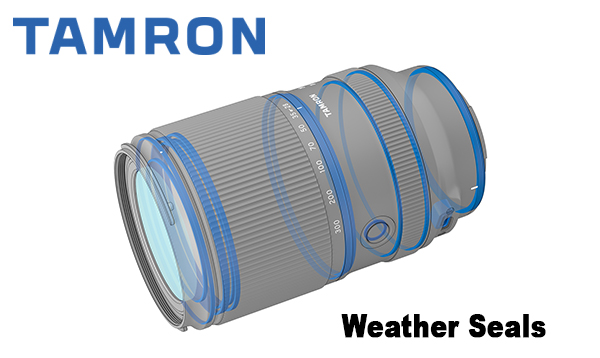
Moisture-resistant construction
Oleophobic, easy-clean Fluorine Coating (front element)
Zoom Lock switch
Ø67mm filter, same as most Tamron lenses for mirrorless
Anticipated retail price of $899 (US)
Specifications
Exterior Construction, Fit & Finish
Not much to say here except “exceptional.” Feels like a high quality photo/electronics product and is consistent in build-quality with Tamron’s entire stable of mirrorless lenses. Zoom ring and focusing ring turn smoothly with just the right resistance. Lens mount engages the camera with an authoritative snap. The lens barrel is grippy yet elegant. All in all, this zoom looks good and feels good.
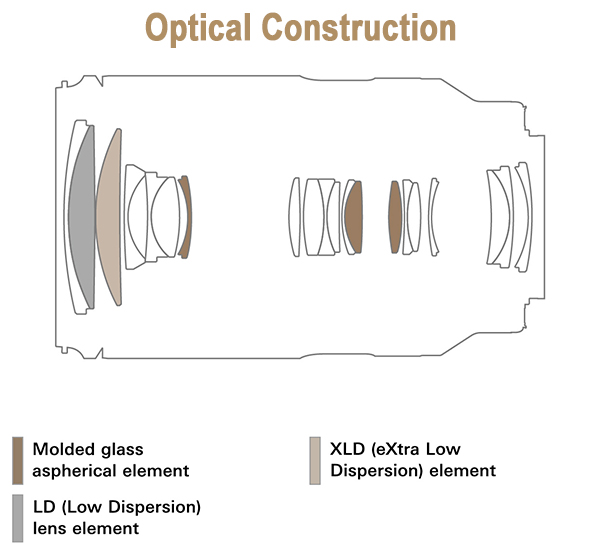
Optical Construction
The optical design of the Tamron 28-300mm f/4-7.1 Di III VC VXD Lens for Sony mirrorless cameras comprises 20 elements in 13 groups and includes LD (Low Dispersion) and XLD (eXtra Low Dispersion) elements.
Without advanced education in optical engineering, it’s difficult to convert these specs into comprehensible performance values, so let me just say that I did not encounter distortion, purple-fringe aberrations or ghost/flair issues. Those are the image-spoilers I always look for when review-testing lenses.
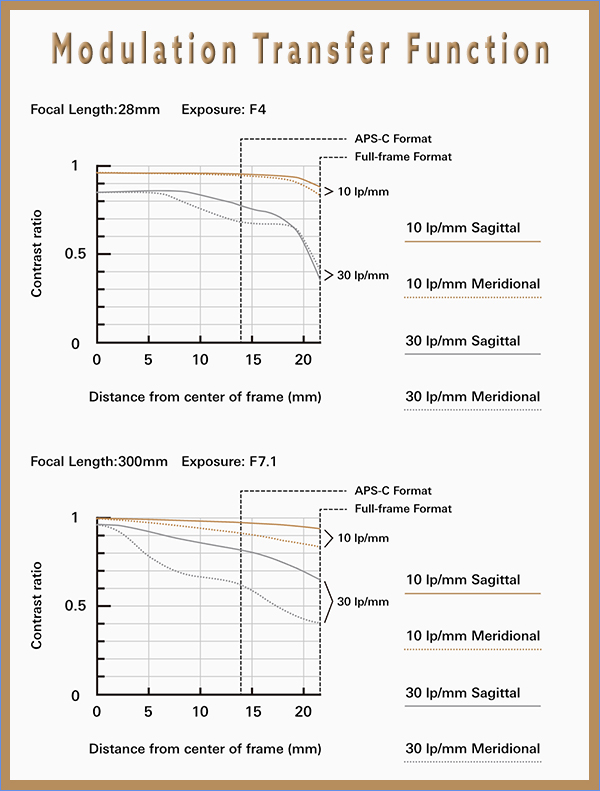
Beyond negating the bad possibilities, whatever Tamron did with the optical formula resulted in extremely sharp images that are richly saturated, crisply rendered and faithful to real-life color fidelity. Images are clean, appropriately contrasty and really fun to open in Adobe Bridge.
Camera Integral Feature Compatibility
When you use Tamron’s 28-300mm super all-in-one zoom lens on a Sony camera, it’s compatible with many of the camera body-integral features (Fast Hybrid AF, Eye AF etc.) supported by the particular Sony model to which it’s attached. This assures that the user experience is the same as when using the comparable camera-brand lens.

Image Quality
Outstanding sharpness edge-to-edge, corner-to-corner, with rich saturation, consistent color fidelity and appropriate contrast. The optical formula delivers near zero distortion with no noticeable flair or ghosting even in backlit situations.
I was able to shoot clean, crisp images at close-up ranges, and equally at the full-out 300mm telephoto setting. The Tamron VC image stabilization system contributed to sharp handheld shots, even under marginal conditions.

Image quality relies on precise and speedy autofocus, of course. Tamron’s proprietary VXD linear motor focus mechanism provided fast and accurate AF, with zero focus-seeking, equally at extreme 300mm telephoto as well as the 7.5-inch close-focus limit.

A Little Bit Longer — Supremely Useful
It’s only 5 inches long, for crying out loud. But it gives you an expanded 300mm zoom reach without sacrificing the 28mm wideangle option or overall IQ. Personally, there have been so many times—at the zoo, at a Little League game, on a nature walk—that my photographic adventure would have been so much better with a 28-300 instead of a 28-200 all-in-one zoom. This has caused me to recalibrate my expectations. Starting at the enormously popular 28mm wideangle end, the Tamron 28-300mm f/4-7.1 Di III VC VXD zoom is ideal for travel, family events and sightseeing—plus loads more. But the fact that it zooms all the out to 300mm instead of the more common 200mm limit of many all-in-one type lenses expands usefulness enormously. Conclusion
I can list five (5) reasons why you will love the Tamron 28-300mm f/4-7.1 Di III VC VXD super all-in-one zoom and want to add it to your lens arsenal.
1. Masterful overall performance (sharpness + AF speed + image stabilization)
2. 10.7X zoom range extends to 300mm
3. Compact: just 5 inches long and weighs a scant 21.5 ounces (610g)
4. Close-up focusing to 7.5 inches
5. Affordable! See purchase options below
Okay, six reasons.
6. 42-450mm zoom range on Sony APS-C mirrorless

Price & Availability
The Tamron 28-300mm f/4-7.1 Di III VC VXD zoom for Sony mirrorless cameras is priced at $899 and is available from Authorized Tamron Dealers from whom you’ll receive a 6-Year USA Limited Warranty. Shop local, help a neighbor. Don’t buy from gray market scammers or any reseller that is not authorized—here’s why.
You can visit the official Tamron Store on Amazon to peruse several Tamron products, but the 28-300mm f/4-7.1 zoom is not listed there as this review is being written.
Subscribe to Tamron’s inspiring and informative newsletter. I do, and I always learn something new.
Want to Become a Better Photographer?
Begin by taking more pictures. Carry a camera everywhere you go and shoot even when you’re 100% sure the picture won’t turn out. Review all of your images with a critical eye and share them with others – and that includes posting the best on our Gallery. Subscribe to our newsletter (see sign-up form on our homepage) and bookmark Shutterbug as a Favorite on your browser so you can check back often. We’re in this for the same reason as you – we love photography, and we’re learning more about it every day.
—Jon Sienkiewicz
(As an Amazon Associate, Shutterbug earns from qualifying purchases linked in this story.)


 Conclusion