It’s very convenient to edit photos on a tablet or phone while traveling, when you’re away from a computer, and Lightroom Mobile is a great option to use. In this tutorial you’ll learn how it works in ways you didn’t imagine.
This free app is a powerful-yet-simple solution for capturing, editing, and sharing your images. And by upgrading to the Premium version you’ll discover even more control, with what Adobe says is “seamless access across all your devices—mobile, desktop, and web.”
Instructor Brian Matiash raves about the broad capabilities of Lightroom Mobile and puts it like this: “The fact that you can edit a full resolution Raw file on a phone still boggles my mind.” He notes that Lightroom Desktop includes some features that are lacking in the mobile version, but he’s discovered a very effective workaround that just may blow your mind too.
This episode is geared toward editing portrait images, but what you’ll learn has broader applications for other genres of photography. So pull out you phone, slide up a chair, and take a look at what you can accomplish in the palm of your hand with a few simple tricks.
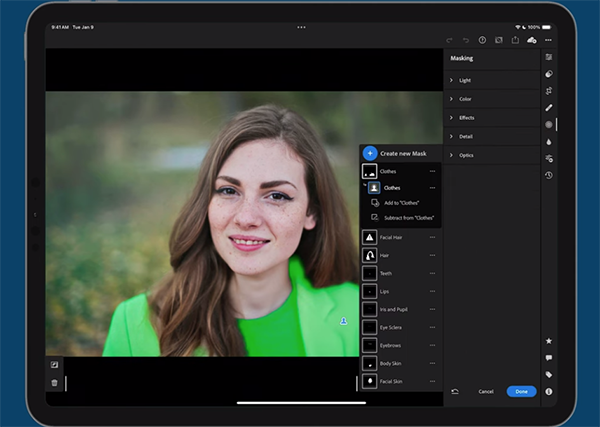
The big surprise here is making localized edits, a task that you couldn’t do before but is easily accomplished with the tricks that Matiash explains. He begins by opening four images on the computer in the Basic mode of Lightroom Desktop and navigates to the People section of the Mask panel. Then he demonstrates what he couldn’t accomplish in Lightroom Mobile until he discovered what you’ll learn today.
The key to all this for Lightroom subscribers is the use of Adaptive Presets for different types of images that you’ll find by clicking on the Premium tab. By expanding the Portrait group and clicking on the Masking icon you’ll discover options for Teeth, Iris and Pupil Eye Sclera, and Face Skin.
Matiash walks you through the process of using several options to enhance photos in much the same way as you’d do when working on the computer. Once you get the hang of it everything is super simple. As you become more confident you’ll even be able to create custom presets for each component mask.
You’ll also learn what happens when editing a photo on an iPhone or iPad that includes multiple subjects in the frame. And you can obtain free portrait presets from Matiash by enrolling in his Lightroom Everywhere course.
Bottom line: The power and versatility of Lightroom Mobile is right at your fingertips, no matter where you are. Be sure to check out the Brian Matiash YouTube channel for more editing tips and tricks.
If you’re a regular visitor to the Shutterbug website you know that we frequently post tutorials on attaining fast and precise focus. That’s because many of our favorite instructors have a personal technique that differ from others, and it’s worth giving them all a try until you find a method that works best for you.
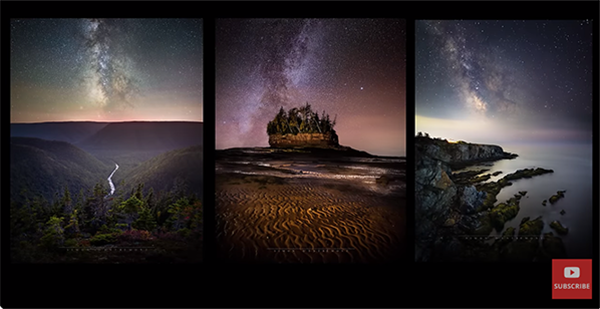
Today’s episode from Canadian pro Simon d’Entremont reveals a method he claims is “the best for every scenario” from landscape and wildlife photography to portraits and more.” Simon is based in Eastern Canada and he’s adept and at a variety of genres, so when he makes such an emphatic claim it’s worth paying attention.
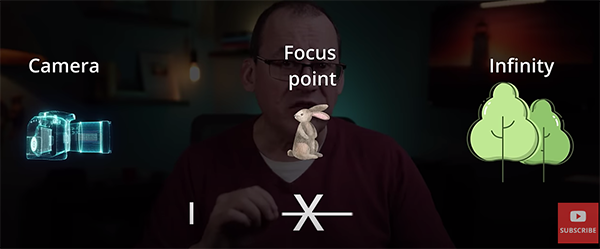
Simon begins with a quick explanation of why photos may be unsharp. Maybe you inadvertently focused on the background instead of a primary subject closer to the camera. Or perhaps your goal was maximum sharpness throughout the frame, and you used the wrong aperture setting to achieve the necessary depth of field.
There are other reasons for blurry photos, but fear not, because Simon has some great solutions for a wide variety of problems—whether your subject is stationary or in motion. He explains the common term “acceptably sharp” like this: “Focus doesn’t go from poor to perfect all at once.” In other words, the area in precise focus is the point at which light rays converge, but there’s an area in front of and behind this spot that will still appear quite sharp.
This is where depth of field enters the equation, because the chosen aperture determines how broad or narrow the zone of sharpness will be. Thus, “the thinner the depth of field, the blurrier the background will be.” Conversely, the deeper the depth of field, the sharper the foreground and the background will look.
Simon reviews three variables that affect depth of field; camera-to-subject distance, the focal length of a lens, and the aforementioned aperture setting on whatever lens you use. He provides interesting illustrations to depict how all this works.
With the basics out of the way Simon turns to important shooting techniques and how they differ based upon the genre of photography that you’re pursuing. Thus, the best approach to take will be different when shooting landscapes or architectural photos that it will be when photographing wildlife or portraits.
One key to fully maximizing Simon’s advice is an understanding of how hyperfocal distance works. By the time you’re done watching you’ll be totally up to speed on this valuable concept, and how it interacts with other essential variable for nailing focus every time. Be sure to pay a visit to Simon’s instructional YouTube channel where there is much more to learn.