Natchez, Mississippi – from dark history to riverside charm
I could have chosen to drive straight from Jackson International Airport to the historic town of Natchez, but I had ideas of touring around the Mississippi.
So, instead, I took the backroads from the beautiful Delta City of Greenwood, a true Southern town where I stayed for a while. These roads took me past flat fields where cotton, soybeans and other crops stretch to the horizon, small towns with fading main streets, and clusters of trees that hide farmsteads and old churches.
Rusting rail sidings and weathered barns hint at how deeply agriculture and the cotton economy still mark the landscape, even as mechanisation has replaced enslaved labour.
I stopped at one small crossroads and, probably illegally, picked a cotton head from a field that spread for miles. I was surprised at how spongy and squashy, it was, assuming that the product you buy in shops had gone through some processing cycle to make it pliable, but no, it was immediately soft and comforting.
Arriving in Natchez after that drive felt like emerging from the rural past into a small city that condenses the region’s story: river, cotton, slavery, reinvention, and the ongoing effort to balance remembrance with a warm, welcoming visitor experience. It is one of the most evocative places in the American South for understanding how cotton wealth and slavery shaped a community, and how that legacy sits alongside today’s easy-going riverfront charm.
In the 19th century, it was a powerhouse of the “Cotton Kingdom,” yet it now blends preserved mansions and sombre slave sites with buzzing festivals, paddle steamers and independent businesses.
Cotton, slavery and the river
Natchez sits high on the bluffs above the Mississippi River, with fertile soils that made nearby plantations extraordinarily productive. Cotton planters moved enslaved people into this region in vast numbers, turning the Natchez area into one of the wealthiest corners of the United States by 1860.
The city became a major node in the domestic slave trade, second only to New Orleans in its scale within the Deep South, and markets such as the notorious Forks of the Road processed tens of thousands of enslaved men, women and children for sale to surrounding plantations.
That economic influence is still visible in the density of surviving antebellum (pre-Civil War) homes and churches, and in the way the city’s historic districts were built around the profits of cotton and human bondage. Walking tours, museums and park sites now interpret both the opulence of planter life and the brutal system that funded it, allowing visitors to grapple with the full story behind Natchez’s gracious facades.
Belfast House and antebellum houses
Amid the historic building stock, places like the Belfast House add character and important depth to understanding the past. Housed in an older structure, it reflects the way Natchez continually repurposes its architectural heritage, whether as lodging, dining or social space, and it slots naturally into a street where almost every section has a story.

Antibellum House – Natchez
Better known as Stanton Hall, it was built as a mansion in a grand Greek Revival style in the 1850s for Irish-born cotton broker Frederick Stanton, who named it after his homeland’s capital. Occupying an entire city block, it now serves as a historic house museum and is a small exhibition of how wealthy people spent their money in the late 19th century. Given the man’s background, the thought occurred to me that Mr Stanton probably had a very strong Northern Irish accent, and that Natchez had experienced an 1800s version of loyalist politician Ian Paisley.
Balloon festival and seasonal atmosphere
I was lucky that I arrived during one of the most photogenic times to visit Natchez, as it was during the annual balloon festival, when hot‑air balloons scatter colour. Unfortunately, inclement weather and a combination of unseasonal drizzle plus low cloud meant the bouquet (collective noun for balloons) did not take flight. This did nothing, however, to hamper the festival atmosphere, which spills into the streets, with music, food vendors and families filling the parks and downtown spaces. Nor did it stop the impressive firework display with a multitude of explosive colours being reflected on the mighty Mississippi River below.
Historic streets and riverfront life
Today’s Natchez feels much smaller and friendlier than its 19th‑century reputation might suggest, with a compact downtown that quickly gives you a sense of place. Buildings that once housed banks and merchants now host galleries, boutiques and cafés, so you experience history not as something sealed behind ropes, National Trust style, but as part of a working town.
The city’s riverfront parks and overlooks make the Mississippi itself part of the visit, with impressive views over the water, the bridges to Louisiana and, quite reassuringly, the sight of paddle steamers easing into the small quayside.
Those boats, with their tall stacks and big stern wheels, echo the era when steamboats carried cotton bales and enslaved people up and down the river, but now they bring people like me, camera‑toting visitors and dinner‑cruise passengers instead. The contrast between relaxed modern tourism and the river’s darker past gives Natchez a distinctive emotional feel.
In the centre of the town, independent shops line the main streets, selling everything from antiques and local art to regional food products, giving a creative, slightly old‑world retail feel rather than a chain‑store strip full of global brands. Restaurants range from simple diners and barbecue joints to more polished Southern and Creole‑influenced venues. I ate at several establishments, and each one of them, including the coffee shop at breakfast time, had live music.
The variety of food and entertainment makes Natchez a place to linger.
How to do it
America As You Like It (www.americaasyoulikeit.com / 020 8742 8299) has a seven night Mississippi fly-drive from £1390 per person, including return flights from Heathrow to Jackson on Delta, seven days fully inclusive car hire, two nights in Jackson, one night in Greenwood, two nights in Natchez and two nights in Ocean Springs.
The post Natchez, Mississippi – from dark history to riverside charm appeared first on The Travel Magazine.









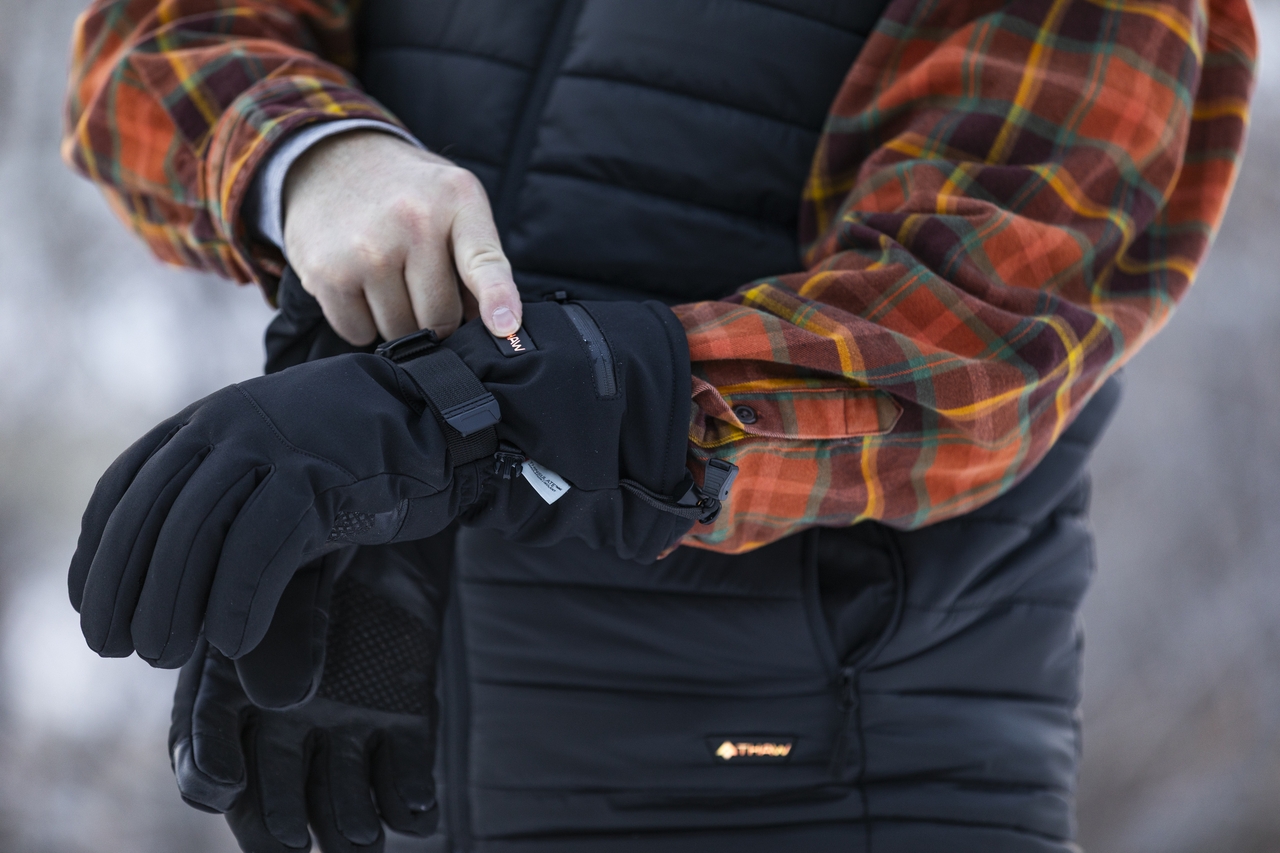 Heated ski gloves aren’t new, but can be chunky and unreliable. These new-tech unisex delights from Thaw, a specialist in heated clothing, offer warmth for the whole hand – with full finger heating – while looking smartly understated. They’re insulated, water-resistant and work on touchscreens (for all those interactive lift maps on your phone!) with reinforced palm and a waterproof battery pocket. Three heating modes provide up to an impressive eight hours of comfort before recharging the batteries. Great for winter outings, such as football matches, at home, too. £129.99
 Cool socks made in Vermont where they know what it’s like to have cold feet. Darn Tough produces a wealth of styles, mostly colourful but never comical, and all in merino wool. These are termed Midway Hiking Socks – perfect for travelling and going out in at the end of a ski day, and they ‘thermoregulate to wrap feet in steady comfort when temperatures change’. But, of course, there are ski socks, too, seamless even at the toe and some with arch support. Guaranteed for life – any problems, send them back. £29 (ski socks £37).
 This Hightrail Polar Hiking Boot from American footwear leader Keen is warm, light and comfy. The company’s Heat Trapolator technology gives three layers of heat-trapping materials underfoot plus KEEN.WARM recycled P.E.T. insulation rated to keep feet cosy in temperatures as low as -25°F. There are leather trimmings, a thermal insole, waterproof membrane, rubber non-slip sole and natural, pesticide-free odour control. This is the women’s model, with stylish purple flourishes, but there’s a purple-free men’s version. £145.
 The colourful styling of Panda Optics’ new RS2 goggles belies the high-tech performance. The peach-hued polarised lens is great for normal weather and the goggles also come with a low-light HD lens, aimed at overcast, snowy, or dusk conditions, that’s easily – and firmly – changeable with magnets and side clips. Advanced anti-fog technology, improved ventilation and top-notch glare reduction, too, from the company specialising in hi-tech eyewear. Also comes in black with blue trim. £142.


