Adlers Hotel, Innsbruck, is a modern, high-rise, twelve-floor hotel in the centre of the city. Located close to the main railway, bus, and tram station, it is convenient for out-of-town guests and for travelling to nearby ski resorts. It is within walking distance of the old town and the River Inn. Its conception relates to a lifestyle experience, modern design and spectacular views. It certainly achieves the latter with floor-to-ceiling windows that look out over the city below and the mountains beyond.
These windows are opaque from the outside. The first six floors of the building housing this hotel are occupied by other businesses. Bedrooms are on floors 6 to 11, which is exactly where you want to be for good views. Spanning the whole of the twelfth floor is a large bar area and the hotel restaurant, Weitsicht. There is also a large outdoor terrace at this level. The views from here are fabulous and the place is usually buzzing because it is a popular lunch and dinner venue. It is operated by the Ultsch family, who also manage the historic Hotel Schwarzer Adler a very different property in the old. This family has a long tradition as hoteliers.
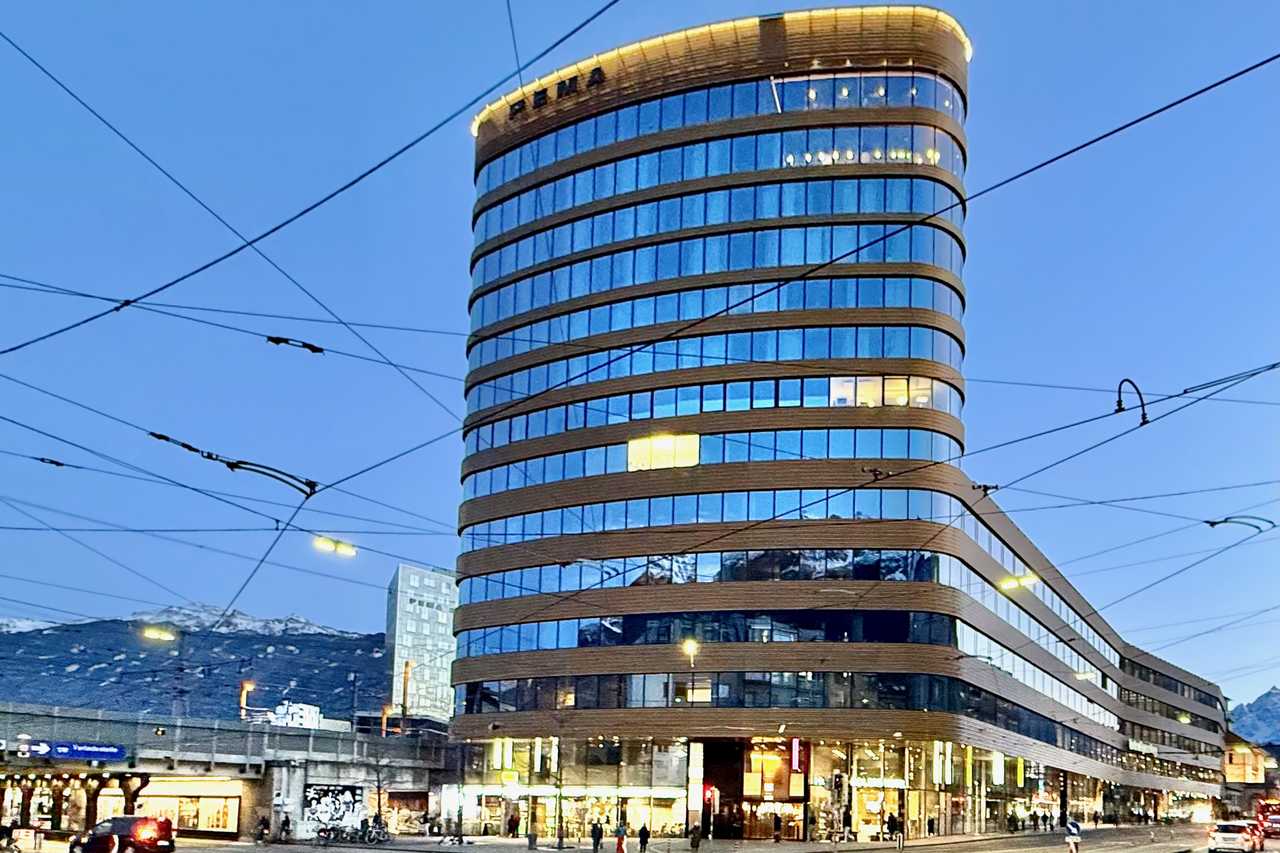
Adlers Hotel in Innsbruck
Who for
Adlers Hotel is ideal for lovers of mountain sports who want to enjoy the winter and summer activities in the surrounding mountains. City sightseers will find this the perfect base to explore the historic areas of Innsbruck and business men will enjoy meetings in the elevated conference room. Families, small groups, couples and solo travellers will all feel at home here, and the hotel welcomes groups celebrating special occasions (from weddings to board meetings), catering for party sizes of 5 to 150.
Accommodation
A total of 75 rooms are divided between 4 different classifications, Panorama Classic (single or double), Panorama Superior, Panorama Deluxe, Panorama Suite and Presidential Suite in Innsbruck’s city centre. Every room features shower/bath, a television, a mini bar, air conditioning, a hairdryer, free Wi-Fi and bathrobes (available from reception). The Panorama Classic offers sufficient room for an individual or a couple to enjoy a comfortable stay. The larger Panorama Superior has enough space to add an extra bed to the double bed making it suitable for a small family. An adjoining room can be added for larger families.
The Panorama Deluxe has a private comfort zone and is positioned for 180º panoramic views of The Innsbruck’s urban alpine landscape – the Panoramic Deluxe outlook. This room also features an electric toilet with integrated bidet. In the Panorama Suite guests can enjoy divided sleeping and living areas with the luxury of a massage chair in the latter – it can accommodate seminars for up to 20 people. Described on its website as the cinematic sky loft the Presidential Suite in Innsbruck’s city centre is surrounded by the best views. This complex of luxurious rooms can be expanded by the addition of adjoining rooms
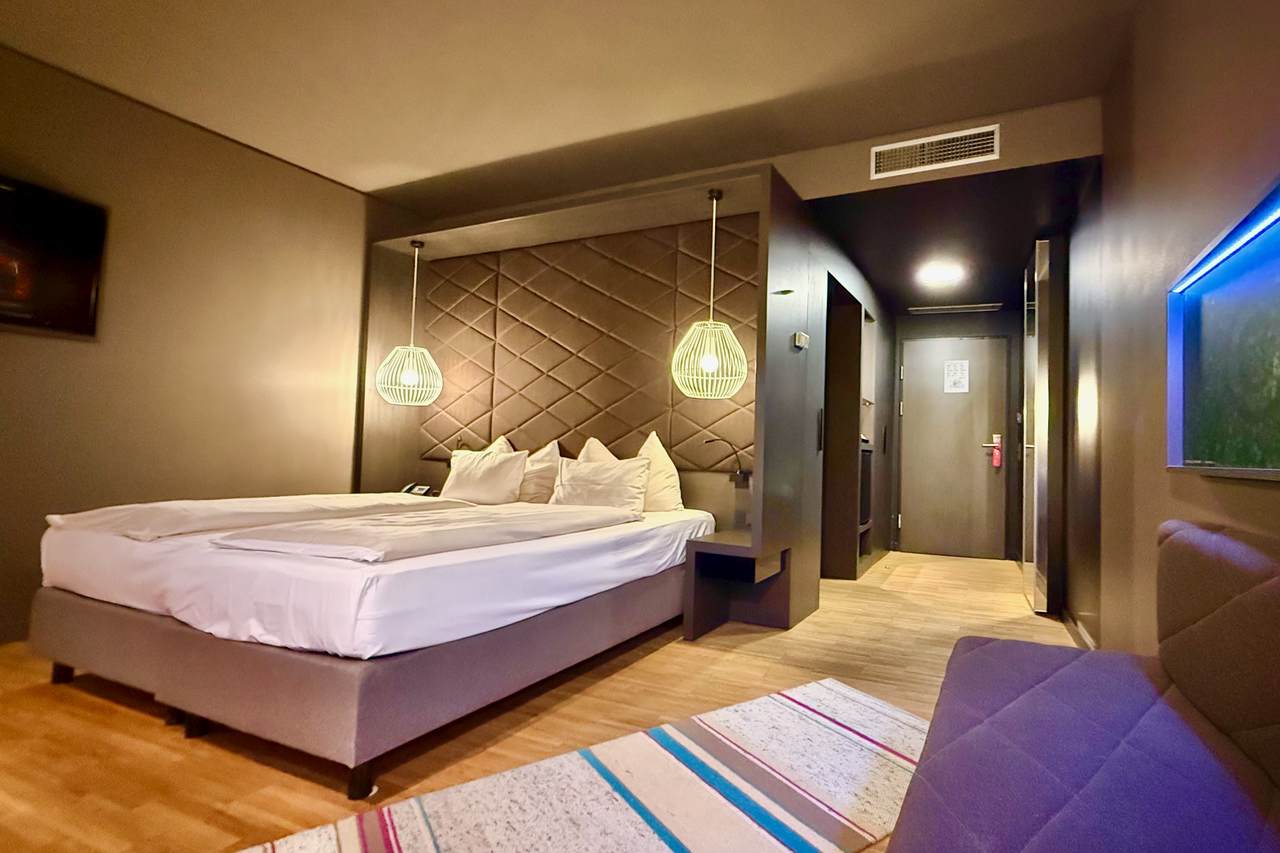
Panorama Classic Bedroom at the Adlers Hotel Innsbruck
Food & Drink
The Adlers Rooftop Bar on the twelfth floor is open all day and until late at night. During the summer a second bar, the Havana Rooftop bar on the floor above, is open in the evening, weather permitting. Adlers bar boasts the largest tequila bar in Innsbruck and on offer here is a journey through the world of tequila – a descriptive tasting of an exclusive selection of this spirit. Other interesting spirits are also available here, including Harry’s Gin from the Tyrol.
Next to the bar is the Restaurant Weitsicht, which offers hotel guests an amazing breakfast while enjoying the best view in Innsbruck. Breakfast comprises a large selection of cereals, a cheese buffet, hot dishes, delicious pastries and fresh fruit. Also available here is the popular Sunday brunch and lunch and evening menus offer an exclusive cuisine including new takes on classic dishes.
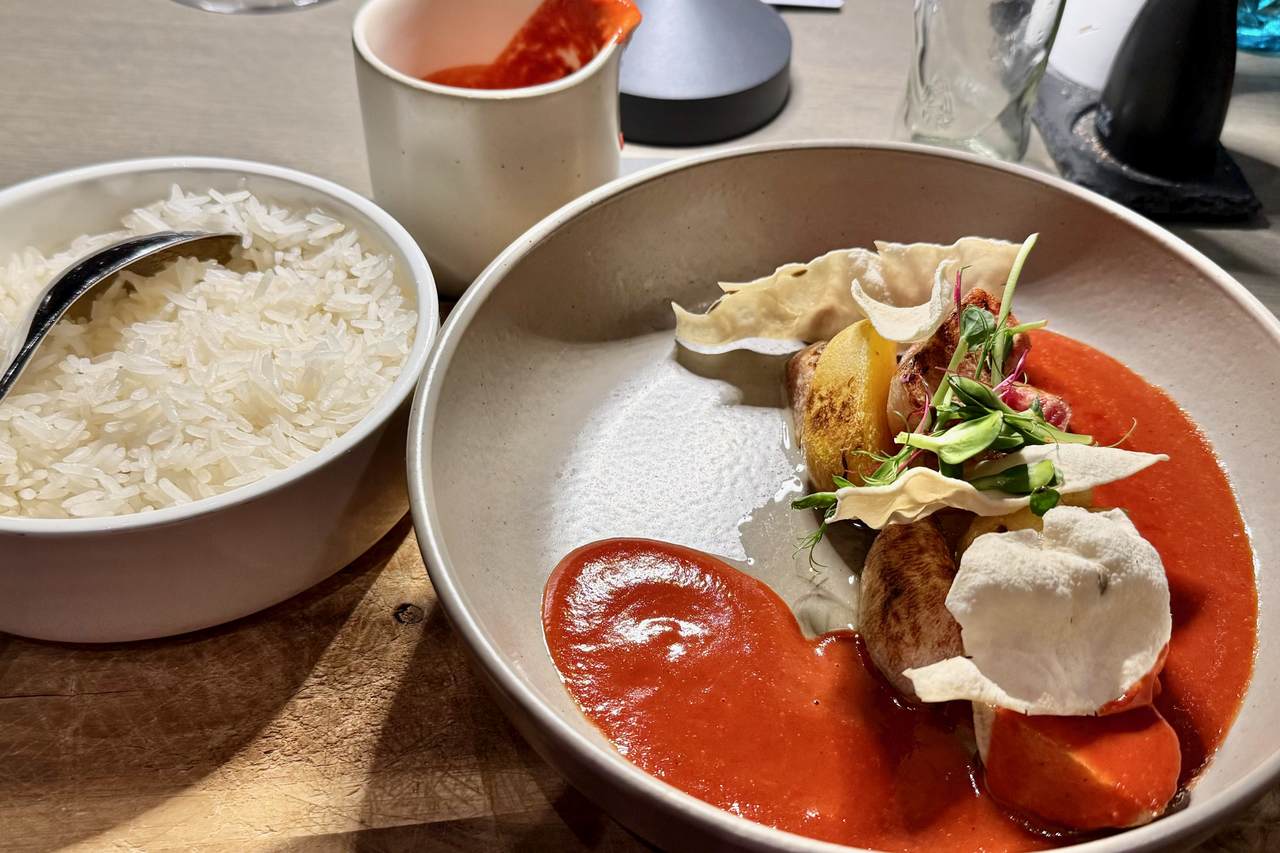
Vibrant Food at the Adlers Hotel Innsbruck
Facilities
Excellent facilities and a wide range of treatments at Adlers Panorama Spa make the hotel well-suited to those seeking a special wellness holiday in Innsbruck. Facilities in the spa include a Finnish sauna, a Bio-sauna, a steam bath, an infrared cabin and the stunning Panorama relaxation area overlooking the city and mountains beyond. A good selection of massages are available (charges apply) and also on offer here is the Bemer application, a magnetic field therapy. Adlers Hotel is also a great venue for conferences and meetings offering well-equipped rooms for meeting and socialising and accommodation for attendees – all with spectacular views. Car parking is also available under the hotel building and there is a ski and boot room on the lower ground floor.
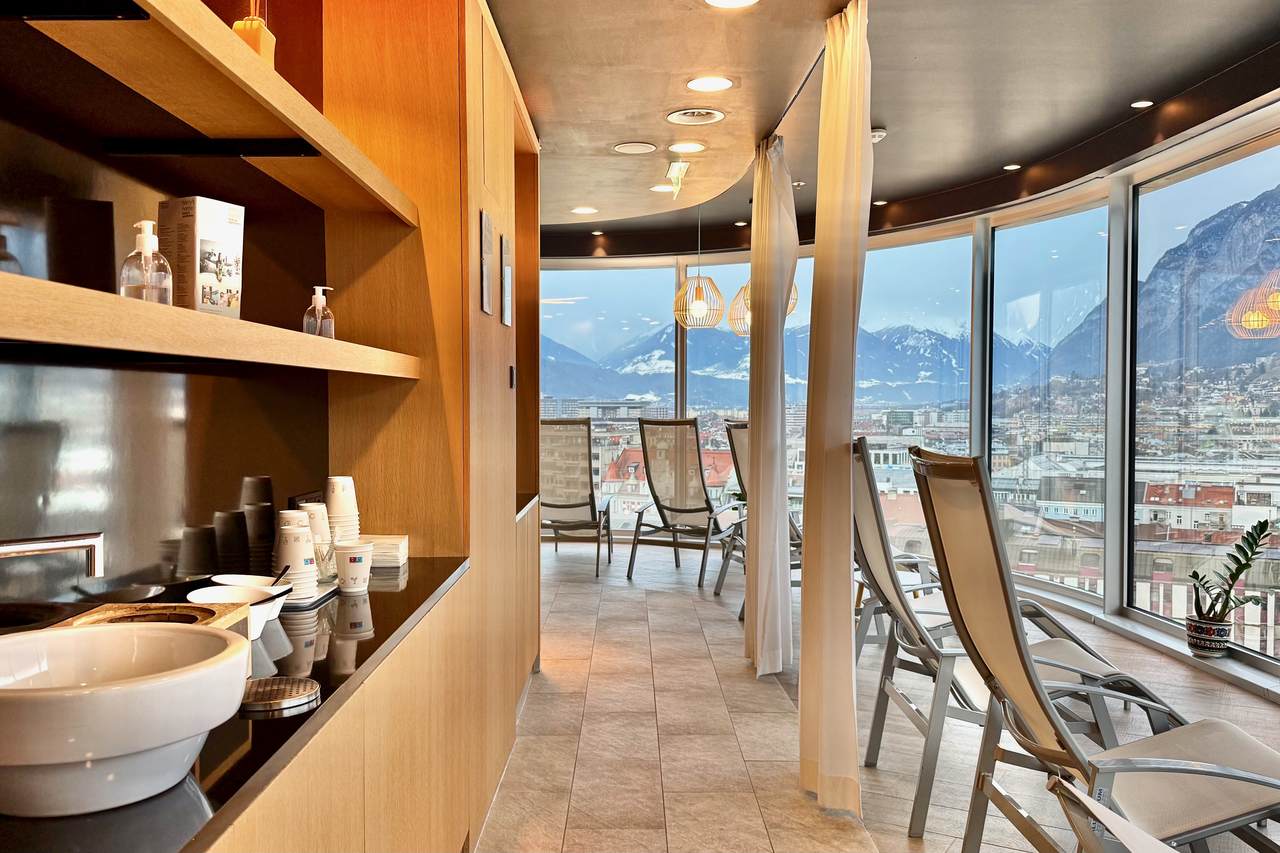
Panorama Relaxation Area at the Adlers Hotel Innsbruck
How much
From € 111,00 for one night in a Panorama Classic room not including breakfast. https://www.adlers-innsbruck.com/en/
What’s Nearby
Adlers Hotel is located within walking distance of the old town of Innsbruck. Here visitors will find numerous elegant historic buildings including a multitude of cathedrals and churches many of them masterpieces of religious art, architecture, and design. A stand out is the Hofkirche (Court Church) built between 1553 and 1563 to house the mausoleum of Emperor Maximilian I. The simple exterior does not prepare one for the elaborate decorations inside including twelve life-size black figures. Maximilian considered Innsbruck to be the capital of Austria. He has certainly left his mark on the city. An Iconic attraction is the Golden Roof (Goldenes Dachl) above a Gothic oriel. It was built in 1500 to mark his marriage to Bianca Maria Sforza. Maximilian and his wife would stand here to watch festivals, dancing and tournaments in the square below. The roof is adorned with copper tiles, hence the name. The building behind this upper window now houses a museum relating the history of Innsbruck
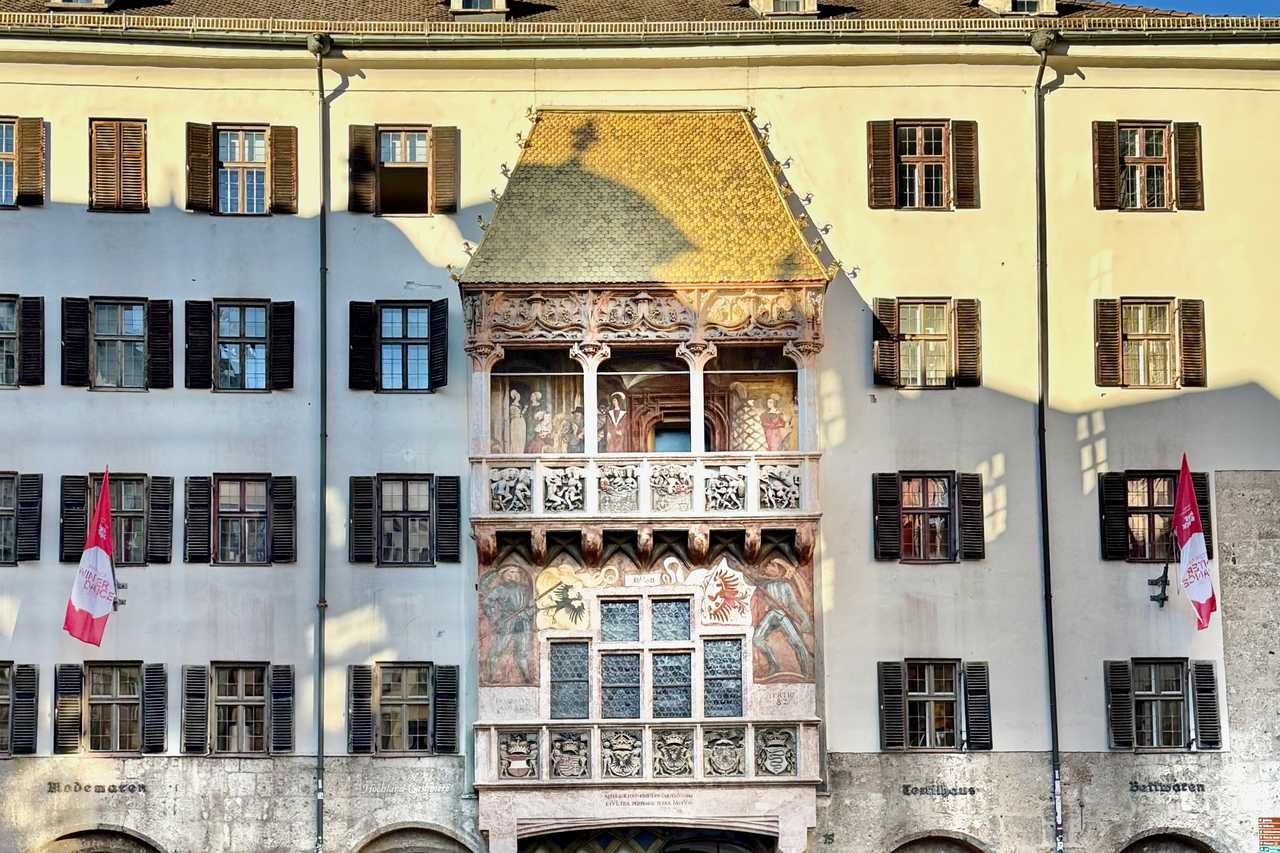
The Golden Roof in Innsbruck City
Coffee culture is strong in Innsbruck and where better to enjoy a beverage at one of several outdoor cafés on Maria Theresien Street. It is hard to images that this popular meeting place was once occupied by farms. That was until members of the aristocracy began abandoning their draughty castles for comfortable townhouses within the city wills. These townhouses were converted into palatial residences during the Baroque period. They and are still there today, including the Palais Gumpp, seat of the Tyrolean government. This elegant square with its stunning alpine background epitomises the charm of Innsbruck today.
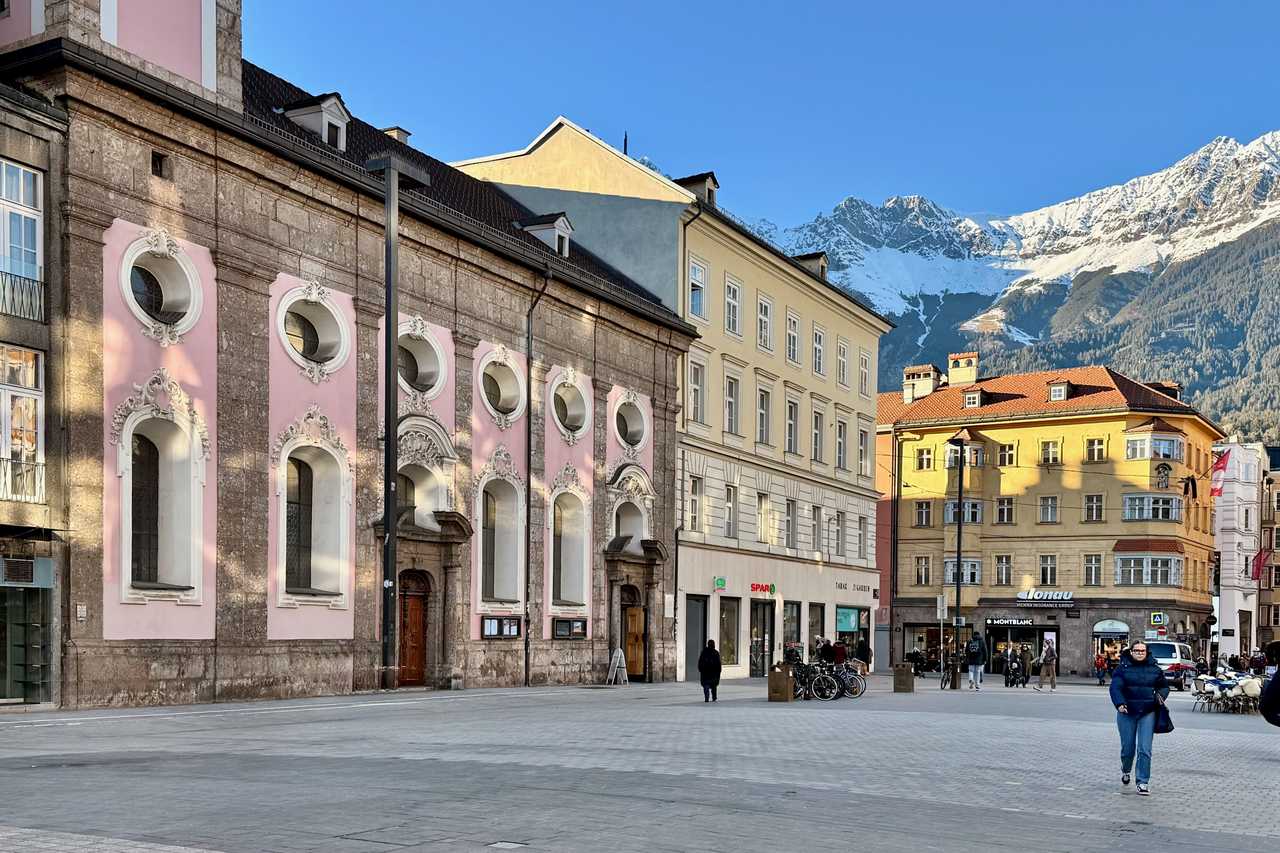
Maria Theresien Straße in Innsbruck
VERDICT
Adler Hotel in Innsbruck offers a wonderful combination of a good location, lovely rooms and stunning views.
You may also like: Explore the Best of Innsbruck: The Ultimate Ski plus City Pass Experience
The post Adlers Hotel review: Windows over Innsbruck, Switzerland appeared first on The Travel Magazine.


