Garden experts reveal the clever trick that turns hydrangea blooms from pink to blue – and all you need is a tea bag
It couldn’t be easier (or cheaper) to give your hydrangeas an update this summer

It’s not often that a helpful post-processing trick slips by Adobe impresario Matt Kloskowksi, and there’s a good chance that you may have missed it too. This technique isn’t exactly new but it’s quick, easy, very effective, and it’s takes barely five minutes to learn.
Matt says Photoshop and Lightroom can be way too complicated and “my personal mission is to create videos that simplify the process of shooting great photos and editing them for the results you’ve always wanted.” Speaking of masking, don’t forget to download Matt’s free Lightroom and Photoshop masking presets with a link in the description beneath the video.
Today’s lesson begins in the Masking panel within Lightroom’s Develop module, but it works the same in Adobe Camera Raw (ACR). Matt acknowledges that this isn’t a trick you’ll employ for all of the photos you edit, and he explains why it’s specifically useful when employing any tools that automatically create masks for you, or when presets are part of your process.
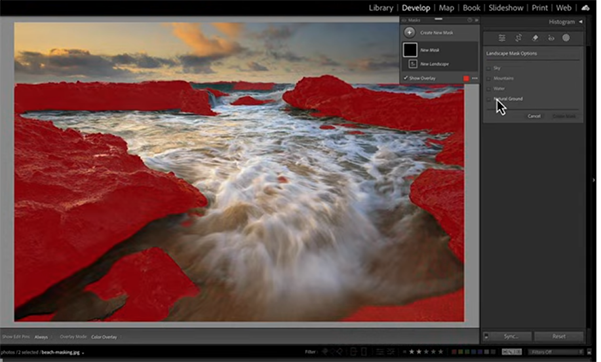
Matt uses the new auto landscape masks as his first example before moving on to people masks and others applications. His overview of today’s quick tip goes like this: “Let’s say you create a bunch of masks. What’s the software is going to do is create all possible masks for the type of image it detects.”
This doesn’t mean you’ll actually need every mask in the list which, in the case of landscapes, includes choices like Sky, Vegetation, Architecture, Artificial Ground, and others. But look closely and you’ll see a small exclamation point next some of the options in the dropdown list. This symbol identifies elements (and corresponding masks) that don’t exist for the specific image at hand.
You may think that leaving these unnecessary masks where they are doesn’t hurt anything, but Matt explains that they should be removed because they can actually slow down the editing process. The solution is following his simple instructions to select an option called Delete All Empty Masks from a pop-out menu.
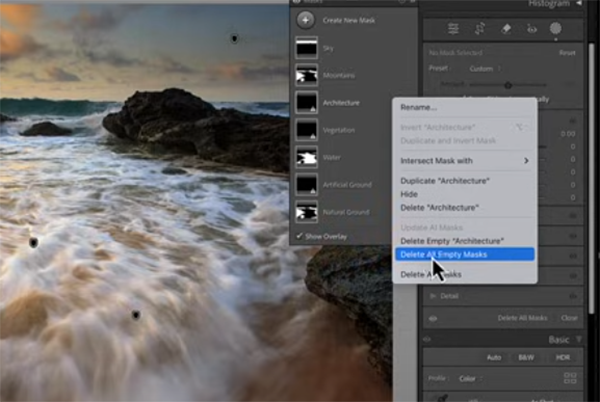
Doing so is a great way “to keep things nice-and-tidy in your masking panel.” There are many more simple tips and techniques like this one on Matt’s instructional YouTube channel that has 128K interested subscribers.
And don’t miss an earlier tutorial we featured with five essential image-editing techniques that one of our favorite instructors says every landscape photographer must understand. There’s also an Editing Workflow Guide that you can download for FREE!
Color theory is a universal language used by artists, filmmakers, designers, and well-informed photographers to imbue creations with their unique vision. The video below from expert Paul Kay explains why this essential concept should be top of mind whenever there’s a camera in your hand.
Kay is a successful travel photographer, popular instructor, and Sony Digital Imaging Ambassador based in Tokyo. He describes the topic of today’s important episode like this: “Learning how to use color theory in photography is such a great unlock for your compositional abilities.” In other words, it’s a fundamental consideration.
In barely 10 minutes Kay emphasizes several key color concepts you need to understand, and then he provides helpful graphics and real-word images to illustrate how to put your new-found knowledge to work. Along the way you’ll learn how the proper use of color “will help accentuate a subject, divert attention, and (my personal favorite) how to change the mood of a photo.”

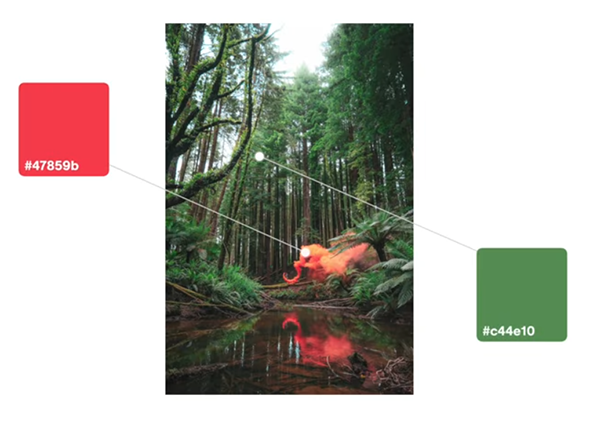
Kay begins with an overview of the Color Wheel within which every color is represented. The trick when using this visual aid is understanding the manner in which colors are arranged. He explains that colors that oppose one another on the wheel are referred to as complimentary colors because “when they sit next to each other in an image they provide the highest amount of visual contrast. Because of that they work.”
Conversely, analogous colors sit together on the color wheel and are fanned out to display to display one main hue along with various gradations as you move to the left and the right. With the basics out of the way, Kay pulls up his first example—a stunning landscape scene captured in Kyoto with the sun setting behind a prominent pagoda and fading clouds overhead.
This shot is a perfect example of using color to accentuate a key subject with complimentary colors because if you time things right you can display beautiful blue and orange tones. Kay says, “I’m using orange as a brighter luminosity to pop out the pagoda and show viewers that it’s the star of my composition.”
As the lesson proceeds you’ll see different types of compelling photographs that rely upon color theory techniques to create magical effects that simply can’t be ignored. So pay close attention, change the manner in which you view the world around you, and take advantage of Kay’s practical advice the next time you’re out in the field.
There’s much more to see and learn on Kay’s instructional YouTube channel so be sure to pay a visit when you have time to explore.
On a related note, don’t miss an earlier tutorial we featured with a post-processing expert who demonstrates a straightforward Lightroom white-balance technique for creating photographs with “color separation” between your subject and the background of a scene.


