
Low ISO Settings Can Be a Big Mistake for Nature & Wildlife Photography
If you were taught to always shoot at the lowest ISO setting possible, join the club. But as you’ll see in the enlightening tutorial below, this is one of those “rules of photography” that’s meant to be ignored.
In fact, one of our favorite teachers insists that “this may be one of the most dangerous piece of advice in photography.” So why’s that? He says always using the lowest ISO, typically ISO 100, “is single-handedly responsible as the biggest reason for poor photos that I see when people ask for advice.”
Simon d’Entremont is a professional wildlife and nature photographer based in Eastern Canada, and you can already understand that he’s not shy about debunking conventional wisdom. In less that 12-minutes he demonstrates why bumping up ISO settings may be the best thing you can do to improve your photography.
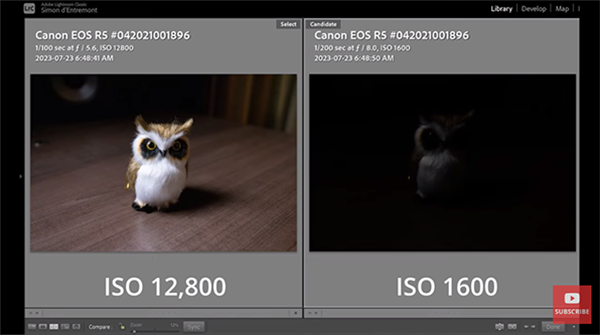
Simon explains that, unlike aperture and shutter speed, “ISO isn’t a source of light.” Instead he suggests thinking of ISO as a volume knob that a camera uses to lighten or darken exposure. He then defines “signal-to-noise ratio” as a way of understanding that “it’s the fact that a photo is really dark in the first place that really creates noise.” In other words, high ISO settings reveal, but aren’t responsible, for noisy images.
If you’re still not convinced take a look at the images in the video. Then you’ll be willing to embrace higher ISO settings—particularly under certain conditions that Simon describes. So how high it too high? That depends upon your camera, the size of its sensor, and a few other considerations. Most experts try to avoid the two highest ISO settings that are available.
With theory out of the way Simon turns to practical applications for high ISO settings, while admitting there are times when a lower ISO can be a great idea. Of course, ambient light levels and whether or not there’s a tripod available factor into the equation.

There are many situations in which high ISO settings enable you to make great photos that are properly exposed, like when photographing fast-moving subjects. This approach also minimizes the prospect of unsharp photos due to camera movement when you’re shooting handheld.
Simon demonstrates other applications for high ISOs, like when fast shutter speeds are necessary to freeze action or smaller apertures are used to accentuate depth of field. As he says with a sly grin, “In my genre of photography, namely wildlife, high ISOs are just part of the business.”
After watching the video take a look at Simon’s popular YouTube channel for more great advice on all aspects of outdoor photography.
And be sure to check out a tutorial we posted earlier, explaining why you should forget the Exposure Triangle and use another pro’s technique instead for better photographs.


