
Photo Vignettes: You’re Probably Doing It Wrong (VIDEO)
Adding a subtle vignette to an image is a great way to finish up an edit and an effective method for focusing a viewer’s attention on the central portion of your scene. But here’s the rub: While most processing software includes sliders that allow you to easily apply this effect, the results you achieve by taking this approach are often disappointing.
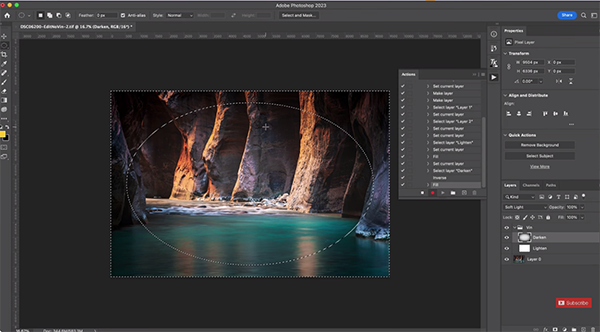
According to Utah-based landscape photographer Austin James Jackson, one of our favorite young instructors, there’s a much better way to get the job done, and you’ll learn what that is in the eye-opening tutorial below. James describes his technique like this: “I create a totally custom vignette in Photoshop that both brightens the center of my photos and darkens the edges.”
As you’ll see, this straightforward technique protects the bright spots in an image, and it’s totally customizable so you can easily dial in the perfect vignette for just about any photo you shoot—be it a landscape, a portrait, or even macro shot. This method is admittedly a bit more time-consuming that simply moving a slider, but if image-quality is your primary concern, the results you’ll achieve are well worth the nominal extra effort.
explains that a vignette is simply the darkening of edges in a photo, noting that “this is something I apply to every one of my images.” He further insists that the custom vignettes you learn to create, “will work on your images 100% of the time.”
The lesson begins with a demonstration of why the standard approach of dragging a slider is lacking in a number of ways, even if you utilize available options like protecting highlights, feather edges, and modifying the shape of the vignette. Oftentimes even adjusting the midpoint doesn’t help to deliver a look that isn’t more than just OK.
Iś you’re unwilling to settle for “decent,” a custom vignette for the specific image at hand is definitely the way to go. And the good news is that you can get the job done quickly without any expertise in Photoshop other than what you’ll learn by watching this video.
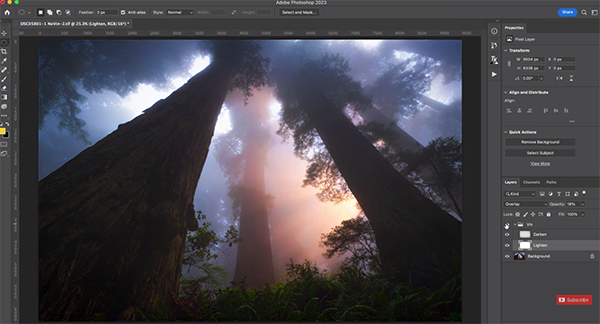
James walks you through the simple process with three different images, demonstrating how and why a proper vignette can make a world of difference to the impact of each of the shots. Rather than summarizing the technique here we’ll let the expert explain everything you need to know.
If you’ve never considered applying vignettes to your photos this lesson will quickly change your mind. And if you’ve tried the conventional approach in the past, and were displeased with the results, you’ll now understand the best way to add this compelling effect.
There’s much more to learn about shooting and editing landscape photos on James’ popular YouTube channel, so elevate your skills by taking a look.
We recently posted a tutorial with another landscape pro, explaining how to give landscape photos by a unique look, so be sure to watch that one as well.


