
The BEST Way to Edit RAW Landscape Photos for Perfect Color (VIDEO)
If you’re new to shooting in Raw and need some help color grading your images, the tutorial below from the PHLOG Photography YouTube channel is just what you need. Even if you’ve done this before, there are likely a few tips and tricks that will speed up your workflow and deliver superior results.
German landscape photographer Christian Mohrle is a very adept instructor and in this episode his demonstrates a straightforward method for editing Raw files for great color. Best yet, his approach delivers spectacular results for photographers of all skill levels. Be sure to download the demonstration image using the link beneath the video so you can make the enhancements yourself as they’re explained.
Mohrle begins with some very basic Raw adjustments for achieving a good base image for the refinements that follow. He jumps into Photoshop’s Raw editor and changes the profile from Adobe Color to Adobe Standard to lessen contrast and slightly brighten the darkest areas in the frame. He then moves to the Basic panel for a few other enhancements.
Because his goal is to use a warm color grading style, his modifications begin by applying a Golden Hour look. He also fixes the blown-out areas of the sky to achieve greater detail, slightly tweaks shadows for the same reason, and adjusts the blacks for a “dreamy effect.”
Now that the exposure looks pretty good, Mohrle refines the image further by adding a bit of texture and sharpness, while dropping Clarity and Dehaze. He also raises Vibrance slightly (which he’ll increase further later), and now it’s time for local adjustments to specific portions of the scene.
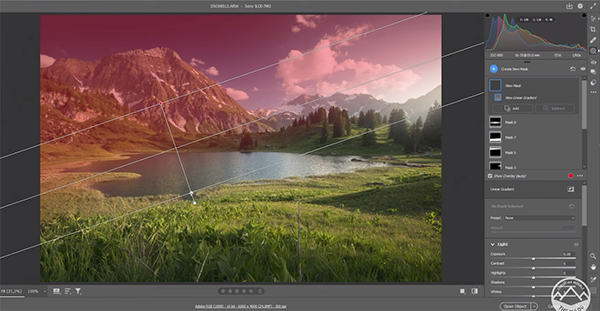
Mohrle employs several simple Masks, beginning with a Color Range Mask and a linear Gradient over the left side of the sky. These enhance blue tones for more impact and add Contrast to accentuate the clouds. He also uses multiple Radial Masks on the right side of the sky to introduce a bit of glow. You’ll see how to rotate the masks to match the direction of the light. Bringing up the blacks and further dropping Dehaze in these areas further enhances the glow effect.

After modifying Hue and increasing Saturation it’s time to add more Masks to various areas of the image. By doing so Mohrle enhances color, exposure and other key variables in the foreground and mid-range of the shot, and he walks you through every step in the process.
With the color grading complete, Mohrle directs his attention to Photoshop’s Details tab for some very careful sharpening. Here he describes the Radius settings he prefers for this particular task.
At this point the eye-catching transformation is almost complete. The final adjustments include further enhancing the glow for an “Orton Effect,” a bit of Dodging, and the use of a Gradient Map to wrap things up.
Mohrle’s popular YouTube channel incudes a wealth of information for landscape photographers, so pay a visit when you have time. And don’t miss an earlier tutorial we posted, demonstrating why another pro says the Remove tool is Photoshop’s best new feature.


